JeepParts
My Garage
My Account
Cart
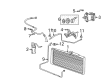
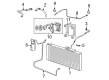
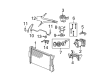
OEM Dodge Ram 2500 A/C Compressor
Air Conditioning Compressor- Select Vehicle by Model
- Select Vehicle by VIN
Select Vehicle by Model
orMake
Model
Year
Select Vehicle by VIN
For the most accurate results, select vehicle by your VIN (Vehicle Identification Number).
9 A/C Compressors found


Dodge Ram 2500 Compressor Part Number: 55055339AH
$588.91 MSRP: $887.00You Save: $298.09 (34%)Ships in 1-3 Business Days

Dodge Ram 2500 Compressor Part Number: 55111411AH
$654.85 MSRP: $957.00You Save: $302.15 (32%)Ships in 1-3 Business Days
Dodge Ram 2500 Compressor Part Number: 55055540AM
$326.47 MSRP: $690.00You Save: $363.53 (53%)Ships in 1-3 Business Days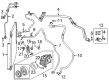
Dodge Ram 2500 Compressor Part Number: 57009385AA
$433.11 MSRP: $656.00You Save: $222.89 (34%)Ships in 1-2 Business Days
Dodge Ram 2500 Compressor - A/C Part Number: 57009571AA
$572.51 MSRP: $765.00You Save: $192.49 (26%)Ships in 1-2 Business DaysDodge Ram 2500 Compressor Part Number: 55056095AB

Dodge Ram 2500 Compressor - A/C Part Number: 55056336AD
Dodge Ram 2500 Compressor Part Number: 55036561AB

Dodge Ram 2500 Compressor Part Number: 55036799AB
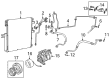
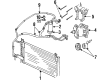
Dodge Ram 2500 A/C Compressor
Choose OEM A/C Compressor that meet Dodge factory standards. Dodge designs and tests every component for precision and durability. Each A/C Compressor follows strict manufacturing steps to lock in quality and fit. If your Dodge Ram 2500 matters to you, OEM parts make the smart choice. You'll get the exact look, feel, and performance you expect. Shop genuine Ram 2500 parts at the highly competitive prices online. Enjoy a manufacturer's warranty, a hassle-free return policy, and rapid delivery. No more guesswork with off brands. Get genuine parts with exact fit and true factory performance. Shop with confidence today at JeepPartsDeal.com.
Dodge Ram 2500 A/C Compressor Parts and Q&A
- Q: How to Service a Denso A/C Compressor Clutch Without Discharging the Refrigerant System on Dodge Ram 2500?A:For servicing the compressor clutch on a Denso A/C while maintaining the right refrigerant pressure, start by cutting the negative Battery Cable and by taking off the accessory belt. Remove the wire connector for the A/C clutch coil from the clutch field coil wire connected to the top of the A/C compressor. Remove the bolts that connect the A/C compressor to the engine and support it when you do this. You can remove the compressor shaft bolt (1) by threading a band-type oil filter wrench or strap wrench in place of the clutch plate (2) as you remove it. Do not push the clutch plate and pulley closer together to the bearings to avoid any problems. Carefully hit the clutch plate (2) with a plastic mallet to let it free from the splines on the compressor shaft (1) and then remove both the plate and any shims (3). Slide snap ring pliers (Special Tool C-4574 or an equal tool) (2) under the outer snap ring (1) fastening the pulley and bearing assembly (3) to the A/C compressor cover and lift it off as you push the assembly toward the rear. Separate the screw holding the clutch coil pigtail wire connector bracket and ground clip to the top of the compressor housing (3). Again, use special tool C-4574 (or any equivalent tool) to remove the outer snap ring (4) holding down the clutch field coil (2) to the front cover of the compressor housing and then the clutch field coil will slide right off. Position the dowel pin on the clutch coil with the hole in the cover of the compressor and put the clutch coil onto the A/C compressor, with the wire harness fixed. Use a new snap ring to hold the clutch field coil, bevel side out and the eyelets on the correct side. Use special tool C-4574 (or an equivalent tool) to put the external snap ring (4) in place and be sure it touches the retainer completely. Attach and fasten the clutch field coil wire harness connector bracket and ground clip with a screw. Take care not to damage the friction areas when installing the assembly (1). If required, gently hit the pulley with a piece of wood (2) resting on the friction part. The new snap ring should be placed so its bevel side faces the outer side in order to hold the pulley and bearing in place. Open the snap ring pliers (Special Tool C-4574 or equivalent) (2) and place the external snap ring (1) over the groove on the crankshaft. When the original clutch plate (2) and pulley and bearing assembly are used, place the original shim(s) (3) on the shoulder of the compressor shaft (1). When using replacement earpins, put a stack of 2.54 mm (0.010 in.) shims around the shoulder. Attach the clutch plate (2) to the compressor shaft first and then mount the compressor shaft bolt (1), tightening it to 17.5 N.m (155 in.lbs.) When you've finished tightening, turn the pulley and test the correct air gap in at least four locations before you stop. Determine the size of the air gap between the clutch plate and the pulley and bearing assembly faces and use shims to match the correct air gap size. After that, add the bolts that hold the A/C compressor to the engine, attach the engine wire harness connector to the A/C compressor clutch coil, put on the accessory Drive Belt and reconnect the negative battery cable.
- Q: How to Remove and Replace a Visteon A/C Compressor Clutch on Dodge Ram 2500?A:Always make sure both of the clutch field coil's tabs and the wire lead are in their proper positions to ensure you do not damage anything when replacing the Visteon A/C clutch. Position the field coil tabs over the recessed area in the front of the compressor and secure the clutch field coil with a two jaw puller, tool 9352 and spacer 9353 (in Kit 9349). After that, connect the wire and connector from the clutch field coil to the A/C compressor and attach it with a plastic retaining clip and screw, tightening it to 4 Nm (35 in. lbs.). Make sure the pulley and bearing assembly are square at the front of the A/C compressor and set it in place with the clutch pulley installer (Special Tool 9355 in Kit 9349) and a hammer, tapping it down until it touches the compressor housing - this way, the snap ring secures it properly. Insert the snap ring (2) into place with Snap Ring Pliers 9764 (or similar) to make sure it goes in correctly. Ensure there is sufficient gap for the clutch field coil wire lead and connector found between the compressor housing and the pulley. For a new clutch installation, set the original shims first; if you are adding a clutch to a compressor that didn't have one before, use the 1.0, 0.50 and 0.13 millimeter shims that come with the clutch hardware. Set the clutch shims in place on the compressor shaft, then hold the clutch plate still using a compressor clutch holding fixture (Special Tool 9351 from Kit 9349) as you tighten the bolt securing the clutch plate to the A/C compressor to 15 Nm (133 in. lbs.). Test the space between the clutch plate and the pulley and bearing and add or remove shims to make sure the gap falls within 0.35 and 0.75 millimeter (0.014 to 0.030 inch). Set the AC compressor on its mounting bracket, attach the bolts and tighten them to 23 Nm (17 ft. lbs.), work the engine wire harness into the compressor clutch field coil connector, lower your vehicle, set the Drive Belt, reattach the negative Battery Cable and carry out the Clutch Break-in Procedure.


Related Dodge Ram 2500 Parts
 Dodge Ram 2500 Heater Core
 Dodge Ram 2500 A/C Compressor Clutch
 Dodge Ram 2500 Blend Door Actuator
 Dodge Ram 2500 Blower Motor Resistor
 Dodge Ram 2500 A/C Accumulator
 Dodge Ram 2500 A/C Compressor Cut-Out Switches
 Dodge Ram 2500 A/C Condenser
 Dodge Ram 2500 A/C Service Cap
 Dodge Ram 2500 A/C System Valve Core
 Dodge Ram 2500 Blower Motor
 Dodge Ram 2500 Evaporator
 Dodge Ram 2500 HVAC Pressure Switch