JeepParts
My Garage
My Account
Cart
OEM Dodge Ram 2500 Van Exhaust Manifold
Engine Exhaust Manifold- Select Vehicle by Model
- Select Vehicle by VIN
Select Vehicle by Model
orMake
Model
Year
Select Vehicle by VIN
For the most accurate results, select vehicle by your VIN (Vehicle Identification Number).
4 Exhaust Manifolds found

Dodge Ram 2500 Van Exhaust Manifold, Passenger Side Part Number: 53030872AB
$247.94 MSRP: $290.00You Save: $42.06 (15%)Ships in 1-2 Business Days
Dodge Ram 2500 Van Exhaust Manifold, Driver Side Part Number: 53010189AB
$312.29 MSRP: $337.00You Save: $24.71 (8%)Ships in 1-2 Business Days
Dodge Ram 2500 Van Exhaust Manifold, Driver Side Part Number: 53010185AB
$261.66 MSRP: $282.00You Save: $20.34 (8%)Ships in 1-2 Business Days
Dodge Ram 2500 Van Exhaust Manifold
Choose OEM Exhaust Manifold that meet Dodge factory standards. Dodge designs and tests every component for precision and durability. Each Exhaust Manifold follows strict manufacturing steps to lock in quality and fit. If your Dodge Ram 2500 Van matters to you, OEM parts make the smart choice. You'll get the exact look, feel, and performance you expect. Shop genuine Ram 2500 Van parts at the highly competitive prices online. Enjoy a manufacturer's warranty, a hassle-free return policy, and rapid delivery. No more guesswork with off brands. Get genuine parts with exact fit and true factory performance. Shop with confidence today at JeepPartsDeal.com.
Dodge Ram 2500 Van Exhaust Manifold Parts and Q&A
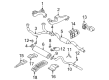
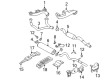
- Q: How to service and repair the exhaust manifold on Dodge Ram 2500 Van?A:Before servicing or repairing the exhaust manifold, first take off the negative battery cable and elevate the car so you can reach it. Eliminate the nuts and bolts holding the exhaust pipe to the engine exhaust manifold. Next, place the vehicle on a jack stand and deal with the exhaust heat shields. After that, loosen and remove the bolts, nuts and washers attaching the manifold to the cylinder head, then pull off the manifold. Make sure to wipe and blow dry the connector areas on the cylinder head and manifold with solvent and compressed air. Check the manifold for any cracks and make sure the flatness of its mating surfaces is right using a straight edge, so they are no more than 0.2 mm per 300 mm (0.008 in. per foot) out of true. If nuts are removed with studs in them, install additional studs on the ends marked with sealer so they won't leak water. Slide the engine exhaust manifolds onto the cylinder head studs and put conical washers and nuts over them. Insert two bolts and conical washers on the outboard ends of the manifold arms and add two bolts which are bolted without conical washers, to the center arm. Wind all bolts and nuts at the center arm first, then work outward to make sure they're all tightened with 34 Nm (25 ft. lbs.) torque. Place the heat shields in position, lift the car again and attach the exhaust pipe to the manifold, making sure it's tightened with bolts, nuts and retainers to 34 Nm (25 ft. lbs. of torque). Once that's done, lower the vehicle and screw the negative cable back onto the battery.

Related Dodge Ram 2500 Van Parts
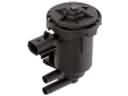 Dodge Ram 2500 Van Canister Purge Valve
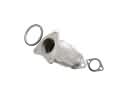 Dodge Ram 2500 Van Catalytic Converter
 Dodge Ram 2500 Van EGR Vacuum Solenoid
 Dodge Ram 2500 Van EGR Valve
 Dodge Ram 2500 Van Exhaust Pipe
 Dodge Ram 2500 Van Exhaust Tip
 Dodge Ram 2500 Van Muffler
 Dodge Ram 2500 Van PCV Valve
 Dodge Ram 2500 Van Tail Pipe
 Dodge Ram 2500 Van Vapor Canister
Browse Dodge Ram 2500 Van Exhaust Manifold by Years
2003
2002
2001
2000
1999