JeepParts
My Garage
My Account
Cart
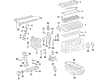
OEM Dodge Sprinter 2500 Intake Valve
Engine Intake Valve- Select Vehicle by Model
- Select Vehicle by VIN
Select Vehicle by Model
orMake
Model
Year
Select Vehicle by VIN
For the most accurate results, select vehicle by your VIN (Vehicle Identification Number).
3 Intake Valves found

Dodge Sprinter 2500 Intake Valve Part Number: 5117399AA
$15.11 MSRP: $28.90You Save: $13.79 (48%)Ships in 1-2 Business Days

Dodge Sprinter 2500 Intake Valve Part Number: 5175396AA

Dodge Sprinter 2500 Intake Valve Part Number: 68005655AA
Dodge Sprinter 2500 Intake Valve
Choose OEM Intake Valve that meet Dodge factory standards. Dodge designs and tests every component for precision and durability. Each Intake Valve follows strict manufacturing steps to lock in quality and fit. If your Dodge Sprinter 2500 matters to you, OEM parts make the smart choice. You'll get the exact look, feel, and performance you expect. Shop genuine Sprinter 2500 parts at the highly competitive prices online. Enjoy a manufacturer's warranty, a hassle-free return policy, and rapid delivery. No more guesswork with off brands. Get genuine parts with exact fit and true factory performance. Shop with confidence today at JeepPartsDeal.com.
The Dodge Sprinter 2500 Intake Valve also acts as an important part that boosts the durability and, and performance of the Dodge Sprinter 2500 engines. The Intake Valve is famous for the durability of its service and specifically serves to control the air/fuel mixture allowing for proper combustion within the Dodge Sprinter 2500's engine for the most efficient performance. In its normal working, Intake Valve enhances the delivery of power and efficiency when using fuel in the engine and thus contributes to fuel consumption efficiency while a spoilt or bad Intake Valve leads to low performance and high emission. That puts the Intake Valve at the center of the integrity and performance of the Dodge Sprinter 2500. Ideal for the Dodge Sprinter 2500 including the 4 door van, and minibuses the Intake Valve comes customized for each customization on the van to guarantee compatibility and performance. First of all, it is important to note that the Dodge Sprinter 2500 Intake Valve is made with great detail, and this indicates that this element reflects the general quality of Mercedes Benz cars which in totality boosts the image of the automobiles in the market. As a result of its rigid design together with a perfect fit, it outclasses most of its competitors to become the prime choice for anyone who wants to get the prime Dodge sprinter 2500 in the market. All in all, the Intake Valve will be of immense use for any user who wants to maintain and enhance the performance and durability of the Dodge Sprinter 2500 car.
Dodge Sprinter 2500 Intake Valve Parts and Q&A
- Q: How to Service and Repair Exhaust Valve and Intake Valves in an Engine on Dodge Sprinter 2500?A:Before working on or fixing the valves, pull off the negative Battery Cable, remove the engine cover and peel off the cylinder head. You should first write down or draw where each valve is before removing it; this will help avoid problems with engine damage after everything is put back together. With an appropriate instrument, attach the retaining fork to the threaded cylinder head and place the thrust piece at the top of the retainer, straight up. Using a valve spring compressor, first compress the valve spring so you can remove the valve collets, the top spring retainer and then the spring. After that, take out the valve stem seals and repeat everything for each valve. After pulling the cylinder head off the assembly board, preserve the order of the valves, springs and retainers just as they were taken out. You should not move the valves from their original positions when you install them so as to prevent damage to the engine. Test the components for any wear or damage and change them when needed. Reconstruct the valves by first placing them in their main positions, next setting the lower valve spring retainer, adding the valve stem seal and completing with both valve springs and their retainers. Repeat this process by compressing the valve spring and putting in valve keepers for every valve you have. When the valve assembly is put together, place the cylinder head on the engine block, fit the Glow Plugs and connect the negative battery cable. Be very careful around the engine when it's on and do not approach the fan, touch any of the pulleys, belts or wear tight clothing close to them. Run the engine and check all fluid levels, take care to notice any problems in the fuel system and put on the cover when finished.

Related Dodge Sprinter 2500 Parts
 Dodge Sprinter 2500 Cam Gear
 Dodge Sprinter 2500 Camshaft
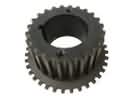 Dodge Sprinter 2500 Crankshaft Gear
 Dodge Sprinter 2500 Crankshaft Pulley
 Dodge Sprinter 2500 Crankshaft Timing Gear
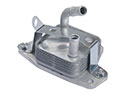 Dodge Sprinter 2500 Engine Oil Cooler
 Dodge Sprinter 2500 Oil Pan Gasket
 Dodge Sprinter 2500 Piston
 Dodge Sprinter 2500 Piston Ring Set
 Dodge Sprinter 2500 Timing Chain
 Dodge Sprinter 2500 Timing Chain Tensioner
 Dodge Sprinter 2500 Timing Cover Gasket