JeepParts
My Garage
My Account
Cart
OEM Dodge Stratus Clock Spring
Spiral Cable Clock Spring- Select Vehicle by Model
- Select Vehicle by VIN
Select Vehicle by Model
orMake
Model
Year
Select Vehicle by VIN
For the most accurate results, select vehicle by your VIN (Vehicle Identification Number).
12 Clock Springs found


Dodge Stratus Clockspring Part Number: 4649194AC
$305.72 MSRP: $387.56You Save: $81.84 (22%)Ships in 1-2 Business Days
Dodge Stratus Clockspring Part Number: 4649194AB
$205.92 MSRP: $528.00You Save: $322.08 (61%)Ships in 1-2 Business DaysDodge Stratus Clockspring Part Number: 4649130AB
$284.00 MSRP: $375.00You Save: $91.00 (25%)Ships in 1-2 Business Days


Dodge Stratus Clockspring Part Number: 4649130AC


Dodge Stratus Clockspring Part Number: 4600161
Dodge Stratus Clockspring Part Number: 4649092AC
Dodge Stratus Clockspring Part Number: 4600163

Dodge Stratus Clockspring Part Number: MR583934
Dodge Stratus Clockspring Part Number: MR301702
Dodge Stratus Clockspring Part Number: 56044931AB
Dodge Stratus Clockspring Part Number: 4649193BC
Dodge Stratus Clockspring Part Number: 4649193BB
Dodge Stratus Clock Spring
Choose OEM Clock Spring that meet Dodge factory standards. Dodge designs and tests every component for precision and durability. Each Clock Spring follows strict manufacturing steps to lock in quality and fit. If your Dodge Stratus matters to you, OEM parts make the smart choice. You'll get the exact look, feel, and performance you expect. Shop genuine Stratus parts at the highly competitive prices online. Enjoy a manufacturer's warranty, a hassle-free return policy, and rapid delivery. No more guesswork with off brands. Get genuine parts with exact fit and true factory performance. Shop with confidence today at JeepPartsDeal.com.
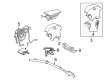
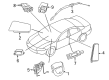
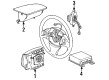
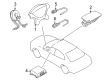
The Dodge Stratus Clock Spring stands as a critical Supplemental Restraint System (SRS) component because it maintains safe electrical connections between the vehicle's system and airbag module. The connection between airbag module and electrical system through the Clock Spring plays a vital role in deploying airbags quickly thus offering enhanced safety to passengers. The Dodge Stratus Clock Spring implements a flat multicore cable wound in a spiral design to both store energy and let the steering wheel rotate allowing it to work properly. The Dodge Stratus Clock Spring underwent different design changes throughout time since its initial release which affected the reliability levels and system performance between each model version. Safety and effectiveness requirements of the Dodge Stratus Clock Spring stem from its basic operational nature. Compatible with multiple Stratus models from 1995 to 2005 the component functions as an essential part in vehicle performance. The Dodge Stratus Clock Spring distinguishes itself in the automotive industry because of its reliable design and performance which fundamentally supports the airbag system operation. Drivers who prioritize budget savings together with performance and reliability should consider acquiring the Dodge model Clock Spring which comes at a price between $50 to $400 since it ensures both efficiency and safety for their vehicle.
Dodge Stratus Clock Spring Parts and Q&A
- Q: How to Maintain a Clock Spring on Dodge Stratus?A:Before servicing the Clock Spring assembly, turn off the negative Battery Cable, wait for two minutes to let the system reserve capacitor discharge and then start working with the air bag parts. Disconnect the Steering Wheel and be sure to pass all the wires safely behind the steering wheel armature so nothing is hurt. Whenever you need to change a deployed Driver air bag, put in a new Clock Spring as well. Then, take out the multi-function switch and slightly lift the top housing latches to move the Clock Spring out of the lock housing, always replacing it if it is broken, damaged or used after an impact that activated the air bags. For installing the Clock Spring, first ensure it is centered, put the top locking tab into the lock housing's slot and carefully press it home. Add back the multi-function switch, put the wires above the steering wheel armature and attach the steering wheel in the end. Sampling done before the system has been tested could result in severe injury or even death for people inside the car.
- Q: How to Service and Repair a Clock Spring Assembly on Dodge Stratus?A:Before working on the Clock Spring Assembly, remove the power by taking the battery negative remote cable out and then allow the capacitor to discharge for two minutes. Undo the fasteners to separate the Steering Wheel and guide each wire going inside the armature. Whenever a Driver air bag needs replacement, be sure to also install a new Clock Spring. After that, disconnect the multi-function switch. After sliding the top off, gently pull back the top lock housing latches so you can remove the Clock Spring. If the Clock Spring is defective, damaged or the vehicle's front air bags have been used, it must be replaced. When installing a Clock Spring again, check that it is centered using the centering instructions. Push the tab with the holes on the lock housing so that it fits into the locking slot. Attach the multi-function switch, then torque it between 1.5 and 2.5 Nm (14 to 22 in. lbs.). Fasten the wires through the steering wheel armature's hole and screw back on the steering wheel. Secure the speed control leads inside the steering wheel's back cover, link them to the switches and stick them into the holes on the steering wheel. Plug the air bag cable into the air bag mounting bracket, then join the two yellow air bag cables to the Driver air bag and push the secondary latch in to make sure the wires are not getting pinched when it's installed. Don't attach the negative terminal of the battery until all the procedures for the air bag system have been carried out and checked.


Related Dodge Stratus Parts
 Dodge Stratus Air Bag Control Module
 Dodge Stratus Air Bag Sensor
 Dodge Stratus Airbag
 Dodge Stratus Coolant Temperature Sensor
 Dodge Stratus Cruise Control Module
 Dodge Stratus Daytime Running Light Relay
 Dodge Stratus Horn Relay
 Dodge Stratus Oil Pressure Switch
 Dodge Stratus Relay
 Dodge Stratus Temperature Sender
 Dodge Stratus Turn Signal Flasher
 Dodge Stratus Wiper Pulse Module