JeepParts
My Garage
My Account
Cart
OEM Jeep Cherokee A/C Condenser
Air Conditioning Condenser- Select Vehicle by Model
- Select Vehicle by VIN
Select Vehicle by Model
orMake
Model
Year
Select Vehicle by VIN
For the most accurate results, select vehicle by your VIN (Vehicle Identification Number).
8 A/C Condensers found


Jeep Cherokee Condenser Part Number: 68399028AB
$196.69 MSRP: $404.00You Save: $207.31 (52%)Ships in 1-2 Business Days

Jeep Cherokee Condenser Part Number: 68399029AA
$476.84 MSRP: $639.00You Save: $162.16 (26%)Jeep Cherokee Condenser Part Number: 52014775AC
$438.69 MSRP: $662.00You Save: $223.31 (34%)Ships in 1-2 Business Days
Jeep Cherokee Condenser Part Number: 83505641

Jeep Cherokee Condenser Part Number: 56002205

Jeep Cherokee Condenser Part Number: 56002190
Jeep Cherokee Condenser Part Number: 55036595AG
Jeep Cherokee Condenser Part Number: 56002957AB
Jeep Cherokee A/C Condenser
Choose OEM A/C Condenser that meet Jeep factory standards. Jeep designs and tests every component for precision and durability. Each A/C Condenser follows strict manufacturing steps to lock in quality and fit. If your Jeep Cherokee matters to you, OEM parts make the smart choice. You'll get the exact look, feel, and performance you expect. Shop genuine Cherokee parts at the highly competitive prices online. Enjoy a manufacturer's warranty, a hassle-free return policy, and rapid delivery. No more guesswork with off brands. Get genuine parts with exact fit and true factory performance. Shop with confidence today at JeepPartsDeal.com.
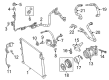
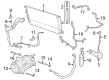
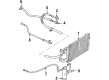
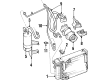
The A/C Condenser in Jeep Cherokee vehicles serves the function of a heat exchanger which condense the hot gaseous refrigerant and in the process, changing its phase from gas to liquid before proceeding to the accumulator. Generally located slightly below the aforementioned part, it consists of bundled pipes designed to cool the system. Structures of A/C Condenser vary in different models of Cherokee over the years though certain types are not described. The main function, however, remains the same throughout these variations and involves the proper refrigerant cooling so as to make the air conditioning most effective. The A/C condenser plays a critical role in running the Cherokee's cabin comfortably warm or cold, depending on the settings.
Jeep Cherokee A/C Condenser Parts and Q&A
- Q: How to Properly Remove and Install an A/C Condenser on Jeep Cherokee?A:Before you remove the condenser, observe the position of every Radiator and condenser air seal, since these seals move air over the condenser and radiator and must be replaced properly for top performance. The first step is to remove and separate the battery's negative cable. Take the refrigerant out of the system for proper reuse. Remove the discharge line refrigerant line fitting at the condenser's intake and seal up all opened fittings with plugs or tape. When servicing Left-Hand Drive vehicles, disconnect the liquid line refrigerant line fitting at the condenser outlet; on Right-Hand Drive vehicles, both remove the refrigerant line jumper and make sure to put plugs or tape over all unconnected refrigerant line fittings. Lift the radiator and condenser as a group, then remove the two nuts that link the condenser studs to the brackets of the radiator's top. Slide the condenser all the way along the engine so the studs beneath the condenser clear the upper radiator bracket holes and the lower condenser holes are past the dowel pins on the bottom of the radiator, then lift it off the radiator. While installing, place the holes of the lower condenser brackets onto the dowel pins on the radiator bottom, move the condenser up until both condenser studs are through the brackets on the radiator top and tighten the nuts to a torque of 5.3 Nm (47 in. lbs.). Attach the condenser and radiator to the vehicle, clear the plugs off the line fittings on the condenser and liquid line and plug the end of the liquid line into the condenser as directed. Pull out the tape or plugs from the condenser inlet line fittings and link the discharge line to the condenser inlet. Put the negative Battery Cable back in place, drain the refrigerant and use a charge kit to add refrigerant. After installing a new condenser, use 30 milliliters (1 fluid ounce) of the proper refrigerant oil in the system through the compressor in your vehicle.
Related Jeep Cherokee Parts
 Jeep Cherokee Cabin Air Filter
 Jeep Cherokee Blend Door Actuator
 Jeep Cherokee Blower Motor
 Jeep Cherokee A/C Compressor Clutch
 Jeep Cherokee Evaporator
 Jeep Cherokee A/C Accumulator
 Jeep Cherokee A/C Compressor Cut-Out Switches
 Jeep Cherokee A/C Expansion Valve
 Jeep Cherokee A/C Hose
 Jeep Cherokee A/C Service Cap
 Jeep Cherokee A/C System Valve Core
 Jeep Cherokee HVAC Pressure Switch