JeepParts
My Garage
My Account
Cart
OEM Jeep Cherokee Rocker Arm
Engine Rocker Arm- Select Vehicle by Model
- Select Vehicle by VIN
Select Vehicle by Model
orMake
Model
Year
Select Vehicle by VIN
For the most accurate results, select vehicle by your VIN (Vehicle Identification Number).
4 Rocker Arms found


Jeep Cherokee Rocker Arms Part Number: 5184296AH
$20.52 MSRP: $30.00You Save: $9.48 (32%)

Jeep Cherokee Rocker Arms Part Number: 68088240AA
$44.23 MSRP: $65.00You Save: $20.77 (32%)
Jeep Cherokee Rocker Arms Part Number: 5048711AA
$14.25 MSRP: $21.00You Save: $6.75 (33%)Ships in 1-2 Business Days


Jeep Cherokee Rocker Arms Part Number: J3242393
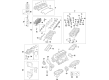
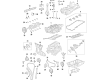
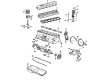
Jeep Cherokee Rocker Arm
Choose OEM Rocker Arm that meet Jeep factory standards. Jeep designs and tests every component for precision and durability. Each Rocker Arm follows strict manufacturing steps to lock in quality and fit. If your Jeep Cherokee matters to you, OEM parts make the smart choice. You'll get the exact look, feel, and performance you expect. Shop genuine Cherokee parts at the highly competitive prices online. Enjoy a manufacturer's warranty, a hassle-free return policy, and rapid delivery. No more guesswork with off brands. Get genuine parts with exact fit and true factory performance. Shop with confidence today at JeepPartsDeal.com.
The Rocker Arm used in Jeep Cherokee cars provides a critical part for the engine's valvetrain system and helps to transfer motion from the pushrod to the intake as well as the exhaust valves. Said to be made of stamped steel or aluminium, the Rocker Arm then maintains the required motion of the pushrod down, to open up the valves. For high-RPM operations we have aluminium for its light weight but for durability, such as in a diesel engine we have cast iron or forged carbon steel. Types of Rocker Arms used in Jeep Cherokee models at different period of time include traditional and roller type. Roller rockers using needle bearings have an advantage on overhead valve as well as overhead camshaft engines. The rocker ratio of modern engines vary between 1.5:1 to 1.8:1, this increases the lift of the camshaft and thus offering better performance. Newer fulcrum bearings are also installed on high RPM engines to deal with loads and the overall toughness of the Rocker Arm system of Jeep Cherokee vehicles.
Jeep Cherokee Rocker Arm Parts and Q&A
- Q: How to Maintain and Fix a Rocker Arm on Jeep Cherokee?A:When serving and repairing the rocker arm assembly, first remove the cylinder head and check for any rocker arm bridges that could stop the valve tip from aligning properly. Then, hold the guitar firmly with one hand and turn each capscrew at the bridge and pivot assembly just a little at a time, alternating between them to keep the bridges from being damaged. Start by removing the bridges, pivots and rocker arms so they don't mix up and then remove the push rods in the same order as you put them on the bench. Spray all the hardware with solvent and blow oil out of the rocker arms and push rods using compressed air. Thoroughly review pivot parts on the rocker arm shaft for indications of scuffing, pitting, fractures and harsh wear and watch for deep pitting on the valve stem tip. Check every push rod end for more wear than usual and change it if necessary, always paying attention to the corresponding hydraulic tappet if one shows any evidence of too much use. Let the push rods roll across a smooth surface or find the spot where light passes through the gap between the push rod and the surface. A line of wear along the push rod may be a sign of a blockage in the engine cylinder head. Just before installing the push rods, coat the tops and bottoms of each ball end in Mopar Engine Oil Supplement or a similar product and make sure that when you install them, the bottom ends of the rods are centered in the tappet plunger cap seat. Coat the rocker arm contact areas, both on the rockers and cylinder head, with Mopar Engine Oil Supplement or similar oil and place all rockers, pivots and bridges above each cylinder according to the original design. Install each capscrew loosely through a bridge, then turn them alternately, just one turn at a time, to make sure the force is the same and nothing else is touched, with a torque of 28 Nm (21 ft. lbs.). The last step is to put back the engine cylinder head cover.

Related Jeep Cherokee Parts
 Jeep Cherokee Harmonic Balancer
 Jeep Cherokee Oil Pump
 Jeep Cherokee Timing Belt
 Jeep Cherokee Cam Gear
 Jeep Cherokee Crankshaft Seal
 Jeep Cherokee Cylinder Head Gasket
 Jeep Cherokee Engine Mount
 Jeep Cherokee Pushrod
 Jeep Cherokee Timing Belt Tensioner
 Jeep Cherokee Timing Chain Tensioner
 Jeep Cherokee Timing Cover Gasket
 Jeep Cherokee Valve Stem Seal