JeepParts
My Garage
My Account
Cart
OEM Jeep Grand Cherokee Front Cross-Member
Front Engine Cross Member- Select Vehicle by Model
- Select Vehicle by VIN
Select Vehicle by Model
orMake
Model
Year
Select Vehicle by VIN
For the most accurate results, select vehicle by your VIN (Vehicle Identification Number).
11 Front Cross-Members found


Jeep Grand Cherokee Engine Cradle, Front Part Number: 68438645AG
$1219.43 MSRP: $1780.00You Save: $560.57 (32%)Ships in 1-3 Business Days
Jeep Grand Cherokee Engine Cradle, Front Part Number: 4877621AD
$873.45 MSRP: $1910.00You Save: $1036.55 (55%)Ships in 1-3 Business Days
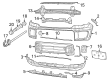
Jeep Grand Cherokee Impact Bar, Front Part Number: 68459328AB
$154.09 MSRP: $228.00You Save: $73.91 (33%)Ships in 1-3 Business DaysJeep Grand Cherokee Engine Cradle, Front Part Number: 68527715AB
$1008.75 MSRP: $1480.00You Save: $471.25 (32%)


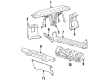
Jeep Grand Cherokee Lower Crossmember, Front Part Number: 55255200


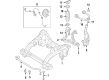
Jeep Grand Cherokee Engine Cradle, Front Part Number: 52089493AI
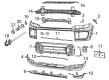
Jeep Grand Cherokee Impact Bar, Front Part Number: 68402958AC
$182.41 MSRP: $270.00You Save: $87.59 (33%)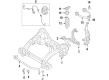
Jeep Grand Cherokee Engine Cradle, Front Part Number: 52124860AM
$549.60 MSRP: $800.00You Save: $250.40 (32%)
Jeep Grand Cherokee Drive Shaft, Front Part Number: 52124634AN
$549.60 MSRP: $800.00You Save: $250.40 (32%)Jeep Grand Cherokee Engine Cradle, Front Part Number: 68518435AC
$1085.46 MSRP: $1590.00You Save: $504.54 (32%)Jeep Grand Cherokee Engine Cradle, Front Part Number: 4877622AD
Jeep Grand Cherokee Front Cross-Member
Choose OEM Front Cross-Member that meet Jeep factory standards. Jeep designs and tests every component for precision and durability. Each Front Cross-Member follows strict manufacturing steps to lock in quality and fit. If your Jeep Grand Cherokee matters to you, OEM parts make the smart choice. You'll get the exact look, feel, and performance you expect. Shop genuine Grand Cherokee parts at the highly competitive prices online. Enjoy a manufacturer's warranty, a hassle-free return policy, and rapid delivery. No more guesswork with off brands. Get genuine parts with exact fit and true factory performance. Shop with confidence today at JeepPartsDeal.com.
The Jeep Grand Cherokee Front Cross-Member serves as an essential structure which improves both reliability and performance throughout all Jeep Grand Cherokee vehicle models. The Front Cross-Member modernizes the Jeep Grand Cherokee because it upholds the engine and transmission while safeguarding driving stability throughout operation. Engineered from steel this K-frame structure receives both strength for handling major weights and precision alignment in the suspension system operations. The Front Cross-Member design for Jeep Grand Cherokee SUVs meets different engine requirements by being applied throughout multiple Gran Cherokeel models. The Jeep Grand Cherokee benefits from its adaptability through improved efficiency and safety capabilities which make it an SUV favorite among enthusiasts. Notably, The unique distinct shape of the Front Cross-Member produces both superior deflection resistance and exceptional strength to turn the the automaker model into a market-leading automotive model. The car Front Cross-Member functions as a premier component which combines state-of-the-art engineering methods with premium materials to enhance vehicle performance while improving lifespan. The car maintains its excellence in luxury and advanced capabilities and comfort features that place it among the top choices for SUV consumers in its class.
Jeep Grand Cherokee Front Cross-Member Parts and Q&A
- Q: How to Service and Repair a Front Cross-Member on Jeep Grand Cherokee?A:Before fixing or servicing the front cross-member, hold the engine with the support fixture #8534 or similar, take out the skid plates and rotors, but do not twist the boot. Remove the nut on the outer tie rod end from the ball stud, take apart the outer tie rod end from the knuckle using puller tool #8677 and then come apart the upper Ball Joint from the knuckle by removing its nut and using the same puller. After that, take the axle nuts off and put them back on just a little, unplug the Speed Sensors and cut the harness from the hooks, next take out the lower ball joint nut and knock out the lower ball joint from the knuckle with puller tool #C-4150A. After you've eliminated the axle nuts, take out the knuckles and lower clevis bolts from the vehicle. As with 4WD models, separate the electrical connector and vent hose, remove the right half shaft, either adjust or remove sections of the propeller shaft, open and drain the differential, support it using a good lifting tool, then undo the front differential front bolts, right bolt and rear bolt and take out the differential while still attached to the left half shaft. Relax the engine mount bolts, raise the engine so the mount bolts are not overloaded, put the steering wheel in its straight ahead position and remove the steering gear as is advised. Use a suitable machine to support the cradle, make marks where the engine support cradle will be welded to the underbody, remove the four bolts on each corner and gently lower the cradle prior to removing the Control Arms and sway bar. First, attach the sway bar and lower control arms to the engine cradle, then raise the cradle and line up its engine mount bolts and finally install all four cradle bolts. Line up the engine cradle with the marks left behind during removal and then tighten the front bolts to 203 N.m and the rear bolts to 122 N.m. Connect the steering gear, place the engine down on its supports and tighten the engine mount bolts to 111 N.m (82 ft.lbs.). For a 4WD, mount the front differential inside the car and tighten the bolts, holding the threads of the rear bolt to 102 N.m (75 ft.lbs.), the right one to 102 N.m (75 ft.lbs.) and of the front to 54 N.m (40 ft.lbs.). All the right half shaft goes into the differential, fix the propeller shaft, link the electrical cable and insert the vent hose. After all the steps, fit the lower clevis bolts and fasten them with 169 N.m (125 ft.lbs.) force, wedge the knuckle onto the halfshaft and twist the halfshaft nut until it shows 251 N.m (185 ft.lbs.), secure the ball joint to the hub using 81 N.m (60 ft.lbs.) torque, repeat the same process on the upper ball joint, slide the tie rod end into the knuckle, tighten the ball stud nut to 75 N.m (55 ft.lbs.), connect the speed sensor electrical connectors and fasten the harness support clips, install the rotors, check and fill the front differential as necessary, install the front skid plates, and check and adjust front wheel alignment as necessary.

Related Jeep Grand Cherokee Parts
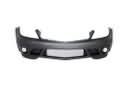 Jeep Grand Cherokee Bumper
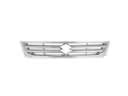 Jeep Grand Cherokee Grille
 Jeep Grand Cherokee Air Deflector
 Jeep Grand Cherokee Bumper Cover
 Jeep Grand Cherokee License Plate
 Jeep Grand Cherokee Lift Support
 Jeep Grand Cherokee Liftgate Lift Support
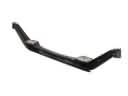 Jeep Grand Cherokee Axle Beam
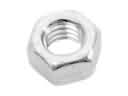 Jeep Grand Cherokee Exhaust Nut
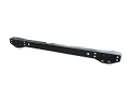 Jeep Grand Cherokee Rear Crossmember
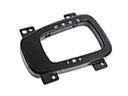 Jeep Grand Cherokee Shift Indicator
 Jeep Grand Cherokee Windshield Wiper