JeepParts
My Garage
My Account
Cart
OEM Jeep Liberty Tail Light
Tail Lamp- Select Vehicle by Model
- Select Vehicle by VIN
Select Vehicle by Model
orMake
Model
Year
Select Vehicle by VIN
For the most accurate results, select vehicle by your VIN (Vehicle Identification Number).
8 Tail Lights found


Jeep Liberty Tail Lamp Assembly Part Number: 55157060AG
$58.04 MSRP: $87.15You Save: $29.11 (34%)Ships in 1-2 Business DaysJeep Liberty Tail Lamp Assembly, Rear Driver Side Part Number: 55155829AH
$184.17 MSRP: $276.00You Save: $91.83 (34%)Ships in 1-2 Business Days
Jeep Liberty Tail Lamp Part Number: 55157346AD
$208.88 MSRP: $312.00You Save: $103.12 (34%)Ships in 1-2 Business DaysJeep Liberty Tail Lamp Assembly, Rear Driver Side Part Number: 55157061AG
$210.00 MSRP: $312.00You Save: $102.00 (33%)Ships in 1-2 Business DaysJeep Liberty Tail Lamp Assembly Part Number: 5KJ40RXFAE

Jeep Liberty Lamp - Tail Stop Backup Part Number: 55157347AD
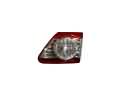
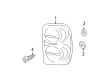
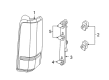
Jeep Liberty Tail Light
Choose OEM Tail Light that meet Jeep factory standards. Jeep designs and tests every component for precision and durability. Each Tail Light follows strict manufacturing steps to lock in quality and fit. If your Jeep Liberty matters to you, OEM parts make the smart choice. You'll get the exact look, feel, and performance you expect. Shop genuine Liberty parts at the highly competitive prices online. Enjoy a manufacturer's warranty, a hassle-free return policy, and rapid delivery. No more guesswork with off brands. Get genuine parts with exact fit and true factory performance. Shop with confidence today at JeepPartsDeal.com.
Jeep Liberty Tail Light is a smart component of the vehicle that is known to combine trail toughness to daily comfort. Jeep engineers have endowed the Liberty with the unibody frame, six cylinder power, nimble dimensions, and it is tuned to its suspension that is not cruel to its passengers on the town. Owners like great towing ability, a variety of four wheel drive, and an interior that makes controls clean and tough enough to survive are testament to the fact that Jeep made the Liberty based on young adventurers who still need a weekday commuter. Since this Jeep SUV has a vibrant market, as well as a good factory, maintenance will not be too expensive, and the parts will not be hard to locate. The Liberty Tail Light follows the same tradition of utility. It has running, brake, turn, and reverse lights which are mounted at the rear corners to ensure the distance is judged by the driver behind and clear stop warnings are given. The red and clear lenses can resist moisture, the reflectors inside enhance the brightness and the housing is strong which fits the Liberty body lines meaning it looks intelligent and can protect against bumps in slim trails. A cracked Tail Light may admit water and therefore Jeep owners need to replace it as soon as possible. It only requires simple tools to replace a broken Tail Light. First, park on flat area, disconnect the battery, unscrew the interior panel, unbolt the unit, take out the bulbs and install the new unit, screw the fasteners, plug in the wiring, then test all functions before attaching the trim once more.