JeepParts
My Garage
My Account
Cart
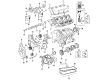
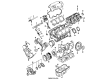
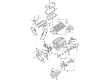
OEM 2000 Dodge Grand Caravan Timing Cover
Engine Timing Cover- Select Vehicle by Model
- Select Vehicle by VIN
Select Vehicle by Model
orMake
Model
Year
Select Vehicle by VIN
For the most accurate results, select vehicle by your VIN (Vehicle Identification Number).
5 Timing Covers found

2000 Dodge Grand Caravan Timing Cover Part Number: 4897571AD
$942.62Ships in 1-2 Business DaysProduct Specifications- Other Name: Cover Package - Engine Timing; Front Cover
- Replaces: 4897571AC
- Item Weight: 16.40 Pounds
- Item Dimensions: 26.3 x 15.0 x 8.2 inches
- Condition: New
- Fitment Type: Direct Replacement
- SKU: 4897571AD
- Warranty: This genuine part is guaranteed by Mopar's factory warranty.

2000 Dodge Grand Caravan Timing Cover Part Number: MD156911
$27.51 MSRP: $34.87You Save: $7.36 (22%)Ships in 1-2 Business DaysProduct Specifications- Other Name: Cover - Timing Belt; Upper Timing Cover; Upper Cover; Outer Timing Cover; Cover Assembly, Timing Belt Outer, Upper; Cover Timing Belt
- Item Weight: 0.60 Pounds
- Condition: New
- Fitment Type: Direct Replacement
- SKU: MD156911
- Warranty: This genuine part is guaranteed by Mopar's factory warranty.

2000 Dodge Grand Caravan Upper Timing Cover Part Number: MD332316
$7.35 MSRP: $9.32You Save: $1.97 (22%)Ships in 1-2 Business DaysProduct Specifications- Other Name: Cover - Timing Belt; Timing Cover; Upper Cover; Cover Timing Belt
- Item Weight: 0.80 Pounds
- Condition: New
- Fitment Type: Direct Replacement
- SKU: MD332316
- Warranty: This genuine part is guaranteed by Mopar's factory warranty.


2000 Dodge Grand Caravan Timing Cover Part Number: MD144769
Product Specifications- Other Name: Cover - Timing Belt; Lower Cover; Timing Belt Outer, Lower Up To 9/88; Cover Assembly, Timing Belt
- Item Weight: 0.90 Pounds
- Item Dimensions: 12.8 x 11.1 x 3.0 inches
- Condition: New
- Fitment Type: Direct Replacement
- SKU: MD144769
- Warranty: This genuine part is guaranteed by Mopar's factory warranty.

2000 Dodge Grand Caravan Lower Cover Part Number: MD301133
Product Specifications- Other Name: Gasket - Timing Belt Cover; Timing Cover Gasket; Timing Cover Seal; Timing Cover; Lower Cover Seal
- Condition: New
- Fitment Type: Direct Replacement
- SKU: MD301133
- Warranty: This genuine part is guaranteed by Mopar's factory warranty.
2000 Dodge Grand Caravan Timing Cover Parts and Q&A
- Q: How to Service and Repair a Timing Cover on 2000 Dodge Grand Caravan?A: Before servicing or repairing the timing cover, remove the negative cable from the battery and empty the cooling system. Hold up the engine and take out the right mount, making sure to lift the vehicle on a hoist and drain the oil as you begin. To start, take out the right wheel, the inner splash shield, the inspection cover under the transaxle, the oil pan and the oil pump pick-up tube. Remove the accessory drive belt and A/C compressor and next disconnect the crankshaft damper. Cut the factory string from the lower radiator and heater hoses that go into the chain cover housing, unscrew the idler pulley from the engine mount and remove the coolant by-pass tube from the housing as well. Put pressure on the engine again and take out the right side engine mount and the mount bracket too. After that, take out the cam sensor from the timing chain cover and from the water pump pulley. Wipe the surfaces that meet, making them free of burrs and remove the oil seal on the crankshaft to get the oil pump engaging properly. Use brand new O-rings and a gasket, attaching the gasket to the cover so that its lower edge is 0.5 mm (0.020 inch) beyond the lower edge of the cover. Place the oil pump inner rotor so that both the pump drive faces and the crankshaft flats meet vertically. Put the cover onto the crankshaft and attach the screws in the timing chain cover with a torque of 27 Nm (20 ft. lbs.). Place in the crankshaft oil seal, water pump pulley and crankshaft damper. Put back the engine bracket and tighten the screws to 54 Nm (40 ft. lbs.). After that, install the right side engine mount the same way. Attach the idler pulley to the bracket for the engine, the cam sensor and both the coolant by-pass, heater and lower radiator hoses. Attach the A/C compressor and accessory drive belt again. Put on the new O-ring while installing the oil pump pick-up tube with a new pick-up tube. Tighten the holding bolt to 28 Nm (250 in lbs.). After finishing the initial assembly, end with installing the oil pan, the transaxle inspection cover, inner splash shield and wheel, then add oil to the crankcase, fill the cooling system and refit the battery negative cable.
Related 2000 Dodge Grand Caravan Parts
 2000 Dodge Grand Caravan Engine Mount
 2000 Dodge Grand Caravan Harmonic Balancer
 2000 Dodge Grand Caravan Oil Pan Gasket
 2000 Dodge Grand Caravan Dipstick
 2000 Dodge Grand Caravan Crankshaft
 2000 Dodge Grand Caravan Crankshaft Thrust Washer Set
 2000 Dodge Grand Caravan Engine Mount Bracket
 2000 Dodge Grand Caravan Exhaust Valve
 2000 Dodge Grand Caravan Piston
 2000 Dodge Grand Caravan Pushrod
 2000 Dodge Grand Caravan Rod Bearing
 2000 Dodge Grand Caravan Timing Belt Tensioner