JeepParts
My Garage
My Account
Cart
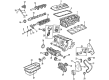
OEM 2000 Dodge Stratus Engine Mount
Engine Motor Mount- Select Vehicle by Model
- Select Vehicle by VIN
Select Vehicle by Model
orMake
Model
Year
Select Vehicle by VIN
For the most accurate results, select vehicle by your VIN (Vehicle Identification Number).
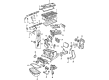
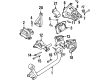
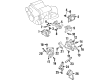
7 Engine Mounts found


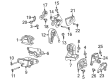
2000 Dodge Stratus Motor Mount, Driver Side Part Number: 4573775AB
$197.25 MSRP: $254.00You Save: $56.75 (23%)Ships in 1-2 Business DaysProduct Specifications- Other Name: Support - Engine Mount; Left Engine Mount; Torque Strut; Bracket; Transfer Case; Transmission Mount; Side Mount; Side Support; Support; Mount; Support Engine Mount
- Position: Driver Side
- Item Weight: 3.60 Pounds
- Item Dimensions: 7.7 x 5.6 x 4.2 inches
- Condition: New
- Fitment Type: Direct Replacement
- SKU: 4573775AB
- Warranty: This genuine part is guaranteed by Mopar's factory warranty.

2000 Dodge Stratus Support Bracket Part Number: 4593436AB
$60.62 MSRP: $69.55You Save: $8.93 (13%)Ships in 1-2 Business DaysProduct Specifications- Other Name: Bracket - Engine Mount; Transmission Mount Bracket; Side Mount; Front Bracket
- Item Weight: 2.20 Pounds
- Condition: New
- Fitment Type: Direct Replacement
- SKU: 4593436AB
- Warranty: This genuine part is guaranteed by Mopar's factory warranty.

2000 Dodge Stratus Motor Mount, Passenger Side Part Number: 4573773AB
$421.33 MSRP: $601.00You Save: $179.67 (30%)Ships in 1-2 Business DaysProduct Specifications- Other Name: Support - Engine Mount; Engine Mount, Right; Engine Mount Torque Strut; Engine Mount Bracket; Side Mount; Front Mount; Side Support; Support; Mount; Support Engine Mount; Engine Mount
- Position: Passenger Side
- Replaces: 4578001AB
- Item Weight: 3.20 Pounds
- Item Dimensions: 6.9 x 4.3 x 3.9 inches
- Condition: New
- Fitment Type: Direct Replacement
- SKU: 4573773AB
- Warranty: This genuine part is guaranteed by Mopar's factory warranty.

2000 Dodge Stratus Engine Support Part Number: 4593410
$195.24 MSRP: $247.50You Save: $52.26 (22%)Ships in 1-2 Business DaysProduct Specifications- Other Name: Support - Engine Support; Motor Mount; Support; Module; Screw/Washer, Right Engine Mount; Module, Engine Support; Module Engine Support
- Item Weight: 14.00 Pounds
- Item Dimensions: 32.8 x 11.7 x 6.4 inches
- Condition: New
- Fitment Type: Direct Replacement
- SKU: 4593410
- Warranty: This genuine part is guaranteed by Mopar's factory warranty.

2000 Dodge Stratus Engine Support Part Number: 4593337AF
$86.59 MSRP: $109.77You Save: $23.18 (22%)Ships in 1-2 Business DaysProduct Specifications- Other Name: Support - Engine Support; Engine Mount Bracket; Motor Mount; Rear Mount; Module; Module Engine Support
- Item Weight: 3.30 Pounds
- Condition: New
- Fitment Type: Direct Replacement
- SKU: 4593337AF
- Warranty: This genuine part is guaranteed by Mopar's factory warranty.

2000 Dodge Stratus Engine Support Part Number: 4593445AA
Product Specifications- Other Name: Support - Engine Support; Engine Mount Bracket; Engine Mount; Motor Mount; Rear Mount; Module Engine Support
- Item Weight: 6.80 Pounds
- Item Dimensions: 11.1 x 4.9 x 4.5 inches
- Condition: New
- Fitment Type: Direct Replacement
- SKU: 4593445AA
- Warranty: This genuine part is guaranteed by Mopar's factory warranty.
2000 Dodge Stratus Engine Support Part Number: 4593338AD
Product Specifications- Other Name: Support - Engine Support; Engine Mount Torque Strut; Engine Mount Bracket; Motor Mount; Front Mount; Engine Carrier; Module Engine Support
- Item Weight: 3.50 Pounds
- Item Dimensions: 4.5 x 6.2 x 8.6 inches
- Condition: New
- Fitment Type: Direct Replacement
- SKU: 4593338AD
- Warranty: This genuine part is guaranteed by Mopar's factory warranty.
2000 Dodge Stratus Engine Mount Parts and Q&A
- Q: How to Service and Repair Engine Mounts on 2000 Dodge Stratus?A: To fix or repair the engine mounts, first put the vehicle on a hoist. To remove the front mount, take out the through bolt and fastening bolts from the mount to the radiator support and make sure to tilt the engine when there isn't enough room. After stopping at the front mount, go to the rear mount by lifting the vehicle again. Start by taking out the through bolt from the rear engine mount and bracket, next remove the rear strut bracket and support bracket and then remove the bending strut from the rear mount to the engine. Removing the bolts which secure the rear mount to the suspension crossmember may involve tilting the engine. When the rear mount is off, slide in the front mount and its damper weight, align it properly and use attaching bolts to secure it to the lower radiator support at 61 Nm (45 ft. lbs. of tightness). Join the through bolt to the same torque setting and then lower the vehicle to the ground. For the installation at the rear, fit the rear mount and secure it to the front suspension crossmember with bolt tightening torque at 61 Nm (45 ft. lbs.). Attach both the rear strut and support bracket in position and ensure all the recommended torques are reached: 61 Nm (45 ft. lbs.) for the bolts holding the bracket to the front crossmember, 108 Nm (80 ft. lbs.) for the nut joining the front crossmember to the support brackets and 61 Nm (45 ft. lbs.) for the rear strut bolt. After that, install the through bolt and tighten it to 61 Nm (45 ft. lbs.) before bringing the car back down.
Related 2000 Dodge Stratus Parts
 2000 Dodge Stratus Oil Pan
 2000 Dodge Stratus Timing Belt
 2000 Dodge Stratus Oil Pump
 2000 Dodge Stratus Crankshaft
 2000 Dodge Stratus Crankshaft Seal
 2000 Dodge Stratus Crankshaft Timing Gear
 2000 Dodge Stratus Oil Filler Cap
 2000 Dodge Stratus Piston Ring Set
 2000 Dodge Stratus Rocker Arm
 2000 Dodge Stratus Timing Belt Tensioner
 2000 Dodge Stratus Timing Chain Tensioner
 2000 Dodge Stratus Timing Cover Gasket