JeepParts
My Garage
My Account
Cart
OEM 2000 Jeep Cherokee Brake Booster
Brake Power Booster- Select Vehicle by Model
- Select Vehicle by VIN
Select Vehicle by Model
orMake
Model
Year
Select Vehicle by VIN
For the most accurate results, select vehicle by your VIN (Vehicle Identification Number).
1 Brake Booster found

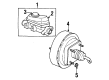
2000 Jeep Cherokee Brake Booster Part Number: 4856672AC
Product Specifications- Other Name: Booster - Power Brake; Booster Assembly
- Replaces: 4856672AB, 4856672
- Item Weight: 10.30 Pounds
- Item Dimensions: 14.2 x 12.9 x 12.5 inches
- Condition: New
- Fitment Type: Direct Replacement
- SKU: 4856672AC
- Warranty: This genuine part is guaranteed by Mopar's factory warranty.
2000 Jeep Cherokee Brake Booster Parts and Q&A
- Q: How to Maintain and Fix a Brake Booster on 2000 Jeep Cherokee?A: You should start your servicing of the vacuum brake booster by first removing the coolant reserve/overflow tank on the RHD cars. Separate the brake lines from the master cylinder as well as the wire from the combination valve differential pressure switch. Pull the nut that connects the combination valve bracket to the booster studs and then get the combination valve off. Also, unscrew the nuts linking the master cylinder to the booster studs and take away the cylinder. Unhook the hose from the booster check valve and take out the knee blocker under the steering column. Unplug the retaining clip, eliminate both nuts and release the brake pedal booster push rod. In the engine compartment, pull the booster studs from the dash panel, lift the booster and slide it out. Take off the dash seal from the booster. Start by installing the dash seal on the booster and afterwards, put the booster in place on the car's dash panel. In the car's interior, put the booster mounting nuts in place and tighten them until they hold the booster securely. Apply Mopar multi-mileage grease to both the pedal pin and the bushing, put the push rod on the brake pedal and secure it with the clip. Tighten the connection bolts to 39 Nm (29 ft. lbs.) after that, add the knee blocker. If the original master cylinder goes back in, confirm the seal at the rear is intact; if it isn't, replace it. Smear the mounting surface of the brake booster with a braked cleaner wipe to avoid building up vacuum leaks. Secure the master cylinder first to the booster studs, after which place and tighten the mounting nuts to 17.5 Nm (155 inch lbs.). After you place the vacuum hose on the booster check valve, install and secure the brake lines to the combination valve and master cylinder and only tighten each brake line fitting by hand to avoid crossing the threads. Connect the combination valve on the booster studs and fasten the bracket mounting nuts to 17.5 Nm (155 inch lbs.), followed by connecting the wire to the combination valve switch. Replace the coolant reserve/overflow tank on RHD vehicles, pump dry the brake system, fill the master cylinder and check that brakes are working before you move the car.
Related 2000 Jeep Cherokee Parts
 2000 Jeep Cherokee Brake Caliper
 2000 Jeep Cherokee Brake Line
 2000 Jeep Cherokee Brake Master Cylinder
 2000 Jeep Cherokee Parking Brake Cable
 2000 Jeep Cherokee Wheel Cylinder
 2000 Jeep Cherokee Brake Dust Shield
 2000 Jeep Cherokee ABS Relay
 2000 Jeep Cherokee Brake Caliper Piston
 2000 Jeep Cherokee Brake Disc
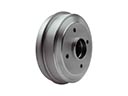 2000 Jeep Cherokee Brake Drum
 2000 Jeep Cherokee Brake Pad
 2000 Jeep Cherokee Hydraulic Hose