JeepParts
My Garage
My Account
Cart
OEM 2001 Dodge Ram 2500 Van A/C Expansion Valve
Air Conditioning Expansion Valve- Select Vehicle by Model
- Select Vehicle by VIN
Select Vehicle by Model
orMake
Model
Year
Select Vehicle by VIN
For the most accurate results, select vehicle by your VIN (Vehicle Identification Number).
2 A/C Expansion Valves found


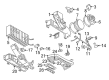
2001 Dodge Ram 2500 Van Expansion Valve, Front Part Number: 55036079AF
Product Specifications- Other Name: Valve - A/C Expansion; Front A/C Expansion Valve; Compressor Cut-Out Switch; HVAC Pressure & Trinary Switches.; Lower Pressure Cut-Off Switch; Valve A/C Expansion; A/C Expansion Valve
- Position: Front
- Replaces: 55036079AD
- Item Weight: 1.20 Pounds
- Item Dimensions: 2.3 x 4.2 x 5.0 inches
- Condition: New
- Fitment Type: Direct Replacement
- SKU: 55036079AF
- Warranty: This genuine part is guaranteed by Mopar's factory warranty.

2001 Dodge Ram 2500 Van Expansion Valve, Rear Part Number: 55055782AA
Product Specifications- Other Name: Valve - A/C Expansion; A/C Expansion Valve, Rear; Valve A/C Expansion; A/C Expansion Valve
- Position: Rear
- Item Weight: 0.80 Pounds
- Condition: New
- Fitment Type: Direct Replacement
- SKU: 55055782AA
- Warranty: This genuine part is guaranteed by Mopar's factory warranty.
2001 Dodge Ram 2500 Van A/C Expansion Valve Parts and Q&A
- Q: How to service and repair the A/C Expansion Valve on 2001 Dodge Ram 2500 Van?A: Before doing anything to the expansion valve, disconnect the battery negative cable and remove all the refrigerant from the refrigerant system. For the front expansion valve, first undo the screw joining the block fitting of the suction line jumper to the expansion valve. With all open refrigerant line fittings exposed, plug or tape them up before proceeding. Get the suction line jumper and filter-drier away from the expansion valve, access the mounting screws, remove them from the valve and evaporator coil block fitting and remove the valve, putting tape or plugs onto all opened refrigerant tubes before reassembling. In models with the optional rear heater-A/C unit, detach and isolate the negative battery lead and drain the refrigerant only from the rear expansion valve. Take the cover off the rear heater-A/C unit, remove the screw in the center of the check valve adapter, install plugs or tape on the open suction and liquid line fittings and disconnect the lines from the expansion valve. Loosen and take out the two screws securing the expansion valve to the bracket at the rear of the heater-A/C unit and coil evaporator tube. Take off the tape or plugs from the evaporator coil block fitting and the evaporator side of the expansion valve, fit the valve into the hole and seal it with two screws turned in until the torque reading shows 11.4 Nm or 100 in. lbs. Screw off the tape or plugs from the block fitting on the suction line jumper and the expansion valve, place the suction line jumper block fitting onto the expansion valve and secure it with a 22 Nm (200 in. lbs.) screw. Connect the negative battery cable, open the refrigerant system and charge the unit. To fit the rear expansion valve, remove the plug or tape from the bracket's combination evaporator tube and from the expansion valve, attach the valve to the bracket and use two screws to hold it securely tightened to 11.4 Nm (100 in. lbs.). Clear out the tape on both heater-A/C suction and liquid lines and the expansion valve, place the lines at the port on the expansion valve, secure it using the adapter plate and mounting screws tightened to 22 Nm (200 in. lbs.). Put the rear heater-A/C cover back into place, attach the negative battery connector, gather and empty the refrigerant system and fill it.
Related 2001 Dodge Ram 2500 Van Parts
 2001 Dodge Ram 2500 Van A/C Accumulator
 2001 Dodge Ram 2500 Van A/C Clutch
 2001 Dodge Ram 2500 Van A/C Compressor
 2001 Dodge Ram 2500 Van A/C Compressor Cut-Out Switches
 2001 Dodge Ram 2500 Van A/C Hose
 2001 Dodge Ram 2500 Van Blend Door Actuator
 2001 Dodge Ram 2500 Van Blower Motor
 2001 Dodge Ram 2500 Van Blower Motor Resistor
 2001 Dodge Ram 2500 Van Evaporator
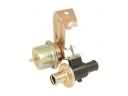 2001 Dodge Ram 2500 Van Heater Control Valve
 2001 Dodge Ram 2500 Van Heater Core
 2001 Dodge Ram 2500 Van HVAC Pressure Switch