JeepParts
My Garage
My Account
Cart
OEM 2001 Jeep Cherokee Wiper Switch
Windshield Wiper Switch- Select Vehicle by Model
- Select Vehicle by VIN
Select Vehicle by Model
orMake
Model
Year
Select Vehicle by VIN
For the most accurate results, select vehicle by your VIN (Vehicle Identification Number).
2 Wiper Switches found


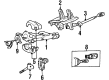
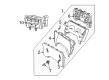
2001 Jeep Cherokee Turn Signal Switch Part Number: 56010315AA
Product Specifications- Other Name: Switch - Multifunction; Multi Purpose Switch; Signal Switch; Multifunction Left Stalk for Interior/Exterior Lights & Turn Signal Controls.
- Item Weight: 0.80 Pounds
- Item Dimensions: 4.0 x 5.5 x 7.9 inches
- Condition: New
- Fitment Type: Direct Replacement
- SKU: 56010315AA
- Warranty: This genuine part is guaranteed by Mopar's factory warranty.


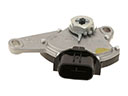
2001 Jeep Cherokee Rear Wiper Switch Part Number: 56007249
Product Specifications- Other Name: Switch - Windshield Wiper; Back Glass Wiper Switch; Windshield Washer Switch; Front Wiper Switch; Switch; Switch Windshield Wiper
- Item Weight: 0.50 Pounds
- Item Dimensions: 3.5 x 2.5 x 2.1 inches
- Condition: New
- Fitment Type: Direct Replacement
- SKU: 56007249
- Warranty: This genuine part is guaranteed by Mopar's factory warranty.
2001 Jeep Cherokee Wiper Switch Parts and Q&A
- Q: How to Replace the Wiper Switch on the Right Multi-Function Control on 2001 Jeep Cherokee?A: First, there should be no battery negative cable plugged in and the air bag near you should be turned off, then you should wait two minutes for the air bag to finish discharging. Drop the knee blocker from the instrument panel, then undo the three screws holding the lower shroud to the upper one on the column. If your vehicle has a standard non-tilt steering column, loosen the nuts above that secure the column; if it has a tilt column, fully steer the wheel down before proceeding. Unscrew both shrouds on top and bottom of the steering column apart from each other, then unscrew two screws hanging above the switch water shield and bracket and one more screw which is just underneath the start button. Pull the lower tab of the switch water shield bracket from the steering column and using your left hand, lift the water shield and bracket away from the steering column. You should lift the tilt release handle if your steering column tilts for more room between the steering wheel and your chest. After that, pull the right multi-function switch out of the steering column to expose the connector, take off the instrument panel wire harness and remove the switch. For the installation, put the right multi-function switch into place on the steering column and plug back in the wire harness connector. Insert the switch into its position and fasten the bracket with the water shield and the left multi-function switch to the steering column's left side. Push the tab underneath the switch water shield bracket towards the steering column until it fits over the screw boss, then tighten the screw below the left multi-function switch control stalk to 1.1 Nm (10 in.lbs.). Screw the switch water shield bracket and securing screws into the upper section of the steering column to 2.2 Nm (20 in.lbs.). If needed, tilt the steering column as low as it goes and place both shrouds over the top and bottom of the steering column. When working with non-tilt columns, secure the upper mount nuts with 22 Nm (200 in.lbs.) and afterward screw on and tighten the three lower steering column shroud screws to 2.0 Nm (18 in.lbs.). Once all systems are set, attach the knee blocker to the instrument panel and link back the negative battery cable.
Related 2001 Jeep Cherokee Parts
 2001 Jeep Cherokee Neutral Safety Switch
 2001 Jeep Cherokee Headlight Switch
 2001 Jeep Cherokee Ignition Switch
 2001 Jeep Cherokee Brake Light Switch
 2001 Jeep Cherokee Clock Spring
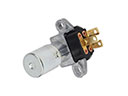 2001 Jeep Cherokee Dimmer Switch
 2001 Jeep Cherokee Fuel Pump Relay
 2001 Jeep Cherokee Ignition Lock Cylinder
 2001 Jeep Cherokee Air Bag Control Module
 2001 Jeep Cherokee Back Up Light Switch
 2001 Jeep Cherokee Door Jamb Switch
 2001 Jeep Cherokee Ignition Lock Assembly