JeepParts
My Garage
My Account
Cart
OEM 2002 Chrysler Sebring Timing Cover
Engine Timing Cover- Select Vehicle by Model
- Select Vehicle by VIN
Select Vehicle by Model
orMake
Model
Year
Select Vehicle by VIN
For the most accurate results, select vehicle by your VIN (Vehicle Identification Number).
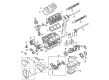
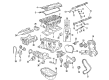
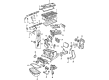
11 Timing Covers found


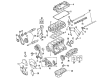
2002 Chrysler Sebring Front Cover, Upper Part Number: MD378731
$35.82 MSRP: $65.85You Save: $30.03 (46%)Ships in 1-2 Business DaysProduct Specifications- Other Name: Cover - Timing Belt; Engine Timing Cover, Upper; Upper Cover; Cover Timing Belt; Timing Cover
- Position: Upper
- Item Weight: 1.00 Pounds
- Condition: New
- Fitment Type: Direct Replacement
- SKU: MD378731
- Warranty: This genuine part is guaranteed by Mopar's factory warranty.


2002 Chrysler Sebring Front Cover, Driver Side Part Number: MD376390
$52.02 MSRP: $56.85You Save: $4.83 (9%)Ships in 1-2 Business DaysProduct Specifications- Other Name: Cover - Timing Belt; Engine Timing Cover, Front; Rear Cover; Cover Timing Belt
- Position: Front Driver Side
- Item Weight: 0.80 Pounds
- Item Dimensions: 10.0 x 6.4 x 3.3 inches
- Condition: New
- Fitment Type: Direct Replacement
- SKU: MD376390
- Warranty: This genuine part is guaranteed by Mopar's factory warranty.


2002 Chrysler Sebring Timing Cover Part Number: 4792604AA
$257.78 MSRP: $326.78You Save: $69.00 (22%)Ships in 1-2 Business DaysProduct Specifications- Other Name: Cover - Timing Belt; Engine Timing Cover; Front Cover; Cover Timing Belt
- Item Weight: 5.20 Pounds
- Item Dimensions: 14.0 x 13.9 x 6.8 inches
- Condition: New
- Fitment Type: Direct Replacement
- SKU: 4792604AA
- Warranty: This genuine part is guaranteed by Mopar's factory warranty.


2002 Chrysler Sebring Timing Cover, Lower Outer Part Number: 5093131AA
Product Specifications- Other Name: Cover Package - Timing; Engine Timing Cover, Lower Outer; Lower Cover; Outer Timing Cover; Cover Package Timing
- Position: Lower Outer
- Item Weight: 0.90 Pounds
- Item Dimensions: 12.6 x 9.8 x 1.4 inches
- Condition: New
- Fitment Type: Direct Replacement
- SKU: 5093131AA
- Warranty: This genuine part is guaranteed by Mopar's factory warranty.


 Product Specifications
- Other Name: Cover - Timing Belt; Engine Timing Cover, Front; Cover Timing Belt
- Position: Front Passenger Side
- Item Weight: 0.80 Pounds
- Item Dimensions: 10.7 x 9.2 x 2.7 inches
- Condition: New
- Fitment Type: Direct Replacement
- SKU: MD376392
- Warranty: This genuine part is guaranteed by Mopar's factory warranty.


2002 Chrysler Sebring Front Cover, Lower Part Number: MD363100
Product Specifications- Other Name: Cover - Timing Belt; Engine Timing Cover, Lower; Lower Cover; Cover Timing Belt
- Position: Lower
- Item Weight: 1.10 Pounds
- Item Dimensions: 13.9 x 11.6 x 2.1 inches
- Condition: New
- Fitment Type: Direct Replacement
- SKU: MD363100
- Warranty: This genuine part is guaranteed by Mopar's factory warranty.


2002 Chrysler Sebring Front Cover, Lower Part Number: MD325374
Product Specifications- Other Name: Cover - Timing Belt; Engine Timing Cover, Front Lower; Lower Cover; Cover Timing Belt; Timing Cover
- Position: Front Lower
- Item Weight: 0.90 Pounds
- Item Dimensions: 13.3 x 9.5 x 2.9 inches
- Condition: New
- Fitment Type: Direct Replacement
- SKU: MD325374
- Warranty: This genuine part is guaranteed by Mopar's factory warranty.

2002 Chrysler Sebring Front Cover, Inner Part Number: MR984958
Product Specifications- Other Name: Cover - Timing Belt; Engine Timing Cover, Inner, Rear; Inner Cover; Cover Timing Belt
- Position: Inner
- Item Weight: 0.60 Pounds
- Condition: New
- Fitment Type: Direct Replacement
- SKU: MR984958
- Warranty: This genuine part is guaranteed by Mopar's factory warranty.

2002 Chrysler Sebring Timing Cover, Upper Outer Part Number: 5093132AA
Product Specifications- Other Name: Cover Package - Timing; Engine Timing Cover, Upper Outer; Front Cover; Upper Cover; Outer Timing Cover; Cover Package Timing
- Position: Upper Outer
- Item Weight: 0.80 Pounds
- Item Dimensions: 13.4 x 8.9 x 1.2 inches
- Condition: New
- Fitment Type: Direct Replacement
- SKU: 5093132AA
- Warranty: This genuine part is guaranteed by Mopar's factory warranty.


2002 Chrysler Sebring Timing Cover, Inner Part Number: 4694318AD
Product Specifications- Other Name: Cover - Timing Belt; Engine Timing Cover, Inner; Front Cover; Inner Cover; Inner Timing Cover; Cover Timing Belt
- Position: Inner
- Replaces: 4694318, 4694318AC, 4694318AB
- Item Weight: 1.60 Pounds
- Item Dimensions: 21.1 x 12.8 x 2.7 inches
- Condition: New
- Fitment Type: Direct Replacement
- SKU: 4694318AD
- Warranty: This genuine part is guaranteed by Mopar's factory warranty.

2002 Chrysler Sebring Inner Cover Part Number: MD330008
Product Specifications- Other Name: Cover - Timing Belt; Engine Timing Cover, Inner; Lower Cover; Cover Timing Belt; Timing Cover
- Position: Inner
- Condition: New
- Fitment Type: Direct Replacement
- SKU: MD330008
- Warranty: This genuine part is guaranteed by Mopar's factory warranty.
2002 Chrysler Sebring Timing Cover Parts and Q&A
- Q: How to Maintain a Timing Cover on 2002 Chrysler Sebring?A: Before servicing the timing chain cover, take out the negative battery cable, empty the cooling system and remove the coolant pressure container. Hoist the vehicle up, remove the wheel and splash shield on the right front side and pull out the accessory drive belts. Also, get rid of the crankshaft vibration dampener and the AC/Generator belt tensioner/bracket assembly at this stage. Un attachment the heater hose from the tube in the right front frame rail location and then lower the car. Take out the screws that secure the heater supply line to the right rail and move the tube into better place. Place the floor jack underneath the engine and put a block of wood underneath it, then remove the two engine mounts and the upper timing chain cover bolts. After that, raise the vehicle one more time to remove all the bolts connecting the timing chain cover to the engine and take off the cover. Get rid of the gasket and remove the front crankshaft oil seal attached to the cover. To install, check and clean the edges of the timing chain cover, then put a 1/8 inch line of Mopar Engine RTV GEN II along the border between the oil pan and cylinder block, install the timing cover and gasket after that. Turn the M10 bolts to 54 Nm (40 ft. lbs.) and the M6 bolts to 12 Nm (105 in. lbs.). Fit the front crankshaft oil seal with the Special Tool 6780-2 sleeve and the 6780-1 installer, then bring the car down and fit the right engine mount. Add the bolts for the heater supply tube to the right front frame rail area, lift your car and fasten the heater hose to the supply line. After that, set up the AC/Generator belt tensioner/bracket assembly, crankshaft vibration damper and all accessory drive belts. Then insert the belt splash shield and right front wheel. Place the vehicle lower to the ground, attach the pressure container for the coolant, fill the cooling system and put the negative battery line back into place.
Related 2002 Chrysler Sebring Parts
 2002 Chrysler Sebring Oil Filter
 2002 Chrysler Sebring Camshaft Seal
 2002 Chrysler Sebring Coolant Filter
 2002 Chrysler Sebring Dipstick Tube
 2002 Chrysler Sebring Engine Mount
 2002 Chrysler Sebring Exhaust Valve
 2002 Chrysler Sebring Piston
 2002 Chrysler Sebring Rocker Arm
 2002 Chrysler Sebring Timing Belt Idler Pulley
 2002 Chrysler Sebring Timing Chain Guide
 2002 Chrysler Sebring Timing Chain Tensioner
 2002 Chrysler Sebring Transmission Mount