JeepParts
My Garage
My Account
Cart
OEM 2002 Jeep Liberty A/C Clutch
Air Conditioning Clutch- Select Vehicle by Model
- Select Vehicle by VIN
Select Vehicle by Model
orMake
Model
Year
Select Vehicle by VIN
For the most accurate results, select vehicle by your VIN (Vehicle Identification Number).
2 A/C Clutches found


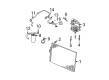
2002 Jeep Liberty Clutch Part Number: 5083076AA
$482.61 MSRP: $611.79You Save: $129.18 (22%)Ships in 1-2 Business DaysProduct Specifications- Other Name: Clutch - A/C Compressor; A/C Compressor Clutch; Clutch A/C Compressor
- Item Weight: 6.30 Pounds
- Item Dimensions: 6.9 x 6.4 x 2.5 inches
- Condition: New
- Fitment Type: Direct Replacement
- SKU: 5083076AA
- Warranty: This genuine part is guaranteed by Mopar's factory warranty.

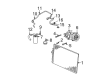
2002 Jeep Liberty Clutch Part Number: 5072536AB
Product Specifications- Other Name: Clutch - A/C Compressor; A/C Compressor Clutch; Clutch A/C Compressor
- Item Weight: 6.70 Pounds
- Condition: New
- Fitment Type: Direct Replacement
- SKU: 5072536AB
- Warranty: This genuine part is guaranteed by Mopar's factory warranty.
2002 Jeep Liberty A/C Clutch Parts and Q&A
- Q: How to Replace the A/C Clutch on 2002 Jeep Liberty?A: To take out the A/C compressor clutch, cut off or disconnect the battery negative cable, take away the serpentine drive belt and unplug the wire harness connector on the compressor clutch coil. After that, take out the four bolts securing the compressor to the bracket and move the compressor to the engine compartment, supporting it all the way. Firmly hold the clutch plate with a spanner wrench as you take off its nut and then take both the clutch and its shims out. Remove the outside front housing snap ring with snap ring pliers and then slide the special rotor puller lip (Special Tool C-6141-1 or its equivalent) into the snap ring groove. After that, put the front cold shaft guard (Special Tool C-6141-2 or its equivalent) in place over the shaft. Tighten the puller through-bolts with the aid of tool C-6461 or an analogous device and turn the center bolt clockwise until the rotor comes loose, not forcing anything on the compressor shaft. Lift off the screw and the retainer from the lead wire harness on the compressor coil. Unhook the snap ring on the compressor and slide the clutch field coil off its center. Check the wearing condition of the clutch rotor and plate and change them if they have serious wear or marks. If the shaft and front end of the compressor are greasy or if the front cover felt has oil, the shaft seal is broken and a new compressor is necessary. Next, examine the rotor bearing to see if it's rough or greasy and if so, change the rotor and clutch plate. Open the clutch box, insert the snap ring and clutch field coil first and run the clutch coil lead harness wire into the solenoid housing. Secure the lead wire with a screw tightened to 2.2 Nm (20 in. lbs.). Center the rotor assembly over the hub of the front compressor and then use the installer to put on the rotor bearing assembly until it is seated. insert the front outer housing snap ring so that the rounded side faces out and is fully down to avoid the clutch failing. Slide on the original clutch shims, then add and tighten the clutch plate and finish with tightening the hex bolt to 15 - 20 Nm (11 - 15 ft. lbs.). After that, test the clutch air gap with a feeler gauge, installing new or original shims as needed to ensure the gap lies between 0.41 and 0.79 millimeters (0.016 to 0.031 inches).
Related 2002 Jeep Liberty Parts
 2002 Jeep Liberty Heater Core
 2002 Jeep Liberty A/C Compressor
 2002 Jeep Liberty Blend Door Actuator
 2002 Jeep Liberty Blower Motor
 2002 Jeep Liberty Blower Motor Resistor
 2002 Jeep Liberty A/C Accumulator
 2002 Jeep Liberty A/C Condenser
 2002 Jeep Liberty A/C Hose
 2002 Jeep Liberty A/C Service Cap
 2002 Jeep Liberty A/C Switch
 2002 Jeep Liberty Evaporator
 2002 Jeep Liberty HVAC Pressure Switch