JeepParts
My Garage
My Account
Cart
OEM Jeep Liberty A/C Clutch
Air Conditioning Clutch- Select Vehicle by Model
- Select Vehicle by VIN
Select Vehicle by Model
orMake
Model
Year
Select Vehicle by VIN
For the most accurate results, select vehicle by your VIN (Vehicle Identification Number).
6 A/C Clutches found


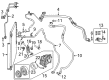
Jeep Liberty Clutch Coil Part Number: 68242651AA
$266.26 MSRP: $396.00You Save: $129.74 (33%)Ships in 1-3 Business Days

Jeep Liberty Clutch & Pulley Part Number: 68057094AA
$394.11 MSRP: $559.00You Save: $164.89 (30%)Ships in 1-2 Business Days


Jeep Liberty Clutch Part Number: 5083076AA
$482.61 MSRP: $611.79You Save: $129.18 (22%)Ships in 1-2 Business Days


Jeep Liberty Clutch Coil Part Number: 5003681AA
$185.30 MSRP: $279.00You Save: $93.70 (34%)Ships in 1-2 Business DaysJeep Liberty Clutch & Pulley Part Number: 68058044AB

Jeep Liberty Clutch Part Number: 5072536AB
Jeep Liberty A/C Clutch
Choose OEM A/C Clutch that meet Jeep factory standards. Jeep designs and tests every component for precision and durability. Each A/C Clutch follows strict manufacturing steps to lock in quality and fit. If your Jeep Liberty matters to you, OEM parts make the smart choice. You'll get the exact look, feel, and performance you expect. Shop genuine Liberty parts at the highly competitive prices online. Enjoy a manufacturer's warranty, a hassle-free return policy, and rapid delivery. No more guesswork with off brands. Get genuine parts with exact fit and true factory performance. Shop with confidence today at JeepPartsDeal.com.
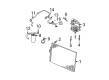
Jeep Liberty A/C Clutch is an essential part of the A/C systems in Jeep Liberty models manufactured from 2002 to 2012 with good reliability and performance. This A/C Clutch can successfully translate engine power into operating the A/C compressor, when the air conditioning is turned on. Through a feature of magnetizing a drum situated on the belt pulley, the Jeep Liberty A/C Clutch secures the belt drive hence performing well without imposing any unproductive pressure on the engine when switched off. Besides, it also brings improvement to the parameter of efficiency for the Jeep Liberty as well as to the safety factor of the vehicle as a stable operating condition is securely achieved. This Jeep Liberty A/C Clutch can work with KJ and KK generations of Jeep, enabling Jeep lovers to easily choose this one. Its design helps to solve common problems like stiction and slide where they occur and thus affect the performances of A/C and fuel consumption. When functioning effectively, the Jeep Liberty A/C Clutch plays an important role in reducing possible hazardous impact on the compressor together with other related constituents in the car's cooling system, thus it has an immense value. Additional attributes of the Jeep Liberty A/C Clutch are that they have an electronic stability control characteristic together with special safety improvement features and attributes to offer the car owners a feasible solution to enhance the cooling system of auto-mobiles.
Jeep Liberty A/C Clutch Parts and Q&A
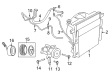
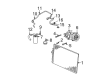
- Q: How to Remove and Replace the A/C Clutch on Jeep Liberty?A:Begin by placing the clutch field coil directly in front of the compressor, ensuring that the positioning tabs and wire harness are correctly directed, to keep them from being damaged. Place the field coil tabs into the holes at the front of the compressor and hold the clutch field coil in place with a two jaw puller and compressor field coil installer spacer. Place the clutch field coil wire lead and bracket over the A/C Compressor and use a screw to secure it, tightened to 4 Nm (35 in. lbs.). Check that the pulley and bearing are in place at the beginning of the compressor, because you'll hear a difference in sound as you inspect them. Attach the clutch pulley installer (Special Tool 9355 from Kit 9349) and use a hammer to put the pulley and bearing assembly into the clutch until it presses against the housing. Make sure the snap ring is seated to stop the clutch from failing. Snap ring (2) goes into place using snap ring pliers (Special Tool 9764 or an equivalent) for security of the pulley and bearing assembly on the compressor. Make sure the clutch field coil wire lead from compressor housing is far enough from the bearing assembly and pulley assembly. If you are installing a new clutch assembly and the compressor didn't have one before, first put in the 1.0, 0.50 and 0.13 millimeter shims from the clutch hardware. Put the clutch shims on the compressor shaft and, with the plate stationary and the bolt fastened to 15 Nm (133 in. lbs.), secure the bolt holding the clutch plate with a strap wrench. Set the gap between the clutch plate and the entire pulley/bearings assembly by using 90° wire gauges and adjusting shims to end up with a 0.35 to 0.65 mm space. A/C compressor, secure it into place on the mounting bracket and secure it with bolts. Plug the wire harness cable from the engine into the compressor clutch field coil, slide the accessory belt back on and reattach the negative Battery Cable. Finally, complete the necessary procedure to break in the clutch.
- Q: How to Maintain a Visteon A/C Clutch on Jeep Liberty?A:Before you do anything else, disconnect and separate the negative Battery Cable. Start by eliminating the accessory Drive Belt and after that disconnect the engine wire harness from the clutch field coil connector. Slide the A/C Compressor off its mount by turning the bolts and carefully remove the item with support. Lift up the compressor before removing the bolt holding the clutch plate to its shaft with the wrench; this bolt might be removed by hand or with an 8 x 1.25 mm bolt. All clutch plate shims must be removed from the hub or compressor shaft. After taking off the clutch plate and shim(s), use A/C Snap Ring Pliers 9764 to remove the snap ring that holds the pulley and bearing assembly to the front of the A/C compressor. Both the pulley and bearing assembly can be disassembled manually or using a two jaw puller. To end, take out the screw securing the clutch field coil wire lead bracket to the A/C compressor and then use the appropriate tool along with a two jaw puller to remove the clutch field coil from the front of the A/C compressor.


Related Jeep Liberty Parts
 Jeep Liberty Heater Core
 Jeep Liberty Blend Door Actuator
 Jeep Liberty Blower Motor
 Jeep Liberty Blower Motor Resistor
 Jeep Liberty A/C Accumulator
 Jeep Liberty A/C Compressor Cut-Out Switches
 Jeep Liberty A/C Condenser
 Jeep Liberty A/C Expansion Valve
 Jeep Liberty A/C Hose
 Jeep Liberty A/C Service Cap
 Jeep Liberty A/C System Valve Core
 Jeep Liberty Evaporator