JeepParts
My Garage
My Account
Cart
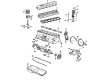
OEM 2002 Jeep Wrangler Oil Pan
Oil Drain Pan- Select Vehicle by Model
- Select Vehicle by VIN
Select Vehicle by Model
orMake
Model
Year
Select Vehicle by VIN
For the most accurate results, select vehicle by your VIN (Vehicle Identification Number).
2 Oil Pans found


2002 Jeep Wrangler Oil Pan Part Number: 53010340AB
$253.79 MSRP: $375.00You Save: $121.21 (33%)Product Specifications- Other Name: Pan - Engine Oil; Engine Oil Pan; Pan Engine Oil
- Item Weight: 12.00 Pounds
- Item Dimensions: 31.2 x 12.4 x 10.3 inches
- Condition: New
- Fitment Type: Direct Replacement
- SKU: 53010340AB
- Warranty: This genuine part is guaranteed by Mopar's factory warranty.


2002 Jeep Wrangler Oil Pan Part Number: 53020560
Product Specifications- Other Name: Pan - Engine Oil; Engine Oil Pan; Pan, Engine Oil; Pan Engine Oil
- Item Weight: 7.10 Pounds
- Item Dimensions: 20.9 x 12.0 x 9.0 inches
- Condition: New
- Fitment Type: Direct Replacement
- SKU: 53020560
- Warranty: This genuine part is guaranteed by Mopar's factory warranty.
2002 Jeep Wrangler Oil Pan Parts and Q&A
- Q: How to Service and Repair an Oil Pan on 2002 Jeep Wrangler?A: Start the service or repair on the oil pan by removing the negative battery cable and raising your vehicle. Eliminate the engine oil by removing its drain plug, followed by removing the exhaust pipe at the manifold and at the catalytic converter's hanger to lower the pipe. Lift out the engine starter motor and remove the flywheel/torque converter housing cover. Sit a jack stand beneath the engine vibration damper and put a 2 x 2 wooden support in between, loosen the engine mount bolts and use the jack to lift the engine until you can comfortably remove the oil pan. Should you have them, unplug the transmission cooler lines and oxygen sensor harness from the studs of the oil pan, then take off the oil pan bolts and studs before lifting the oil pan and removing the gasket. Since you don't want to disturb the sealant, clean the oil pan gasket and remove as much excess film from the rear main cap oil pan gasket groove as you carefully can. Soak the oil pan in solvent, clean the oil screen and pipe and make sure the screen is not blocked. Check if the threads of the oil drain plug and plug hole are damaged and make the necessary repairs and also inspect the oil pan flange to see if it is bent or distorted and straighten it if needed. The installation process involves cleaning the block and pan gasket and making four alignment dowels from 1/4 x 1 1/2 inch bolts without the heads and adding a slot in the top for easier installation and removal. Put two dowels into the timing case cover and two into the cylinder block and next apply Mopar Silicone Adhesive Sealant to the specified places on the cylinder block. Slide the gasket snugly down the dowels onto the block and cover, lower the oil pan over the dowels and onto the gasket, attach the smaller 1/4 inch bolts and tighten them to 9.5 Nm (84 inch lbs.) and gradually tighten the larger 5/16 inch bolts to 15 Nm (132 inch lbs.). Remove the dowels and fit in the remaining four 1/4 inch oil pan bolts, tightened to 9.5 Nm (84 inch lbs.). Lower the engine onto its mounts, put the through bolts in and tighten the nuts, lower the jack stand and remove the wood you had under it. Place the flywheel and torque converter housing access cover, install the engine starter motor and link the exhaust pipe to the engine hanger and manifold. Secure the drain plug under the oil pan, turn it until the torque says 34 Nm (25 ft. lbs.), place the vehicle back on the ground, attach the negative cable to the battery and add oil to the oil pan to the established level. Always be vigilant around the engine, make sure you aren't in the center of the fan's path, keep your hands clear of pulleys, belts or the fan and don't wear loose clothing. After that, begin the engine and examine for leaks.
Related 2002 Jeep Wrangler Parts
 2002 Jeep Wrangler Transmission Mount
 2002 Jeep Wrangler Coolant Filter
 2002 Jeep Wrangler Crankshaft
 2002 Jeep Wrangler Harmonic Balancer
 2002 Jeep Wrangler Crankshaft Pulley
 2002 Jeep Wrangler Crankshaft Seal
 2002 Jeep Wrangler Crankshaft Thrust Washer Set
 2002 Jeep Wrangler Intake Valve
 2002 Jeep Wrangler Piston
 2002 Jeep Wrangler Piston Ring Set
 2002 Jeep Wrangler Timing Cover
 2002 Jeep Wrangler Valve Stem Seal