JeepParts
My Garage
My Account
Cart
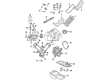
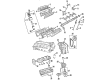
OEM 2003 Dodge Durango Crankshaft
Crank Shaft- Select Vehicle by Model
- Select Vehicle by VIN
Select Vehicle by Model
orMake
Model
Year
Select Vehicle by VIN
For the most accurate results, select vehicle by your VIN (Vehicle Identification Number).
2 Crankshafts found

2003 Dodge Durango Crankshaft Part Number: 53021387AA
Product Specifications- Other Name: Crankshft
- Item Weight: 59.60 Pounds
- Item Dimensions: 30.6 x 9.3 x 7.9 inches
- Condition: New
- Fitment Type: Direct Replacement
- SKU: 53021387AA
- Warranty: This genuine part is guaranteed by Mopar's factory warranty.

2003 Dodge Durango Crankshaft Part Number: R4790759AB
Product Specifications- Other Name: Crankshft; Crankshaft And Key
- Item Weight: 64.10 Pounds
- Item Dimensions: 32.0 x 8.3 x 7.3 inches
- Condition: New
- Fitment Type: Direct Replacement
- SKU: R4790759AB
- Warranty: This genuine part is guaranteed by Mopar's factory warranty.
2003 Dodge Durango Crankshaft Parts and Q&A
- Q: How to Safely Extract the Crankshaft from an Engine on 2003 Dodge Durango?A: Before taking out the crankshaft, lift the engine from the vehicle and then take out the engine oil pump. Take care not to mess with the oil pan gasket, as it is held on by the cylinder block at three points and can't be accessed without removing the whole pan. The oil pump pickup tube and oil pan gasket/windage tray are to be removed after you remove the oil pan. Then, get rid of the bedplate bolts, remembering where the three stud bolts are on the block and pull the connecting rods off the crankshaft while ensuring you do not damage the mating surface between the bedplate and block. The lower halves of the main bearing are found in the bedplate, so give it a close look and then carefully pry it at the marked points to remove it. As you handle the crankshaft, be careful of the bearing surfaces and after that, remove the crankshaft target wheel. Examine the connecting rod bearing bores and the main bearing bores to check for scoring, bluing or noticeably deep scratches, since more removal of parts may be necessary. Any damage discovered in the connecting rod bearing bores means the piston assembly on the cylinder head needs to be taken out, but if the bedplate or cylinder block main bearing bores are damaged, the entire engine has to be replaced. Should this be necessary, remove both bearing halves from the cylinder block and bedplate, completely clean and check the sealing surfaces and bearing bores and look for any cracks or scratches in the bedplate main bearing bores. Look over the crankshaft thrust washers for wear or defects and be sure to check the oil pan gasket/windage tray for any cuts or splits, replacing them as you find it necessary. During installation, put clean engine oil on the upper main bearing halves and avoid hurting the crankshaft bearing surfaces in any way. Slather sealant onto the screws that will hold the crankshaft target wheel in place and screw them into their holes; then torque the screws to 22 Nm (21 ft. lbs.). Put the crankshaft inside the cylinder block and below the thrust washers. The area between the bedplate and cylinder block must be coated with sealant to stop serious oil leaks and the time allowed for apparent leakage after sealant (installation) matters. Once surfaces are clean and full of sealant, place a 2.5 mm (0.100 inch) layer of Mopar Gen II Silicone Rubber Adhesive sealant onto the joining edges. Make sure to coat the main bearings on the crankshaft with clean engine oil and then dab each bedplate retainer bolt with clean oil before putting them in place. Secure the retaining bolts to the bedplate, making sure that the stud bolts are in place and turning them strictly by the given torque sequence: make the A - L bolts 54 Nm (40 ft. lbs.), the 1-10 bolts 2.8 Nm (25 in. lbs.), spin those bolts 90° more, then secure the A1 - A6 bolts at 27 Nm (20 ft. lbs.). Calibrate the amount of movement the crankshaft can have, add the connecting rods and measure the spaces between them. Place the oil pan gasket/windage tray with a brand new O-ring, set the oil pickup tube and make sure you torque the bolt and nuts to 28 Nm (20 ft. lbs.). In the end, attach the oil pan and connect all the bolts with a final torque of 15 Nm (11 ft. lbs.) following the required sequence, then insert the engine once more.
Related 2003 Dodge Durango Parts
 2003 Dodge Durango Cam Gear
 2003 Dodge Durango Camshaft Bearing
 2003 Dodge Durango Crankshaft Seal
 2003 Dodge Durango Dipstick Tube
 2003 Dodge Durango Lash Adjuster
 2003 Dodge Durango Piston Ring Set
 2003 Dodge Durango Pushrod
 2003 Dodge Durango Rod Bearing
 2003 Dodge Durango Timing Chain Tensioner
 2003 Dodge Durango Timing Cover
 2003 Dodge Durango Timing Cover Gasket
 2003 Dodge Durango Valve Stem Seal