JeepParts
My Garage
My Account
Cart
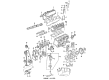
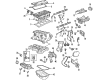
OEM 2003 Jeep Liberty Crankshaft Seal
- Select Vehicle by Model
- Select Vehicle by VIN
Select Vehicle by Model
orMake
Model
Year
Select Vehicle by VIN
For the most accurate results, select vehicle by your VIN (Vehicle Identification Number).
4 Crankshaft Seals found


2003 Jeep Liberty Rear Main Seal Part Number: 53020788AB
$32.63 MSRP: $48.35You Save: $15.72 (33%)Product Specifications- Other Name: Seal - Crankshaft Oil; Engine Crankshaft Seal, Rear; Crankshaft Seal; Seal Crankshaft Bearing Oil; Seal Crankshaft Oil Rear; Engine Crankshaft Seal
- Position: Rear
- Replaces: 68045792AA
- Item Weight: 0.70 Pounds
- Item Dimensions: 1.0 x 5.1 x 5.3 inches
- Condition: New
- Fitment Type: Direct Replacement
- SKU: 53020788AB
- Warranty: This genuine part is guaranteed by Mopar's factory warranty.


2003 Jeep Liberty Rear Main Seal Part Number: 4621939AB
$27.24 MSRP: $40.20You Save: $12.96 (33%)Ships in 1-2 Business DaysProduct Specifications- Other Name: Seal - Rear Main Crankshaft; Engine Crankshaft Seal, Rear; Rear Seal; Seal Rear Main Crankshaft Serviced With Retainer [04663625]; Crankshaft Seal
- Position: Rear
- Item Weight: 0.50 Pounds
- Item Dimensions: 0.7 x 4.6 x 4.8 inches
- Condition: New
- Fitment Type: Direct Replacement
- SKU: 4621939AB
- Warranty: This genuine part is guaranteed by Mopar's factory warranty.


2003 Jeep Liberty Oil Seal, Front Part Number: 53021313AA
$10.49 MSRP: $15.00You Save: $4.51 (31%)Product Specifications- Other Name: Seal - Crankshaft Oil; Engine Crankshaft Seal, Front; Timing Cover Gasket; Timing Cover Seal; Crankshaft Seal; Front Crank Seal; Timing Cover Oil Seal; Engine Crankshaft Seal.
- Position: Front
- Item Weight: 1.40 Pounds
- Item Dimensions: 0.6 x 3.2 x 3.1 inches
- Condition: New
- Fitment Type: Direct Replacement
- SKU: 53021313AA
- Warranty: This genuine part is guaranteed by Mopar's factory warranty.


2003 Jeep Liberty Front Crank Seal Part Number: 4667198
$16.24 MSRP: $23.35You Save: $7.11 (31%)Product Specifications- Other Name: Seal - Front Main Crankshaft; Engine Crankshaft Seal, Front; Timing Cover Gasket; Timing Cover Seal; Front Seal; Crankshaft Front Oil Seal; Engine Crankshaft Seal.
- Position: Front
- Item Weight: 0.40 Pounds
- Item Dimensions: 0.6 x 2.0 x 2.0 inches
- Condition: New
- Fitment Type: Direct Replacement
- SKU: 4667198
- Warranty: This genuine part is guaranteed by Mopar's factory warranty.
2003 Jeep Liberty Crankshaft Seal Parts and Q&A
- Q: How to Service and Repair a Crankshaft Seal on 2003 Jeep Liberty?A: Before dealing with the rear crankshaft oil seal, take out the transmission and flex plate. Insert the flat blade of a 3/16 screwdriver between the dust lip and the metal case to separate the seal without touching the crankshaft seal. Some contact to the crankshaft chamfer is acceptable. If you find burrs or scratches on the crankshaft edge, gently clean them using 400 grit sandpaper to not harm the seal as you replace it. You do not need to put lubricant on the seal when you are installing it. Insert Tool 6926-1 Seal Guide at the front of the crankshaft and slide the seal over the guide, placing its lip toward the crankcase. Use Special Tool 6926-2 to drive the seal into the block and let C-4171 slide into place until the bottom hits the block, making sure the seal remains flat to prevent oil leaks. Put the transmission back down but do not tighten it. Insert and tighten the bolts with 95 Nm (70 ft. lbs.) of pressure that uses Mopar Lock & Seal Adhesive on them, then secure the flexplate using that same product.
Related 2003 Jeep Liberty Parts
 2003 Jeep Liberty Cylinder Head
 2003 Jeep Liberty Oil Pan Gasket
 2003 Jeep Liberty Timing Belt
 2003 Jeep Liberty Timing Chain
 2003 Jeep Liberty Cam Gear
 2003 Jeep Liberty Crankshaft
 2003 Jeep Liberty Dipstick
 2003 Jeep Liberty Exhaust Valve
 2003 Jeep Liberty Lash Adjuster
 2003 Jeep Liberty Piston Ring Set
 2003 Jeep Liberty Timing Cover
 2003 Jeep Liberty Valve Stem Seal