JeepParts
My Garage
My Account
Cart
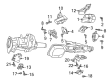
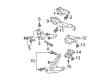
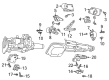
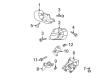
OEM 2004 Dodge Dakota Engine Mount
Engine Motor Mount- Select Vehicle by Model
- Select Vehicle by VIN
Select Vehicle by Model
orMake
Model
Year
Select Vehicle by VIN
For the most accurate results, select vehicle by your VIN (Vehicle Identification Number).
16 Engine Mounts found


2004 Dodge Dakota Front Mount, Passenger Side Part Number: 52020244AA
Product Specifications- Other Name: Insulator - Engine Mount; Engine Mount, Rear Right, Right; Engine Mount Torque Strut; Engine Mount Bracket; Motor Mount; Rear Insulator; Front Insulator; Insulator Engine Mount
- Position: Passenger Side
- Item Weight: 1.00 Pounds
- Condition: New
- Fitment Type: Direct Replacement
- SKU: 52020244AA
- Warranty: This genuine part is guaranteed by Mopar's factory warranty.


2004 Dodge Dakota Mount Bracket Part Number: 52058669AD
Product Specifications- Other Name: Bracket - Insulator; Manual Transmission Mount Bracket; Engine Mount Bracket; Motor Mount; Rear Insulator Mount Bracket; Bracket
- Item Weight: 2.60 Pounds
- Item Dimensions: 7.8 x 4.2 x 4.2 inches
- Condition: New
- Fitment Type: Direct Replacement
- SKU: 52058669AD
- Warranty: This genuine part is guaranteed by Mopar's factory warranty.


2004 Dodge Dakota Rear Mount Part Number: 52019615AC
Product Specifications- Other Name: Insulator - Engine Mount; Support Bracket; Isolator, Rear; Torque Strut; Bracket; Motor Mount; Rear Insulator; Insulator Engine Mount
- Position: Rear
- Item Weight: 1.60 Pounds
- Item Dimensions: 6.0 x 4.1 x 3.2 inches
- Condition: New
- Fitment Type: Direct Replacement
- SKU: 52019615AC
- Warranty: This genuine part is guaranteed by Mopar's factory warranty.

2004 Dodge Dakota Front Mount, Driver Side Part Number: 52022031AC
Product Specifications- Other Name: Insulator - Engine Mount; Engine Mount, Left, Right; Engine Mount Bracket; Motor Mount; Front Insulator; Insulator Engine Mount
- Position: Driver Side
- Item Weight: 7.20 Pounds
- Condition: New
- Fitment Type: Direct Replacement
- SKU: 52022031AC
- Warranty: This genuine part is guaranteed by Mopar's factory warranty.

2004 Dodge Dakota Front Mount, Passenger Side Part Number: 52019962AC
Product Specifications- Other Name: Insulator - Engine Mount; Engine Mount, Front Right, Right; Engine Mount Bracket; Motor Mount; Front Insulator; Insulator Engine Mount
- Position: Front Passenger Side
- Item Weight: 4.80 Pounds
- Item Dimensions: 9.4 x 5.1 x 4.8 inches
- Condition: New
- Fitment Type: Direct Replacement
- SKU: 52019962AC
- Warranty: This genuine part is guaranteed by Mopar's factory warranty.
2004 Dodge Dakota Front Mount, Driver Side Part Number: 52022032AB
Product Specifications- Other Name: Insulator - Engine Mount; Engine Mount, Left, Right; Engine Mount Bracket; Motor Mount; Front Insulator; Insulator Engine Mount
- Position: Driver Side
- Condition: New
- Fitment Type: Direct Replacement
- SKU: 52022032AB
- Warranty: This genuine part is guaranteed by Mopar's factory warranty.

2004 Dodge Dakota Mount Bracket, Driver Side Part Number: 52021841AA
Product Specifications- Other Name: Bracket - Engine Mount; Engine Mount Bracket, Left; Motor Mount; Bracket Engine Mount; Engine Mount Bracket
- Position: Driver Side
- Condition: New
- Fitment Type: Direct Replacement
- SKU: 52021841AA
- Warranty: This genuine part is guaranteed by Mopar's factory warranty.

2004 Dodge Dakota Front Mount, Driver Side Part Number: 52021835AA
Product Specifications- Other Name: Insulator - Engine Mount; Engine Mount, Left; Engine Mount Bracket; Motor Mount; Front Insulator; Insulator Engine Mount
- Position: Driver Side
- Condition: New
- Fitment Type: Direct Replacement
- SKU: 52021835AA
- Warranty: This genuine part is guaranteed by Mopar's factory warranty.

2004 Dodge Dakota Front Mount, Passenger Side Part Number: 52021834AA
Product Specifications- Other Name: Insulator - Engine Mount; Engine Mount, Right; Engine Mount Bracket; Motor Mount; Front Insulator; Insulator Engine Mount
- Position: Passenger Side
- Condition: New
- Fitment Type: Direct Replacement
- SKU: 52021834AA
- Warranty: This genuine part is guaranteed by Mopar's factory warranty.

2004 Dodge Dakota Mount Bracket, Driver Side Part Number: 52020257AB
Product Specifications- Other Name: Bracket - Engine Mount; Engine Mount Bracket, Left; Motor Mount; Bracket Engine Mount; Engine Mount Bracket
- Position: Driver Side
- Condition: New
- Fitment Type: Direct Replacement
- SKU: 52020257AB
- Warranty: This genuine part is guaranteed by Mopar's factory warranty.
 Product Specifications
- Other Name: Insulator - Engine Mount; Engine Mount, Left, Rear Left; Engine Mount Torque Strut; Engine Mount Bracket; Motor Mount; Rear Insulator; Front Insulator; Insulator Engine Mount
- Position: Rear Driver Side
- Item Weight: 8.10 Pounds
- Condition: New
- Fitment Type: Direct Replacement
- SKU: 52020243AB
- Warranty: This genuine part is guaranteed by Mopar's factory warranty.

2004 Dodge Dakota Rear Mount Part Number: 52019998
Product Specifications- Other Name: Insulator - Transmission Support; Automatic Transmission Mount; Engine Mount Torque Strut; Bracket; Motor Mount; Rear Insulator; Lower Insulator; Insulator; Bracket And Insulator Transmission Support; Isolator Engine Mount
- Item Weight: 2.80 Pounds
- Item Dimensions: 7.6 x 4.0 x 3.0 inches
- Condition: New
- Fitment Type: Direct Replacement
- SKU: 52019998
- Warranty: This genuine part is guaranteed by Mopar's factory warranty.

2004 Dodge Dakota Front Mount, Driver Side Part Number: 52019961AC
Product Specifications- Other Name: Insulator - Engine Mount; Engine Mount, Front Left, Left; Engine Mount Bracket; Motor Mount; Front Insulator; Insulator Engine Mount
- Position: Front Driver Side
- Condition: New
- Fitment Type: Direct Replacement
- SKU: 52019961AC
- Warranty: This genuine part is guaranteed by Mopar's factory warranty.
 Product Specifications
- Other Name: Bracket - Engine Mount; Engine Mount Bracket, Right; Motor Mount; Bracket Engine Mount; Engine Mount Bracket
- Position: Passenger Side
- Condition: New
- Fitment Type: Direct Replacement
- SKU: 52019958AC
- Warranty: This genuine part is guaranteed by Mopar's factory warranty.

2004 Dodge Dakota Rear Mount Part Number: 52019394AD
Product Specifications- Other Name: Insulator - Transmission Support; Automatic Transmission Mount; Engine Mount Torque Strut; Bracket; Motor Mount; Rear Insulator; Lower Insulator; Bracket And Insulator Transmission Support; Insulator Engine Mount
- Condition: New
- Fitment Type: Direct Replacement
- SKU: 52019394AD
- Warranty: This genuine part is guaranteed by Mopar's factory warranty.
- Product Specifications
- Other Name: Bracket - Engine Mount; Engine Mount Bracket, Right; Motor Mount; Bracket Engine Mount; Engine Mount Bracket
- Position: Passenger Side
- Condition: New
- Fitment Type: Direct Replacement
- SKU: 52021840AA
- Warranty: This genuine part is guaranteed by Mopar's factory warranty.
2004 Dodge Dakota Engine Mount Parts and Q&A
- Q: How to Service and Repair an Engine Mount for 2WD and 4WD on 2004 Dodge Dakota?A: Before servicing or repairing the front engine mount in any vehicle, take away the negative cable from the battery and remove the viscous fan to avoid harm. To do this on a 2WD, raise the vehicle, take off the engine oil filter and oil drain plug, put a jack under the engine and a wedge across the oil pan and lift the front axle. Disconnect the engine mounts from the front axle by removing the four bolts and the three bolts from the left engine bracket to the front axle. Then, lower the front axle and unbolt the items together. Having first raised the engine, take out both engine mounts, then attach the new ones using eight bolts, applying a torque of 54 Nm (40 ft. lbs.). Fit the two through bolts into the mounts and gently lower the engine so they rest on the frame brackets. At this time, tighten the nuts to 94 Nm (70 ft. lbs.). Place the oil drain trough back, fit the engine oil filter, place the vehicle on the ground, add the viscous fan and attach the negative battery cable. For 4WD, begin the same as with the peers, but you should also get rid of the skid plate and front crossmember. With the front axle and engine supported, take out the bolts holding the mounts onto it and the two on the left engine bracket, then drop the front axle and get rid of the six through bolts. Hold up the engine, attach the new mounts, tighten each nut to 94 Nm (70 ft. lbs.) and check the alignment prior to tightening the through bolts to 101 Nm (75 ft. lbs.) as well as the bolts connecting the front axle to the left engine bracket. Following this, reconnect the lower part of the front crossmember, install the viscous fan, lift the vehicle, drive the drain trough, oil filter and skid plate. For both types, coat the mount to engine block and the left engine bracket to front axle bolt connections with leopard Lock and Seal Adhesive, Medium Strength Thread-locker.
Related 2004 Dodge Dakota Parts
 2004 Dodge Dakota Oil Filter
 2004 Dodge Dakota Oil Pan
 2004 Dodge Dakota Timing Chain
 2004 Dodge Dakota Cam Gear
 2004 Dodge Dakota Camshaft
 2004 Dodge Dakota Crankshaft
 2004 Dodge Dakota Crankshaft Pulley
 2004 Dodge Dakota Crankshaft Thrust Washer Set
 2004 Dodge Dakota Intake Valve
 2004 Dodge Dakota Rod Bearing
 2004 Dodge Dakota Timing Cover
 2004 Dodge Dakota Valve Stem Seal