JeepParts
My Garage
My Account
Cart
OEM 2004 Dodge Ram 1500 Timing Chain
Engine Timing Chain- Select Vehicle by Model
- Select Vehicle by VIN
Select Vehicle by Model
orMake
Model
Year
Select Vehicle by VIN
For the most accurate results, select vehicle by your VIN (Vehicle Identification Number).
2 Timing Chains found

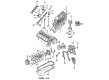
2004 Dodge Ram 1500 Timing Gear Set Part Number: 5086533AD
Product Specifications- Other Name: Sprocket Package - Timing; Engine Timing Chain Kit; Timing Gear; Cam Gear; Timing Drive Package; Chain Package Timing Contains Timing Chain And Gears
- Replaces: 5086533AB
- Item Weight: 4.60 Pounds
- Item Dimensions: 6.7 x 6.7 x 3.3 inches
- Condition: New
- Fitment Type: Direct Replacement
- SKU: 5086533AD
- Warranty: This genuine part is guaranteed by Mopar's factory warranty.


2004 Dodge Ram 1500 Timing Chain Part Number: 5019423AD
Product Specifications- Other Name: Chain - Engine Timing; Engine Timing Chain Kit; Drive Assembly; Timing Drive Package; Chain & Gear Kit Engine Timing; Timing Drive Package Engine
- Replaces: 5019423AC
- Item Weight: 5.80 Pounds
- Item Dimensions: 10.1 x 8.8 x 3.6 inches
- Condition: New
- Fitment Type: Direct Replacement
- SKU: 5019423AD
- Warranty: This genuine part is guaranteed by Mopar's factory warranty.
2004 Dodge Ram 1500 Timing Chain Parts and Q&A
- Q: How to Service and Repair a Timing Chain on 2004 Dodge Ram 1500?A: Prior to altering the timing chain or sprockets, pull the negative cable from the battery and run the cooling system to empty it. Take away the right and left cylinder head covers and the radiator fan shroud. Turn the engine until the timing mark on the crankshaft damper lines up with the TDC mark on the timing chain cover, making certain that the camshaft sprocket "V6" marks show at 12 o'clock. Don't touch the nut on the right side camshaft sprocket-retighten yours to 5 ft. lbs. Remember to also remove the power steering pump, access the left and right cylinder head plugs, the oil fill housing, crankshaft damper and timing cover. Hold the primary chain tensioner down and in place, covering the opening in the oil pan to stop the plate behind the left secondary chain tensioner from falling inside. Then, extract the secondary chain tensioners, camshaft position sensor, crankshaft position sensor and left and right camshaft sprocket bolts. Hold the left and right camshaft steel tubes in place with Special Tool 8428 Camshaft Wrench as you remove their sprockets. Detach the bolt from the idler sprocket assembly, slide all three sprockets out and the main chain and finally remove the two pivoting tensioner arms and chain guides, as well as the primary chain tensioner. Check the sprockets for worn teeth, the idler sprocket assembly bush and shaft for signs of wear, the spline joint for tightness, the chain guides and tensioner arms for signs of wear, the piston and ratcheting device of the secondary tensioner for contact and the plastic faces of the primary tensioner for signs they should be changed. After fitting the secondary chain tensioner, compress its piston and loose the ratchet pawl, place the primary chain tensioner over the oil pump and tighten all the bolts to 28 Nm. Attach the right torx bolt and side chain tensioner arm once the silver and black bolts hold the guides tight to the engine and cylinder heads. Put on the left side chain guide and tensioner arm, after which attach the right side chain guide. Install both side chains on the idler, maneuvering the plated chain so it fits with the other side and set Special Tool 8429 over them to secure them. Place the two plated links of the primary chain at 12 o'clock on the idler sprocket and make sure the one plated link is at 6 o'clock on the crankshaft sprocket. Lubricate the bushings and idler shaft, then fit all chains, the crankshaft sprocket and idler sprocket together, making sure the marks on the wheel stay aligned before putting on the 34 Nm retaining bolt. Place the dots on the left and right camshaft sprockets over the matching chain links, clean extra oil from the camshaft sprocket bolts and loosely put the bolts in place. Look if all the padded links are matched to the marks on all the sprockets and if "W" lines up with the 12 o'clock place on the camshaft sprockets. Install the second set of tensioners and tighten the bolts to 28 Nm and afterward remove all the tensioner locking pins, being sure not to manually extend the tensioners. Attach Special Tool 6958 and tighten the bolts that hold the left and right camshaft sprockets to 122 Nm. Go two complete revolutions on the engine and ensure all the timing marks are in their right places. Add engine oil to all three chains and measure the idler gear end play. Replace it if it is not within 0.10 - 0.25 mm, then fit the timing chain cover and crankshaft damper, next the cylinder head covers and finally the threaded plug in the right head, making sure the sealant is used and it is tightened to 81 Nm before installation. Installing the oil fill housing, attaching the left cylinder access plug, fitting the power steering pump and adding coolant finishes off the entire procedure.
Related 2004 Dodge Ram 1500 Parts
 2004 Dodge Ram 1500 Camshaft
 2004 Dodge Ram 1500 Engine Mount
 2004 Dodge Ram 1500 Oil Pump
 2004 Dodge Ram 1500 Rocker Arm
 2004 Dodge Ram 1500 Coolant Filter
 2004 Dodge Ram 1500 Crankshaft Thrust Washer Set
 2004 Dodge Ram 1500 Drain Plug Washer
 2004 Dodge Ram 1500 Engine Mount Bracket
 2004 Dodge Ram 1500 Oil Pan
 2004 Dodge Ram 1500 Pushrod
 2004 Dodge Ram 1500 Timing Cover
 2004 Dodge Ram 1500 Valve Cover Gasket