JeepParts
My Garage
My Account
Cart
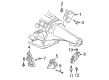
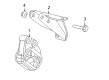
OEM 2004 Dodge Ram 1500 Engine Mount
Engine Motor Mount- Select Vehicle by Model
- Select Vehicle by VIN
Select Vehicle by Model
orMake
Model
Year
Select Vehicle by VIN
For the most accurate results, select vehicle by your VIN (Vehicle Identification Number).
15 Engine Mounts found


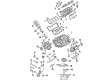
2004 Dodge Ram 1500 Transmission Mount Part Number: 52021470AD
$81.34 MSRP: $124.00You Save: $42.66 (35%)Product Specifications- Other Name: Insulator - Transmission Support; Automatic & Manual Transmission Mounts; Engine & Transfer Case Mount; Motor Mount; Transmission Mount Bracket; Rear Mount
- Replaces: 52021470AC, 52021470AB
- Item Weight: 4.00 Pounds
- Item Dimensions: 3.8 x 4.2 x 8.9 inches
- Condition: New
- Fitment Type: Direct Replacement
- SKU: 52021470AD
- Warranty: This genuine part is guaranteed by Mopar's factory warranty.


2004 Dodge Ram 1500 Motor Mount, Driver Side Part Number: 52020603AC
$382.88 MSRP: $422.00You Save: $39.12 (10%)Ships in 1-2 Business DaysProduct Specifications- Other Name: Insulator - Engine Mount; Engine Mount, Left; Engine Mount Bracket; Front Mount; Insulator Engine Mount
- Position: Driver Side
- Replaces: 52020603AB
- Item Weight: 9.40 Pounds
- Item Dimensions: 5.4 x 5.7 x 7.5 inches
- Condition: New
- Fitment Type: Direct Replacement
- SKU: 52020603AC
- Warranty: This genuine part is guaranteed by Mopar's factory warranty.


2004 Dodge Ram 1500 Motor Mount, Driver Side Part Number: 52110089AC
$204.39 MSRP: $260.00You Save: $55.61 (22%)Ships in 1-2 Business DaysProduct Specifications- Other Name: Bracket - Engine Mount; Engine Mount, Left; Engine Mount Bracket; Front Mount; Insulator Engine Mount
- Position: Driver Side
- Replaces: 52110089AB
- Item Weight: 11.30 Pounds
- Item Dimensions: 5.2 x 5.4 x 8.9 inches
- Condition: New
- Fitment Type: Direct Replacement
- SKU: 52110089AC
- Warranty: This genuine part is guaranteed by Mopar's factory warranty.


2004 Dodge Ram 1500 Motor Mount, Passenger Side Part Number: 52110086AC
$157.22 MSRP: $238.00You Save: $80.78 (34%)Ships in 1-2 Business DaysProduct Specifications- Other Name: Bracket - Engine Mount; Engine Mount, Right; Engine Mount Bracket; Front Mount; Insulator Engine Mount
- Position: Passenger Side
- Replaces: 52110086AB
- Item Weight: 7.50 Pounds
- Item Dimensions: 5.0 x 5.9 x 5.9 inches
- Condition: New
- Fitment Type: Direct Replacement
- SKU: 52110086AC
- Warranty: This genuine part is guaranteed by Mopar's factory warranty.

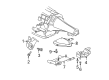
2004 Dodge Ram 1500 Mount Bracket, Driver Side Part Number: 52110055AH
$43.57 MSRP: $63.15You Save: $19.58 (32%)Ships in 1-2 Business DaysProduct Specifications- Other Name: Bracket - Engine Mount; Left Manual/Automatic Transmission Mount; Motor Mount; Bracket Engine Mount
- Position: Driver Side
- Replaces: 52110055AD, 52110055AF, 52110055AE, 52110055AG
- Item Weight: 9.00 Pounds
- Condition: New
- Fitment Type: Direct Replacement
- SKU: 52110055AH
- Warranty: This genuine part is guaranteed by Mopar's factory warranty.


2004 Dodge Ram 1500 Mount Bracket, Driver Side Part Number: 52110084AC
Product Specifications- Other Name: Bracket - Engine Mount; Automatic & Manual Transmission Mount Bracket, Left; Engine Mount Torque Strut; Motor Mount; Mount Brace; Bracket Engine Mount; Engine Mount Bracket
- Position: Driver Side
- Item Weight: 9.00 Pounds
- Item Dimensions: 20.7 x 11.6 x 5.3 inches
- Condition: New
- Fitment Type: Direct Replacement
- SKU: 52110084AC
- Warranty: This genuine part is guaranteed by Mopar's factory warranty.

 Product Specifications
- Other Name: Bracket - Engine Mount; Engine Mount, Right; Engine Mount Bracket; Front Mount; Insulator Engine Mount
- Position: Passenger Side
- Replaces: 52020604AC, 52020604AB
- Item Weight: 10.00 Pounds
- Item Dimensions: 3.3 x 4.8 x 10.5 inches
- Condition: New
- Fitment Type: Direct Replacement
- SKU: 52020604AD
- Warranty: This genuine part is guaranteed by Mopar's factory warranty.
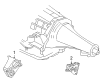
2004 Dodge Ram 1500 Mount Bracket, Driver Side Part Number: 52110053AD
Product Specifications- Other Name: Bracket - Engine Mount; Automatic Transmission Mount Bracket, Left; Motor Mount; Bracket Engine Mount
- Position: Driver Side
- Item Weight: 5.20 Pounds
- Item Dimensions: 14.1 x 8.2 x 5.1 inches
- Condition: New
- Fitment Type: Direct Replacement
- SKU: 52110053AD
- Warranty: This genuine part is guaranteed by Mopar's factory warranty.
2004 Dodge Ram 1500 Motor Mount, Driver Side Part Number: 52020605AC
Product Specifications- Other Name: Bracket - Engine Mount; Engine Mount, Left; Engine Mount Bracket; Front Mount; Insulator Engine Mount
- Position: Driver Side
- Replaces: 52020605AB
- Item Weight: 8.10 Pounds
- Item Dimensions: 7.1 x 5.8 x 5.2 inches
- Condition: New
- Fitment Type: Direct Replacement
- SKU: 52020605AC
- Warranty: This genuine part is guaranteed by Mopar's factory warranty.

 Product Specifications
- Other Name: Bracket - Engine Mount; Engine Mount, Right; Engine Mount Bracket; Front Mount; Insulator Engine Mount
- Position: Passenger Side
- Replaces: 52021600AC, 52021600AB, 52021600AD
- Item Weight: 7.10 Pounds
- Item Dimensions: 6.4 x 6.0 x 4.7 inches
- Condition: New
- Fitment Type: Direct Replacement
- SKU: 52021600AE
- Warranty: This genuine part is guaranteed by Mopar's factory warranty.
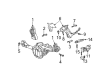
2004 Dodge Ram 1500 Motor Mount, Driver Side Part Number: 52020601AD
Product Specifications- Other Name: Bracket - Engine Mount; Engine Mount, Left; Engine Mount Bracket; Front Mount; Insulator Engine Mount
- Position: Driver Side
- Replaces: 52020601AC, 52020601AB
- Item Weight: 10.00 Pounds
- Item Dimensions: 7.7 x 5.6 x 5.4 inches
- Condition: New
- Fitment Type: Direct Replacement
- SKU: 52020601AD
- Warranty: This genuine part is guaranteed by Mopar's factory warranty.
- Product Specifications
- Other Name: Bracket - Engine Mount; Automatic & Manual Transmission Mount Bracket, Right; Motor Mount; Bracket Engine Mount
- Position: Passenger Side
- Replaces: 52020564AB
- Item Weight: 2.20 Pounds
- Item Dimensions: 6.2 x 5.3 x 3.0 inches
- Condition: New
- Fitment Type: Direct Replacement
- SKU: 52020564AC
- Warranty: This genuine part is guaranteed by Mopar's factory warranty.
- Product Specifications
- Other Name: Insulator - Engine Mount; Engine Mount, Right; Engine Mount Bracket; Front Mount; Insulator Engine Mount
- Position: Passenger Side
- Replaces: 52020602AC
- Item Weight: 7.20 Pounds
- Item Dimensions: 4.9 x 5.4 x 6.8 inches
- Condition: New
- Fitment Type: Direct Replacement
- SKU: 52020602AD
- Warranty: This genuine part is guaranteed by Mopar's factory warranty.

2004 Dodge Ram 1500 Motor Mount, Driver Side Part Number: 5037425AA
Product Specifications- Other Name: Insulator - Engine Mount; Engine Mount, Left; Engine Mount Bracket; Front Mount; Insulator Engine Mount
- Position: Driver Side
- Item Weight: 5.10 Pounds
- Item Dimensions: 6.4 x 4.4 x 3.7 inches
- Condition: New
- Fitment Type: Direct Replacement
- SKU: 5037425AA
- Warranty: This genuine part is guaranteed by Mopar's factory warranty.
2004 Dodge Ram 1500 Motor Mount, Passenger Side Part Number: 5037424AA
Product Specifications- Other Name: Insulator - Engine Mount; Engine Mount, Right; Engine Mount Bracket; Front Mount; Insulator Engine Mount
- Position: Passenger Side
- Item Weight: 5.60 Pounds
- Condition: New
- Fitment Type: Direct Replacement
- SKU: 5037424AA
- Warranty: This genuine part is guaranteed by Mopar's factory warranty.
2004 Dodge Ram 1500 Engine Mount Parts and Q&A
- Q: How to Service and Repair a Front Engine Mount on a 2WD on 2004 Dodge Ram 1500?A: Before servicing the front engine mount on a 2WD, first take out the negative battery cable. Remove the viscous fan to avoid hurting the fan blade, fan clutch and fan shroud. Move the vehicle higher and get rid of the engine oil filter and oil drain plates. Find the proper place for your jack to hold up the engine and place a piece of wood across the engine oil pan in line with the jack. Secondly, jack up the front axle in a similar supportive way. Release all seven bolts from the engine mounts at the front axle and the left engine bracket and let the front axle lower onto the jack stands. With the through bolts out, rise the engine enough to take out the engine mounts on both sides and then remove the attaching bolts from the engine as well. When installing, put adhesive and medium strength threadlocker on the bolts between the engine block and mount and the bolts joining the left bracket to the front axle. Place the right and left side engine mounts onto the block, then connect them using the eight bolts and turn them to 54 Nm (40 ft. lbs.). Set the two through bolts in the left and right engine mounts and only tighten the nuts slightly on them. Unscrew the engine until you can slip the through bolts into the slots on the brackets and tighten each to 94 Nm (70 ft. lbs.) using the through bolt nuts. After that, mount the oil drain system, attach the engine oil filter, lift the car, install the viscous fan and reconnect the battery's negative cord.
Related 2004 Dodge Ram 1500 Parts
 2004 Dodge Ram 1500 Oil Pump
 2004 Dodge Ram 1500 Timing Chain
 2004 Dodge Ram 1500 Camshaft Thrust Plate
 2004 Dodge Ram 1500 Crankshaft Pulley
 2004 Dodge Ram 1500 Crankshaft Seal
 2004 Dodge Ram 1500 Crankshaft Thrust Washer Set
 2004 Dodge Ram 1500 Cylinder Head Gasket
 2004 Dodge Ram 1500 Dipstick
 2004 Dodge Ram 1500 Dipstick Tube
 2004 Dodge Ram 1500 Harmonic Balancer
 2004 Dodge Ram 1500 Valve Cover Gasket
 2004 Dodge Ram 1500 Valve Stem Seal