JeepParts
My Garage
My Account
Cart
OEM 2004 Jeep Grand Cherokee Camshaft Position Sensor
Cam Position Sensor- Select Vehicle by Model
- Select Vehicle by VIN
Select Vehicle by Model
orMake
Model
Year
Select Vehicle by VIN
For the most accurate results, select vehicle by your VIN (Vehicle Identification Number).
2 Camshaft Position Sensors found


2004 Jeep Grand Cherokee Camshaft Position Sensor Part Number: 56041584AF
$104.81 MSRP: $157.00You Save: $52.19 (34%)Product Specifications- Other Name: Sensor - Camshaft; Engine Camshaft Position Sensor; Camshaft Sensor; Sensor Camshaft
- Replaces: 56041584AE, 56028133AE, 56028133AD, 56041584AC
- Item Weight: 0.50 Pounds
- Item Dimensions: 1.4 x 2.1 x 4.0 inches
- Condition: New
- Fitment Type: Direct Replacement
- SKU: 56041584AF
- Warranty: This genuine part is guaranteed by Mopar's factory warranty.


 Product Specifications
- Other Name: Sensor - Camshaft; Engine Camshaft Position Sensor; Cam Sensor; Sensor Camshaft
- Item Weight: 0.50 Pounds
- Item Dimensions: 1.2 x 2.1 x 2.8 inches
- Condition: New
- Fitment Type: Direct Replacement
- SKU: 4897023AA
- Warranty: This genuine part is guaranteed by Mopar's factory warranty.
2004 Jeep Grand Cherokee Camshaft Position Sensor Parts and Q&A
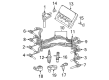
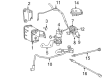
- Q: How to Remove and Install a Camshaft Position Sensor on a 6-Cylinder Engine on 2004 Jeep Grand Cherokee?A: The Camshaft Position Sensor (Cmp) on the 6-cylinder engine is mounted over the oil pump drive shaft on the right side, close to the oil filter and tells the computer where to deliver fuel so that the engine runs efficiently but does not control when the fuel is ignited. Release the electrical wire, remove both of the nuts holding the sensor and separate the sensor from the oil pump drive. If you're removing the Cmp and oil pump drive together, make sure the engine crankshaft does not rotate so that the Cmp sensor remains in place. Unplug the electrical connector, pull out the sensor and mark where the oil pump drive sits relative to the engine piece. After this, remove the bolt that locks everything down and mark the position and direction of the pulse ring and slot at the top of the gear. Throw the old oil pump drive-to-engine block gasket away. When installing, remove dirt from the oil pump drive mounting hole, attach a new gasket and place a toothpick in the access hole onto the pulse ring to keep it in place. Place the oil pump drive into the engine so that it lines up with the pump, rotate the driveshaft back as you did before and then use your fingers to tighten the hold-down clamp bolt. If the engine crankshaft or camshaft has rotated, reset the relationship between the Cmp sensor by taking out the ignition coil rail assembly and cylinder number 1 spark plug, then rotating the engine until you detect compression and position the timing index mark with the Top Dead Center (Tdc) mark. Drop the oil pump drive onto the engine block so it sits level and then place the sensor on the oil pump drive with the Cmp sensor pointing towards the rear side of the block. Apply 2 Nm (15 in. lbs.) to the two mounting bolts and then plug in the electrical connector. After removal, install the spark plug and ignition coil rail once again. To confirm that the oil pump drive is in the right rotational position, insert the scan tool into the data link connector which is near the driver, open the Set Sync screen and turn the engine on. The frame on the screen should show In Range and 0° while the engine runs without pressure on the oil pump drive already in place. When you see a plus (+) or minus (-) next to the degree symbol or if the number is not 0, use the hold-down clamp bolt to loosen the drive and turn it so In Range appears. Aim to get the value close to 0° which will improve fuel synchronization. After that, turn the hold-down clamp bolt until it reaches 23 Nm (17 ft. lbs.).
Related 2004 Jeep Grand Cherokee Parts
 2004 Jeep Grand Cherokee Coolant Temperature Sensor
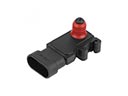 2004 Jeep Grand Cherokee MAP Sensor
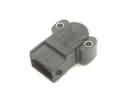 2004 Jeep Grand Cherokee Throttle Position Sensor
 2004 Jeep Grand Cherokee Ignition Switch
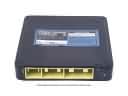 2004 Jeep Grand Cherokee Engine Control Module
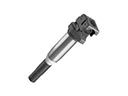 2004 Jeep Grand Cherokee Ignition Coil
 2004 Jeep Grand Cherokee Ignition Lock Cylinder
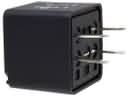 2004 Jeep Grand Cherokee Relay
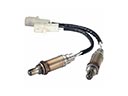 2004 Jeep Grand Cherokee Oxygen Sensor
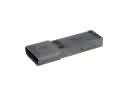 2004 Jeep Grand Cherokee Ignition Control Module
 2004 Jeep Grand Cherokee Ignition Lock Assembly
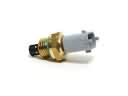 2004 Jeep Grand Cherokee Intake Manifold Temperature Sensor