JeepParts
My Garage
My Account
Cart
OEM 2005 Chrysler 300 Brake Caliper
Caliper- Select Vehicle by Model
- Select Vehicle by VIN
Select Vehicle by Model
orMake
Model
Year
Select Vehicle by VIN
For the most accurate results, select vehicle by your VIN (Vehicle Identification Number).
10 Brake Calipers found

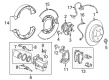
2005 Chrysler 300 Caliper, Rear Driver Side Part Number: 68548611AA
$82.71 MSRP: $180.00You Save: $97.29 (55%)Ships in 1-2 Business DaysProduct Specifications- Other Name: Caliper - Disc Brake; Disc Brake Caliper, Rear Left
- Position: Rear Driver Side
- Replaces: 5142563AA, 5142563AB
- Condition: New
- Fitment Type: Direct Replacement
- SKU: 68548611AA
- Warranty: This genuine part is guaranteed by Mopar's factory warranty.

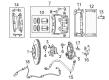
2005 Chrysler 300 Caliper Assembly, Front Driver Side Part Number: 68548603AA
$139.00 MSRP: $207.00You Save: $68.00 (33%)Ships in 1-2 Business DaysProduct Specifications- Other Name: Caliper - Disc Brake; Disc Brake Caliper, Front Left; Brake Caliper; Caliper
- Position: Front Driver Side
- Replaces: 5140824AA, 5142557AA, 5142557AB
- Condition: New
- Fitment Type: Direct Replacement
- SKU: 68548603AA
- Warranty: This genuine part is guaranteed by Mopar's factory warranty.
2005 Chrysler 300 Caliper Assembly, Front Passenger Side Part Number: 68548602AA
$100.95 MSRP: $219.00You Save: $118.05 (54%)Ships in 1-2 Business DaysProduct Specifications- Other Name: Caliper - Disc Brake; Disc Brake Caliper, Front Right; Brake Caliper; Caliper
- Position: Front Passenger Side
- Replaces: 5142556AA, 5140823AA, 5142556AB
- Condition: New
- Fitment Type: Direct Replacement
- SKU: 68548602AA
- Warranty: This genuine part is guaranteed by Mopar's factory warranty.
2005 Chrysler 300 Caliper, Rear Passenger Side Part Number: 68548610AA
$137.88 MSRP: $205.00You Save: $67.12 (33%)Ships in 1-3 Business DaysProduct Specifications- Other Name: Caliper - Disc Brake; Disc Brake Caliper, Rear Right; Brake Caliper
- Position: Rear Passenger Side
- Replaces: 5142562AA, 5142562AB
- Condition: New
- Fitment Type: Direct Replacement
- SKU: 68548610AA
- Warranty: This genuine part is guaranteed by Mopar's factory warranty.
2005 Chrysler 300 Caliper, Rear Driver Side Part Number: 68548609AA
$133.42 MSRP: $200.00You Save: $66.58 (34%)Product Specifications- Other Name: Caliper - Disc Brake; Disc Brake Caliper, Rear Left; Brake Caliper
- Position: Rear Driver Side
- Replaces: 5142565AB, 5142565AA
- Condition: New
- Fitment Type: Direct Replacement
- SKU: 68548609AA
- Warranty: This genuine part is guaranteed by Mopar's factory warranty.
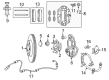
2005 Chrysler 300 Caliper Assembly, Front Passenger Side Part Number: 68548604AA
$168.42 MSRP: $250.00You Save: $81.58 (33%)Ships in 1-3 Business DaysProduct Specifications- Other Name: Caliper - Disc Brake; Disc Brake Caliper, Front Left, Front Right; Brake Caliper; Caliper
- Position: Front Passenger Side
- Replaces: 5137670AB, 5137670AA
- Condition: New
- Fitment Type: Direct Replacement
- SKU: 68548604AA
- Warranty: This genuine part is guaranteed by Mopar's factory warranty.
2005 Chrysler 300 Caliper, Rear Passenger Side Part Number: 68548608AA
$132.31 MSRP: $199.00You Save: $66.69 (34%)Ships in 1-2 Business DaysProduct Specifications- Other Name: Caliper - Disc Brake; Disc Brake Caliper, Rear Right; Brake Caliper
- Position: Rear Passenger Side
- Replaces: 5142564AA, 5142564AB
- Condition: New
- Fitment Type: Direct Replacement
- SKU: 68548608AA
- Warranty: This genuine part is guaranteed by Mopar's factory warranty.
2005 Chrysler 300 Caliper Assembly, Front Passenger Side Part Number: 68548605AA
$165.76 MSRP: $250.00You Save: $84.24 (34%)Product Specifications- Other Name: Caliper - Disc Brake; Disc Brake Caliper, Front Left, Front Right; Brake Caliper; Caliper
- Position: Front Passenger Side
- Replaces: 5137671AB, 5137671AA
- Condition: New
- Fitment Type: Direct Replacement
- SKU: 68548605AA
- Warranty: This genuine part is guaranteed by Mopar's factory warranty.

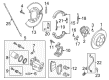
2005 Chrysler 300 Caliper Assembly, Silver, Rear Driver Side Part Number: 5174329AA
$556.24 MSRP: $844.00You Save: $287.76 (35%)Ships in 1-2 Business DaysProduct Specifications- Other Name: Caliper - Disc Brake; Disc Brake Caliper, Rear Left; Caliper; Caliper Assembly Disc Brake Rear; Caliper Disc Brake; Brake Caliper
- Position: Rear Driver Side
- Item Weight: 6.10 Pounds
- Item Dimensions: 9.5 x 9.5 x 8.9 inches
- Condition: New
- Fitment Type: Direct Replacement
- SKU: 5174329AA
- Warranty: This genuine part is guaranteed by Mopar's factory warranty.
2005 Chrysler 300 Caliper Assembly, Silver, Rear Passenger Side Part Number: 5174328AA
$521.98 MSRP: $791.00You Save: $269.02 (35%)Ships in 1-2 Business DaysProduct Specifications- Other Name: Caliper - Disc Brake; Disc Brake Caliper, Rear Right; Caliper; Caliper Assembly Disc Brake Rear; Caliper Disc Brake; Brake Caliper
- Position: Rear Passenger Side
- Item Weight: 5.80 Pounds
- Item Dimensions: 9.7 x 9.8 x 9.2 inches
- Condition: New
- Fitment Type: Direct Replacement
- SKU: 5174328AA
- Warranty: This genuine part is guaranteed by Mopar's factory warranty.
2005 Chrysler 300 Brake Caliper Parts and Q&A
- Q: How to Service and Repair a Brake Caliper on Rear Disc Brakes on 2005 Chrysler 300?A: The first step to repairing the rear disc brake caliper is to disconnect and isolate the battery's negative cable from the post. Slide a brake pedal holding tool onto the pedal and press it all the way in to avoid the master cylinder from losing brake fluid through the lines while you change them out. Hold and lift the car until the wheels are off the ground; then remove both the wheel mounting nuts and the tire. Loosen the banjo bolt holding the brake line to the caliper, throw out the old washers and insert new ones when reassembling the system. Removing the bolts of the guide pins, take the caliper off the adapter and remove it from the brake pads as well. Drain the brake fluid out of the caliper, then put the caliper in a vise with safe jaws. Put a slightly padded wooden block in front of the caliper piston when removing it. With every short burst of low pressure air, fill the fluid inlet of the caliper to make the piston slide out of the bore, then you can remove it. Remove and disposing of the dust boot, then gently pull out and remove the piston seal from the groove. After drinking alcohol or a suitable solvent in the piston bore and through the drilled passages, carefully inspect both items for signs of damage. First, dampen the caliper with a fine spray of water, then wipe it clean by lightly rubbing any loose bits onto a damp cloth while holding asbestos fragments in a secure container. Flush the inside of the brakes either with fresh brake fluid or Mopar Non-Chlorinated Brake Parts Cleaner, to make sure other fluids do not harm the rubber parts. Check for damage, leaks or even just ordinary wear in the caliper and if yours is not up to par, either repair it or exchange it with a fresh unit. When putting everything together, clean and dry the place you will work, grease the caliper piston, piston seal and bore with clean brake fluid and fit a new piston seal in the proper groove. Fit a fresh dust boot onto the piston and press it down to make sure it is seated, then slide the piston into the bore. With Special Tool 9314 and Handle Special Tool C-4171, set the dust boot in the caliper counterbore until it is only slightly tight. Set the bleeder screw into the indicated hole, tighten it to 15 Nm and after that install the caliper on the vehicle. Be sure to draw back the caliper piston and use a wood block during installation. Place the caliper perfectly within the brake pads and caliper adapter and make sure not to misdrive the guide pin bolts on them; they need to be tightened to 60 Nm torque. Fit new washers onto the banjo bolt and tighten it to 43 Nm torque before replacing the tire and wheel assembly which should then have its wheel mounting nuts tightened to 150 Nm torque. Place the vehicle on the floor, get rid of the brake pedal holding tool, complete the battery negative connection, bleed any air in the brake system and drive on the road to confirm everything is correct.
Related 2005 Chrysler 300 Parts
 2005 Chrysler 300 ABS Control Module
 2005 Chrysler 300 Brake Caliper Bracket
 2005 Chrysler 300 Brake Caliper Piston
 2005 Chrysler 300 Brake Disc
 2005 Chrysler 300 Brake Dust Shield
 2005 Chrysler 300 Brake Line
 2005 Chrysler 300 Brake Pad
 2005 Chrysler 300 Hydraulic Hose
 2005 Chrysler 300 Parking Brake Cable
 2005 Chrysler 300 Parking Brake Shoe
 2005 Chrysler 300 Wheel Bearing Dust Cap
 2005 Chrysler 300 Wheel Stud