JeepParts
My Garage
My Account
Cart
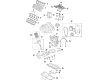
OEM 2005 Dodge Durango Piston
Engine Pistons- Select Vehicle by Model
- Select Vehicle by VIN
Select Vehicle by Model
orMake
Model
Year
Select Vehicle by VIN
For the most accurate results, select vehicle by your VIN (Vehicle Identification Number).
4 Pistons found


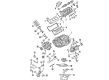
2005 Dodge Durango Piston Part Number: 68233351AA
Product Specifications- Replaces: 5012362AF, 5012362AE, 5012362AC, 5012362AD
- Item Weight: 3.00 Pounds
- Item Dimensions: 10.5 x 6.3 x 6.5 inches
- Condition: New
- Fitment Type: Direct Replacement
- SKU: 68233351AA
- Warranty: This genuine part is guaranteed by Mopar's factory warranty.


2005 Dodge Durango Piston Part Number: 5086010AB
Product Specifications- Other Name: Piston Pin And Rod; Piston Pin And Rod See Note; Piston Pin And Rod
- Item Weight: 3.10 Pounds
- Item Dimensions: 12.9 x 5.5 x 4.6 inches
- Condition: New
- Fitment Type: Direct Replacement
- SKU: 5086010AB
- Warranty: This genuine part is guaranteed by Mopar's factory warranty.


2005 Dodge Durango Piston Part Number: 5086011AB
Product Specifications- Other Name: Piston Pin And Rod; Piston Pin And Rod
- Item Weight: 3.10 Pounds
- Item Dimensions: 12.7 x 5.6 x 4.4 inches
- Condition: New
- Fitment Type: Direct Replacement
- SKU: 5086011AB
- Warranty: This genuine part is guaranteed by Mopar's factory warranty.


2005 Dodge Durango Piston Part Number: 5019316AC
Product Specifications- Replaces: 5019316AA, 5019316AB
- Item Weight: 3.30 Pounds
- Item Dimensions: 11.3 x 7.3 x 6.9 inches
- Condition: New
- Fitment Type: Direct Replacement
- SKU: 5019316AC
- Warranty: This genuine part is guaranteed by Mopar's factory warranty.
2005 Dodge Durango Piston Parts and Q&A
- Q: How to Safely Remove and Replace a Piston in an Engine on 2005 Dodge Durango?A: Before you can change the piston, first disconnect the battery's negative cable, take out the oil pan and gasket/windage tray and then remove the cylinder head(s). Should that be required, use a secure ridge reamer to remove the high point from the cylinder bores and be sure the tops of the pistons are still hidden. Lift out the piston and connecting rod assemblies from the cylinder block, ensuring you turn the crankshaft to make each connecting rod sit in the center of its bore. Don't mark the connecting rods or caps with a punch or stamp, as this can damage them and use a permanent marker or scribe tool to label the positions of the connecting rods and bearing caps, being careful not to harm the surfaces where the damaged joints meet. Take out the cap from the connecting rod and slide Special Tool 8507 Connecting Rod Guides into the rod, then use them to take out the piston from the cylinder bore. Carry out this for every piston. After you remove the bearing cap, set it on the connecting rod quickly to protect it from damage. To clean the engine, don't use a wire brush or abrasive cleaning tool on pistons or rods because of the Moly coat, as a solvent in warm water and wiped with a towel on the pistons and a wood or plastic scraper on the ring land grooves is safer. Be sure to examine the connecting rod journal for any sign of marked wear, outward taper or scratching and then check the rod for any bowing or bending, as well as checking the piston for tapering, being more in shape than round, scores and breaks in the ring lands. To do the installation, start by adding the piston rings, then oil the piston head and rings before putting a ring compressor over them so the rings don't move. Put the bearing hole and connecting rod hole in line and rub engine oil on the bearing's surface. Raise Special Tool 8507 over the bolt threads on the connecting rod and install the connecting rod guides. The pistons have an "F" impressed into them which proves that they should go into the engine facing toward the front, as should the connecting rod oil slinger. First, clean and grease the inside cylinder with engine oil, then rotate the crankshaft so the rod journal is at the center and finally insert the rod and piston, directing the connecting rod onto the journal as you go. Place the hammer's handle over the piston and tap it down into the cylinder bore as you guide the connecting rod. Because Connecting Rod Bolts are Torque to Yield Bolts, it is important to replace them each time they are removed. Add engine oil to the rod bolts and the surface of the bearings, set the connecting rod cap and bearing in place and tighten the bolts up to 27 Nm (20 ft. lbs.) plus 90°. After that, put back the cylinder head(s), timing chain and cover, cylinder head covers and oil pan and gasket/windage tray, top off the crankcase with the right engine oil and reconnect the negative battery cable.
Related 2005 Dodge Durango Parts
 2005 Dodge Durango Oil Filter
 2005 Dodge Durango Camshaft
 2005 Dodge Durango Oil Pump
 2005 Dodge Durango Cam Gear
 2005 Dodge Durango Crankshaft Pulley
 2005 Dodge Durango Cylinder Head
 2005 Dodge Durango Dipstick
 2005 Dodge Durango Dipstick Tube
 2005 Dodge Durango Lash Adjuster
 2005 Dodge Durango Oil Pan Gasket
 2005 Dodge Durango Rocker Arm
 2005 Dodge Durango Valve Stem Seal