JeepParts
My Garage
My Account
Cart
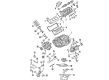
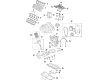
OEM 2006 Dodge Durango Piston
Engine Pistons- Select Vehicle by Model
- Select Vehicle by VIN
Select Vehicle by Model
orMake
Model
Year
Select Vehicle by VIN
For the most accurate results, select vehicle by your VIN (Vehicle Identification Number).
4 Pistons found


2006 Dodge Durango Piston Part Number: 68233351AA
Product Specifications- Replaces: 5012362AF, 5012362AE, 5012362AC, 5012362AD
- Item Weight: 3.00 Pounds
- Item Dimensions: 10.5 x 6.3 x 6.5 inches
- Condition: New
- Fitment Type: Direct Replacement
- SKU: 68233351AA
- Warranty: This genuine part is guaranteed by Mopar's factory warranty.


2006 Dodge Durango Piston Part Number: 5019316AC
Product Specifications- Replaces: 5019316AA, 5019316AB
- Item Weight: 3.30 Pounds
- Item Dimensions: 11.3 x 7.3 x 6.9 inches
- Condition: New
- Fitment Type: Direct Replacement
- SKU: 5019316AC
- Warranty: This genuine part is guaranteed by Mopar's factory warranty.

2006 Dodge Durango Piston Part Number: 5086011AC
Product Specifications- Other Name: Piston Pin And Rod See Note; Piston Pin And Rod See Note; Piston Pin And Rod
- Item Weight: 2.70 Pounds
- Item Dimensions: 12.8 x 5.7 x 4.6 inches
- Condition: New
- Fitment Type: Direct Replacement
- SKU: 5086011AC
- Warranty: This genuine part is guaranteed by Mopar's factory warranty.

2006 Dodge Durango Piston Part Number: 5086010AC
Product Specifications- Other Name: Piston Pin And Rod
- Item Weight: 2.60 Pounds
- Condition: New
- Fitment Type: Direct Replacement
- SKU: 5086010AC
- Warranty: This genuine part is guaranteed by Mopar's factory warranty.
2006 Dodge Durango Piston Parts and Q&A
- Q: How to Remove and Replace Piston Assemblies on 2006 Dodge Durango?A: In order to eliminate and change out the piston and connecting rod sets, the following must be done, the negative battery cable must be disconnected, the oil pan and oil pan gasket / windage tray eliminated, together with the cylinder head(s). Cover tops of pistons with ridge reamer(or a thoroughly dependable one if required) suitable to the rims of the bores of the cylinders in order to clean off the foremost ridges. Unbolt out of the top of the cylinder block the piston and connecting rod assemblies; this is done by rotating the crankshaft until each of the connecting rods rest in the center of the cylinder bore. Do not punch or stamp (with a number punch) the ends of the connecting rods or connecting cap ends to aid in the future identification, risking an unrepairable damaged rod and cap joint surfaces, and note their relative locations with a permanent ink marker or scribe tool. Unscrew the connecting rod cap and put Special Tool 8507 Connecting Rod Guides into the retiring connecting rod and withdraw the piston out of the pillar bore and so in case of each piston. Install a bearing cap on the mating connecting rod immediately after the operation because, otherwise, the mating connecting rod will be damaged. Clean with appropriate solvent the pistons in the warm water and dry with towels, wood or plastic scraper in the grooves of ring lands, and leave the piston pin in the piston and connecting rod assembly. Examine the connecting rod journal that would not be excessive worn or tapered or scored and check connecting rod run down or out of twist or bent. Look at the piston to see whether taper, elliptical contours, and scoring/scraping mark the skirts, and inspect the ring lands to see whether they are corroded or cracked. As far as installation is concerned, first put in the piston rings and then dip the piston head and the rings in to clean engine oil, place a ring compressor over it and tighten it to make sure the rings do not move. Position the bearing on the connecting rod with hole in the bearing shell pointing at hole in the connecting rod, and pour some clean engine oil on the surface of the bearing. Insert Connecting rod. 8507 Special tool guides connect rod threads in the connecting rods. There is a raised F on the pistons noting the direction of installation, which should be pointing front of the engine on either side of the cyl attended cylinder bank, the slot on the connecting rod oil slinger should point the front also. Insert the cylinder bore with engine oil and clean and lubricate it, turn the crankshaft, so that the crankshaft journal on the connecting rod centres in the cylinder bore. Push the rod and piston in the bore and direct the connecting rod on to the rod journal tapping the piston with the handle of a hammer. Connecting Rod Bolts are Torque to Yield Bolts that must never be reused (and must be replaced whenever they are loosened, or pulled clear). Coat the rod bolts and bearing areas using engine oil, fit the connecting rod cap and bearing over it and close the bolt to 27Nm (20 ft. lbs) + 90. Lastly, replace the cylinder head(s), timing chain and cover, cylinder head covers, and oil pan and gasket/windage tray, renew the crankcase with the right engine oil to the right level and re-reengage the negative cable with the battery.
Related 2006 Dodge Durango Parts
 2006 Dodge Durango Oil Filter
 2006 Dodge Durango Camshaft
 2006 Dodge Durango Oil Pump
 2006 Dodge Durango Cam Gear
 2006 Dodge Durango Crankshaft Pulley
 2006 Dodge Durango Cylinder Head
 2006 Dodge Durango Dipstick
 2006 Dodge Durango Dipstick Tube
 2006 Dodge Durango Lash Adjuster
 2006 Dodge Durango Oil Pan Gasket
 2006 Dodge Durango Rocker Arm
 2006 Dodge Durango Valve Stem Seal