JeepParts
My Garage
My Account
Cart
OEM 2005 Dodge Ram 3500 Oil Pan
Oil Drain Pan- Select Vehicle by Model
- Select Vehicle by VIN
Select Vehicle by Model
orMake
Model
Year
Select Vehicle by VIN
For the most accurate results, select vehicle by your VIN (Vehicle Identification Number).
2 Oil Pans found


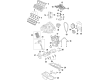
2005 Dodge Ram 3500 Oil Pan Part Number: 53021334AF
$206.21 MSRP: $304.00You Save: $97.79 (33%)Product Specifications- Other Name: Pan - Engine Oil; Engine Oil Pan; Pan Engine Oil
- Item Weight: 7.50 Pounds
- Item Dimensions: 25.3 x 10.4 x 8.4 inches
- Condition: New
- Fitment Type: Direct Replacement
- SKU: 53021334AF
- Warranty: This genuine part is guaranteed by Mopar's factory warranty.

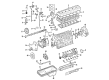
2005 Dodge Ram 3500 Oil Pan Part Number: 5086855AA
Product Specifications- Other Name: Pan - Engine Oil; Engine Oil Pan; Pan Engine Oil
- Item Weight: 8.30 Pounds
- Condition: New
- Fitment Type: Direct Replacement
- SKU: 5086855AA
- Warranty: This genuine part is guaranteed by Mopar's factory warranty.
2005 Dodge Ram 3500 Oil Pan Parts and Q&A
- Q: How to Remove and Install an Oil Pan on 2005 Dodge Ram 3500?A: To access the oil pan on a 4x4, open your hood and remove both negative cables from the battery, after which unscrew the bolts holding the intake air assembly and radiator shroud. Fix the #8534B engine support fixture, lift the car and release the engine oil. Take out the bolts from the front engine mount, lower the car and with engine support #8534B lift the engine out from front position. After removing the oil dipstick, lift and attend to the vehicle as before and use a hammer to break the pan's seal by removing the bolts. Lower the pan partway, remove the fasteners keeping the oil in place and then remove the oil pan and tube, as well as the two bolts at the front of the block stiffener. First, pull up the hood, clip the negative battery connectors, lift and support the vehicle, remove the transmission oil cooler lines, detach the propeller shaft and take out the bolts from the starter. With all this preparation done, it's time to take out the torque converter bolts, exhaust hanger bolts, gear shift cable, wiring harness, transmission mount and crossover bolts. Set the transmission jack, take out the bolts holding the bell housing, then the transmission and complete these steps with the flywheel housing bolts and flex plate bolts. Remove the oil first, after that, get rid of the steering rack bolts, the oil pan bolts and the oil pickup bolts to take off the oil pan. Scrub all gasket material off the sealing surfaces of the oil pan and cylinder block and clean the oil pan and flush the suction tube using a suitable fluid. Inspect the oil pan as well as the suction tube and tube braces for any signs of damage and if you find something broken, replace it. Look at the oil drain plug and drain hole threads too. Check the oil pan's sealing spot to see if it's level, fixing any very small issues with a ball-peen hammer, but try to stay away from welding. Before installing the cylinder on a 4x4, clean the sealing areas of the cylinder block and oil pan and also clean the oil pan and T-joints. Insert the pan rail/gear housing into the pan rail/rear seal retainer and apply Mopar onto the T-joint. With the right sealant, set the gasket on the oil pan and then install the suction tube, directing both pieces as you fit them. Apply new tube-to-block gaskets and ensure all the suction tightening bolts are hand snug, starting with the bolts on the oil pump, to 24 Nm (18 ft. lbs.) and hand-tighten the remaining bolts to 43 Nm (32 ft. lbs.). After starting in the middle, tighten the oil pan bolts to 28 Nm (21 ft. lbs.), attach the engine oil dipstick, engine block stiffener and flywheel to crankshaft adapter, torquing all to 137 Nm (101 ft. lbs.). First, lower the vehicle, next lower the engine into the motor mounts and finalize by tightening the through bolts to 88 NM or 64 ft. lbs. After removing the engine support fixture #8534B, fit the battery negative wires, fill up the engine with new oil, start the engine, check for leaks, turn off the engine to check the oil level and set it if required and then slide the fan and fan shroud into place. Next, treat a 4x2 setup by cleaning and sealing as explained, then put on the fresh gasket, insert the suction tube in the oil pan and install both parts. Follow the same steps as before for the suction tube bolts, then tighten the oil pan bolts, install the rack bolts, flex plate, flywheel to crankshaft adapter and set the transmission and transfer case into place. Screw the flywheel housing assembly to the starter motor, making sure that a new clamping ring is installed and securing them with 77 Nm (57 ft. lbs.). Put the EGR cooler, fan and fan shroud in place, take out the transmission jack, bolt in the crossmember and transmission mount, connect the wiring harness, gear shift cable, exhaust bolts, torque converter bolts, starter, starter bolts and transmission oil cooler lines. Afterward, attach the minus terminals from each battery and secure the hood.
Related 2005 Dodge Ram 3500 Parts
 2005 Dodge Ram 3500 Camshaft Seal
 2005 Dodge Ram 3500 Coolant Filter
 2005 Dodge Ram 3500 Crankshaft Seal
 2005 Dodge Ram 3500 Crankshaft Timing Gear
 2005 Dodge Ram 3500 Dipstick Tube
 2005 Dodge Ram 3500 Intake Valve
 2005 Dodge Ram 3500 Oil Pan Gasket
 2005 Dodge Ram 3500 Oil Pump
 2005 Dodge Ram 3500 Piston
 2005 Dodge Ram 3500 Rocker Arm
 2005 Dodge Ram 3500 Rod Bearing
 2005 Dodge Ram 3500 Valve Cover Gasket