JeepParts
My Garage
My Account
Cart
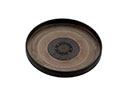
OEM Dodge Ram 3500 Oil Pan
Oil Drain Pan- Select Vehicle by Model
- Select Vehicle by VIN
Select Vehicle by Model
orMake
Model
Year
Select Vehicle by VIN
For the most accurate results, select vehicle by your VIN (Vehicle Identification Number).
10 Oil Pans found


Dodge Ram 3500 Oil Pan Part Number: 53021334AF
$204.39 MSRP: $304.00You Save: $99.61 (33%)


Dodge Ram 3500 Oil Pan Part Number: 68043300AA
$579.37 MSRP: $848.00You Save: $268.63 (32%)Ships in 1-2 Business Days


Dodge Ram 3500 Oil Pan Part Number: 53020914AB


Dodge Ram 3500 Oil Pan Part Number: 53020918


Dodge Ram 3500 Oil Pan Part Number: 68038821AA
$865.62 MSRP: $1265.00You Save: $399.38 (32%)
Dodge Ram 3500 Oil Pan Part Number: 53020920

Dodge Ram 3500 Oil Pan Part Number: 5086855AA

Dodge Ram 3500 Oil Pan Part Number: 4762073

Dodge Ram 3500 Oil Pan Part Number: 53020922AC
Dodge Ram 3500 Oil Pan Part Number: 5080632AA
Dodge Ram 3500 Oil Pan
Choose OEM Oil Pan that meet Dodge factory standards. Dodge designs and tests every component for precision and durability. Each Oil Pan follows strict manufacturing steps to lock in quality and fit. If your Dodge Ram 3500 matters to you, OEM parts make the smart choice. You'll get the exact look, feel, and performance you expect. Shop genuine Ram 3500 parts at the highly competitive prices online. Enjoy a manufacturer's warranty, a hassle-free return policy, and rapid delivery. No more guesswork with off brands. Get genuine parts with exact fit and true factory performance. Shop with confidence today at JeepPartsDeal.com.
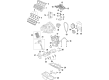
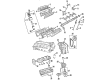
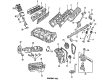
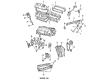
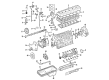
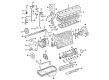
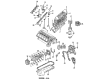
The Oil Pan in Dodge Ram 3500 is the component which holds the engine oil in order to lubricate and help to cool the engine. Built as a part of the engine, Wet Sump System employs Oil Pan that collects oil that is drawn by the oil pump through a pickup tube. This design enables the oil to return to the Oil Pan after performing its function of lubrication of the variousparts of the engine. Traditionally, Dodge Ram 3500 Oil Pans were constructed out of stamped steel, new models are more commonly comprised of cast aluminum for greater strength and performance. Some of the operational scenarios that the Oil Pan has to be configured to include adequate oil supply and no leakage.
Dodge Ram 3500 Oil Pan Parts and Q&A
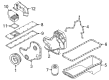
- Q: How to Remove the Oil Pan from an Engine on Dodge Ram 3500?A:Before removing the engine oil pan, take out the negative Battery Cable and fasten Engine Support Fixture 8534B to the vehicle without jacking up the engine. To take out the Engine Mount to frame bolt, on 2WD vehicles remove each bolt, but on 4WD vehicles loosen the left and right mount bolts and remove only the lower bolt from each side, while always noting the slot at the upper hole in the bracket. After that, take off the structural cover and get rid of the engine oil. Remove the front crossmember, but be sure the engine is only raised a little to give enough space for the oil pan while checking close to the fan shroud to fan and cowl to Intake Manifold. To give you space to remove the oil pan, use Engine Support Fixture 8534B to raise the engine. Uninstall the Transmission Mount to crossmember bolts, then, using the right transmission jack, raise the transmission up about 3 inches. Don't try to remove the gasket from the oil pan since the gasket holds the engine windage tray in place. Unfasten the oil pan bolts in the stated order and then bring out the oil pan, placing the double-ended oil pan studs where they belong. After unbolting the oil pump pickup tube, disconnect it and place a new oil pan gasket/windage tray assembly, as a worn gasket cannot be reused. Steps 9 and 11 on page 32 require you to discard the old integral windage tray and gasket and fit new ones.
- Q: How to Install an Oil Pan on Dodge Ram 3500?A:Before anything else, ensure the gasket-matching parts on the block and the oil pan are cleaned. Cover the 4 T-joints with Mopar(R) Engine RTV so the bead squares off with the bottom of the gasket in an area about 4.5 mm x 25 mm at every location. The new integral windage tray and gasket should be put in, because the old gasket cannot be saved. Replace the old o-ring in the oil pump pickup tube and tighten the tube to the pump fasteners until they reach 28 Nm (250 in. lbs.). Applying the studs to the double-ended oil pan set them back in the spot they were originally located. Attach the oil pan and use an angle torque wrench to tighten all bolts and studs to 12 Nm (105 in.lbs.) as described. Put the transmission onto the crossmember, arrange the nuts and tighten them up. Lower the engine onto its location in the mounts using Engine Support Fixture 8534B. First, fix the left-side engine mount bolt and hand-screw the right-side bolt on a 2WD car. Tighten the nuts for both mounts to 68 Nm (50 ft. lbs.). On 4WD vehicles, use both sides of the bracket to attach the engine mount bolts and tighten the nuts to 68 Nm (50 ft. lbs.). Take out Engine Support Fixture 8534B. Place the structural cover and the front crossmember in position. Put oil into the engine, attach the negative Battery Cable and then turn on the car to check for leakage.


Related Dodge Ram 3500 Parts
 Dodge Ram 3500 Camshaft Plug
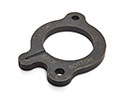 Dodge Ram 3500 Camshaft Thrust Plate
 Dodge Ram 3500 Coolant Filter
 Dodge Ram 3500 Crankshaft Timing Gear
 Dodge Ram 3500 Engine Mount Bracket
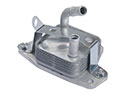 Dodge Ram 3500 Engine Oil Cooler
 Dodge Ram 3500 Oil Pump Rotor Set
 Dodge Ram 3500 Piston Ring Set
 Dodge Ram 3500 Rocker Shaft Spring Kit
 Dodge Ram 3500 Timing Chain Tensioner
 Dodge Ram 3500 Timing Cover
 Dodge Ram 3500 Valve Cover Gasket
Browse Dodge Ram 3500 Oil Pan by Years
2010 2009 2008 2007 2006 2005 2004 2003 2002 2001 2000 1999 1998 1997 1996 1995 1994