JeepParts
My Garage
My Account
Cart
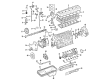
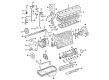
OEM 2005 Dodge Ram 3500 Crankshaft Seal
- Select Vehicle by Model
- Select Vehicle by VIN
Select Vehicle by Model
orMake
Model
Year
Select Vehicle by VIN
For the most accurate results, select vehicle by your VIN (Vehicle Identification Number).
5 Crankshaft Seals found


2005 Dodge Ram 3500 Rear Main Seal Retainer Part Number: 5086755AC
$167.33 MSRP: $252.00You Save: $84.67 (34%)Ships in 1-2 Business DaysProduct Specifications- Other Name: Retainer - Crankshaft Rear Oil Seal; Retainer Crankshaft Rear Oil Seal; serviced individually.
- Position: Rear
- Replaces: 5086755AB
- Item Weight: 1.90 Pounds
- Item Dimensions: 2.7 x 11.9 x 12.1 inches
- Condition: New
- Fitment Type: Direct Replacement
- SKU: 5086755AC
- Warranty: This genuine part is guaranteed by Mopar's factory warranty.


2005 Dodge Ram 3500 Oil Seal, Front Part Number: 68426385AA
$43.93 MSRP: $65.00You Save: $21.07 (33%)Ships in 1-2 Business DaysProduct Specifications- Other Name: Seal - Crankshaft Oil; Engine Crankshaft Seal, Front; Front Crank Seal; Outer Timing Cover Seal; Seal Crankshaft Oil Front; Crankshaft Seal
- Position: Front
- Item Weight: 0.50 Pounds
- Item Dimensions: 3.4 x 3.5 x 0.7 inches
- Condition: New
- Fitment Type: Direct Replacement
- SKU: 68426385AA
- Warranty: This genuine part is guaranteed by Mopar's factory warranty.


2005 Dodge Ram 3500 Rear Main Seal Part Number: 53021335AE
$97.59 MSRP: $142.00You Save: $44.41 (32%)Product Specifications- Other Name: Retainer - Crankshaft Rear Oil Seal; Engine Crankshaft Seal, Rear; Rear Main Seal Retainer; Crankshaft Rear Oil Seal not included with Long Block Engine Install Kit.
- Position: Rear
- Replaces: 53021335AD, 53021338AB, 68017721AA, 53021335BA, 53021335AC, 68060342AA, 5140028AA
- Item Weight: 3.10 Pounds
- Item Dimensions: 1.3 x 10.2 x 14.9 inches
- Condition: New
- Fitment Type: Direct Replacement
- SKU: 53021335AE
- Warranty: This genuine part is guaranteed by Mopar's factory warranty.


2005 Dodge Ram 3500 Oil Seal, Front Part Number: 53021585AD
$24.97 MSRP: $36.70You Save: $11.73 (32%)Product Specifications- Other Name: Seal - Crankshaft Oil; Front Engine Crankshaft Seal; Timing Cover Seal; Gasket; Crankshaft Seal; Front Seal included with Long Block Engine Install Kit.
- Position: Front
- Replaces: 53021585AB
- Item Weight: 0.50 Pounds
- Item Dimensions: 1.1 x 3.3 x 3.3 inches
- Condition: New
- Fitment Type: Direct Replacement
- SKU: 53021585AD
- Warranty: This genuine part is guaranteed by Mopar's factory warranty.

2005 Dodge Ram 3500 Rear Main Seal Part Number: 68444256AA
$134.26 MSRP: $197.00You Save: $62.74 (32%)Ships in 1-2 Business DaysProduct Specifications- Other Name: Seal Kit - Crankshaft Oil; Engine Crankshaft Seal, Rear; Seal Crankshaft Oil Rear; Engine Crankshaft Seal; Crankshaft Seal
- Position: Rear
- Replaces: 5114027AA, 68086401AA, 68142421AA, 5015705AA
- Item Weight: 1.10 Pounds
- Item Dimensions: 8.0 x 7.8 x 1.6 inches
- Condition: New
- Fitment Type: Direct Replacement
- SKU: 68444256AA
- Warranty: This genuine part is guaranteed by Mopar's factory warranty.
2005 Dodge Ram 3500 Crankshaft Seal Parts and Q&A
- Q: How to Service and Repair a Front Crankshaft Seal on 2005 Dodge Ram 3500?A: The first step in fixing or repairing a front crankshaft seal is to unhook both battery negative cables and lift the car onto the hoist. Partially empty the engine coolant into a safe container after which you should lower the vehicle. Remove the hose from the radiator upper part, detach the coolant recovery bottle from the radiator and unplug the windshield washer pump and its electrical connections to lift the washer bottle off the fan shroud. Then, take out the fan/drive unit, cooling fan shroud and fan assembly and then remove the accessory drive belt and cooling fan support/hub from in front of the engine. Raise the vehicle a second time to take off the crankshaft damper and speed indicator ring, the power steering pump and the accessory drive belt tensioner. Pull out the cover-to-housing bolts, carefully lift the cover from the housing, making sure not to ruin the gasket surfaces and then remove the crank seal dust shield with the cover. Place the covered surface, with the block over, on a flat table and gently hammer out the old seal using a suitable punch and hammer. Be sure neither the lip nor the crankshaft has oil on it before installation to prevent leaks and remember to clean the mating surfaces of the cover and housing gasket carefully. Look at the gear housing and cover for any cracks, fix any bends and examine the front journal of the crankshaft for signs of grooves or nicks. Coat the outside edge of the new Mopar® seal with Mopar® Stud & Bearing Mount but do not lubricate the inside diameter. With the cover supported by wood blocks, place the seal into the cover's rear, using Special Tool 8281 and the driver handle and hit driver handle until it reaches the lowest position. Screw on the plastic seal pilot given with the seal kit into the crankshaft seal and then coat the gear housing cover sealing surface with Mopar® Silicone Rubber Adhesive Sealant. Connect the cover to the gear housing, causing the seal pilot to match with the crankshaft nose and secure the cover bolts to 24 Nm (18 ft. lbs.). Then remove the pilot tool. After installing the dust barrier, place the crankshaft damper and speed indicator on the engine, torquing all their bolts to 40 Nm (30 ft. lbs.) and turn the engine an additional 60° using the barring tool. Place the fan support/hub assembly over the axle and turn the bolts by hand so they reach 32 Nm (24 ft. lbs.). Then reattach the power steering pump and accessory drive belt tensioner, tightening the mounting bolt to 43 Nm (32 ft. lbs.). Cooling fan, accessory drive belt and cooling system back in place, hook the battery's negative cables, wait for the oil to drain and turn on the engine to check for any oil leaks.
Related 2005 Dodge Ram 3500 Parts
 2005 Dodge Ram 3500 Oil Filter
 2005 Dodge Ram 3500 Coolant Filter
 2005 Dodge Ram 3500 Lash Adjuster
 2005 Dodge Ram 3500 Oil Filler Cap
 2005 Dodge Ram 3500 Oil Pan
 2005 Dodge Ram 3500 Oil Pump
 2005 Dodge Ram 3500 Piston Ring Set
 2005 Dodge Ram 3500 Pushrod
 2005 Dodge Ram 3500 Rod Bearing
 2005 Dodge Ram 3500 Timing Cover
 2005 Dodge Ram 3500 Transmission Mount
 2005 Dodge Ram 3500 Valve Cover Gasket