JeepParts
My Garage
My Account
Cart
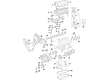
OEM 2006 Chrysler Pacifica Piston
Engine Pistons- Select Vehicle by Model
- Select Vehicle by VIN
Select Vehicle by Model
orMake
Model
Year
Select Vehicle by VIN
For the most accurate results, select vehicle by your VIN (Vehicle Identification Number).
2 Pistons found


2006 Chrysler Pacifica Piston Part Number: 68067541AA
$253.77 MSRP: $292.00You Save: $38.23 (14%)Ships in 1-2 Business DaysProduct Specifications- Replaces: 5102235AA
- Item Weight: 3.10 Pounds
- Item Dimensions: 13.4 x 6.1 x 4.4 inches
- Condition: New
- Fitment Type: Direct Replacement
- SKU: 68067541AA
- Warranty: This genuine part is guaranteed by Mopar's factory warranty.


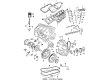
2006 Chrysler Pacifica Piston Part Number: 4666129AA
$227.63 MSRP: $347.00You Save: $119.37 (35%)Ships in 1-2 Business DaysProduct Specifications- Other Name: Piston Pin And Rod; Piston Pin And Rod
- Replaces: 5019338AB
- Item Weight: 4.30 Pounds
- Item Dimensions: 10.6 x 6.3 x 6.6 inches
- Condition: New
- Fitment Type: Direct Replacement
- SKU: 4666129AA
- Warranty: This genuine part is guaranteed by Mopar's factory warranty.
2006 Chrysler Pacifica Piston Parts and Q&A
- Q: How to Properly Remove and Install a Piston in an Engine on 2006 Chrysler Pacifica?A: For removing the piston and connecting rod, begin by getting rid of both the cylinder heads and the oil pan. Use a solid reamer to take out the top piece of every cylinder while keeping the piston tops from being damaged. It's important to take out the pistons and connecting rods from the top of the cylinder block with the crankshaft turned to center each connecting rod. Examine the connecting rods and caps so you can tell the cylinders apart and place markings as required. Measure piston to rod position, then install anchors on the connecting rod and take off the cap to push each piston and rod assembly from the cylinder, making certain you do not scratch the crankshaft journals. Following removal, put the bearing cap back in place on the other rod. Starting the installation, put the piston rings in place and examine the connecting rod bearing caps carefully for damage; change any that seem to be damaged from normal wear. Test the connecting rod bolts by laying a straight edge across their threads, changing those that are shorter than the edge. Please note that each gap for the compression ring needs to be staggered before you mount the pistons and connecting rod into the bore. Coat the piston head and rings in clean oil, slide the compressor over the piston, tighten it with the right wrench and be careful not to change the ring positions. Use rod bolt protectors and rotate the crankshaft so the connecting rod sits in the center, then position the rod and piston inside using the guide pin so the piston arrow faces toward the front of the engine and the oil hole on the connecting rod faces the major thrust side. Alongside guiding the connecting rod, pound the piston down with a hammer handle. Put the rod caps in place and then put in the replaced connecting rod bolts, tightening them first to 27 Nm (20 ft. lbs.) and then turning them an extra 1/4 turn. In the last step, place and secure both cylinder heads and the oil pan.
Related 2006 Chrysler Pacifica Parts
 2006 Chrysler Pacifica Dipstick
 2006 Chrysler Pacifica Crankshaft
 2006 Chrysler Pacifica Crankshaft Pulley
 2006 Chrysler Pacifica Cylinder Head
 2006 Chrysler Pacifica Cylinder Head Gasket
 2006 Chrysler Pacifica Dipstick Tube
 2006 Chrysler Pacifica Harmonic Balancer
 2006 Chrysler Pacifica Intake Valve
 2006 Chrysler Pacifica Oil Pan Gasket
 2006 Chrysler Pacifica Timing Belt Tensioner
 2006 Chrysler Pacifica Timing Chain
 2006 Chrysler Pacifica Valve Stem Seal