JeepParts
My Garage
My Account
Cart
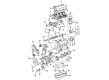
OEM 2006 Chrysler Pacifica Crankshaft
Crank Shaft- Select Vehicle by Model
- Select Vehicle by VIN
Select Vehicle by Model
orMake
Model
Year
Select Vehicle by VIN
For the most accurate results, select vehicle by your VIN (Vehicle Identification Number).
2 Crankshafts found

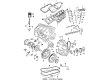
2006 Chrysler Pacifica Crankshaft Part Number: 4781507AD
Product Specifications- Other Name: Crankshft
- Replaces: 4781507AC, 4781071AB, 4781071AC
- Condition: New
- Fitment Type: Direct Replacement
- SKU: 4781507AD
- Warranty: This genuine part is guaranteed by Mopar's factory warranty.

2006 Chrysler Pacifica Crankshaft Part Number: 4792692AB
Product Specifications- Other Name: Crankshft
- Replaces: 4792692AC, 4792177, 4792692AA
- Item Weight: 56.60 Pounds
- Item Dimensions: 22.3 x 8.4 x 7.7 inches
- Condition: New
- Fitment Type: Direct Replacement
- SKU: 4792692AB
- Warranty: This genuine part is guaranteed by Mopar's factory warranty.
2006 Chrysler Pacifica Crankshaft Parts and Q&A
- Q: How to Remove and Install a Crankshaft in an Engine on 2006 Chrysler Pacifica?A: Getting rid of the crankshaft means you have to get the engine out of the vehicle, followed by removing the oil pan, oil pickup tube and windage tray. After this, disconnect the front timing belt cover, the timing belt and timer pulley and remove the crankshaft sprocket. Slide the dowel pin out of the crankshaft and take out the oil pump assembly, then unfasten the retainer holding the oil seal on the crankshaft rear. Try not to use a metal stamp on the bearing caps; using paint or a scribe is safer, because it's important to mark bolt caps and not mix them up during assembly. Lift up the main bearing caps, since they are not the same and should be marked. After that, carefully remove the crankshaft from the cylinder block. Gather the engines' main and connecting rod bearings in place before you fit the crankshaft. Verify the crankshaft journals for high wear, expanse of the tapered area and scoring, making sure taper falls below 0.015 mm and roundness remains in check with soup bowls at no more than 0.010 mm and grinding keeping the journal under 0.254 mm in size at the bottom of the standard diameter below the surface. Never grind Number 2 main bearing's thrust surface and never nick either the crank pin or the bearing fillets. After grinding, clean all the cavities and file down any rough parts on the oil holes so the final finishing on the crankshaft matches the engine's normal direction of rotation. During installation, set the upper main bearings into the cylinder block, in line with the oil holes and add the crankshaft last. Roll the crankshaft forward until it is slightly beyond its limit, lubricate, put the front thrust washer on, roll it back to fit the rear thrust washer and then finish the installation. Put lower main bearings into the main bearing caps, fill them with clean engine oil and lubricate the main bearing cap bolts before you fit them. Most caps have a special order for tightening: first the inner main cap bolts, then the windage tray bolts and lastly the main cap tie bolts. Screw in the inside main bearing cap bolts to 20 Nm past one-quarter of a turn, measure crankshaft end play, add the connecting rods and check side clearance. Set up the windage tray, lube the bolts, get them to a snug fit and begin tightening from the inside, working outward and finishing with 28 Nm more of a tightening after an extra 90° turn. Start by installing the main cap tie bolts and tightening them to 28 Nm, then align the rear crankshaft oil seal retainer and oil seal, the oil pump assembly and a pin in the crankshaft, placing the crankshaft sprocket and timing belt, the timing belt tensioner, the front timing belt cover, the oil pickup tube and tube bolt to 28 Nm, the oil pan and lastly reinstall the engine on the mounts, filling the crankcase with oil.
Related 2006 Chrysler Pacifica Parts
 2006 Chrysler Pacifica Oil Filter
 2006 Chrysler Pacifica Dipstick
 2006 Chrysler Pacifica Timing Belt
 2006 Chrysler Pacifica Crankshaft Pulley
 2006 Chrysler Pacifica Crankshaft Seal
 2006 Chrysler Pacifica Crankshaft Thrust Washer Set
 2006 Chrysler Pacifica Cylinder Head Gasket
 2006 Chrysler Pacifica Engine Mount Bracket
 2006 Chrysler Pacifica Exhaust Valve
 2006 Chrysler Pacifica Rocker Arm Pivot
 2006 Chrysler Pacifica Timing Cover Gasket
 2006 Chrysler Pacifica Valve Stem Seal