JeepParts
My Garage
My Account
Cart
OEM 2006 Chrysler Pacifica Wheel Bearing
Hub Bearing- Select Vehicle by Model
- Select Vehicle by VIN
Select Vehicle by Model
orMake
Model
Year
Select Vehicle by VIN
For the most accurate results, select vehicle by your VIN (Vehicle Identification Number).
3 Wheel Bearings found

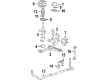
2006 Chrysler Pacifica Hub & Bearing, Front Part Number: 4880208AC
$205.07 MSRP: $303.00You Save: $97.93 (33%)Product Specifications- Other Name: Bearing - Brake; Front Wheel Bearing and Hub Assembly; Wheel Hub Repair Kit.; Front Hub
- Position: Front
- Replaced by: 4880208AD
- Replaces: 4880208AA, 4880208AB
- Item Weight: 11.50 Pounds
- Item Dimensions: 7.0 x 7.0 x 5.9 inches
- Condition: New
- Fitment Type: Direct Replacement
- SKU: 4880208AC
- Warranty: This genuine part is guaranteed by Mopar's factory warranty.

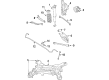
2006 Chrysler Pacifica Hub Part Number: 4880209AB
$201.18 MSRP: $255.00You Save: $53.82 (22%)Ships in 1-2 Business DaysProduct Specifications- Other Name: Hub - Brake; Wheel Bearing and Hub Assembly; Wheel Hub Repair Kit.
- Replaced by: 4880209AC
- Item Weight: 11.60 Pounds
- Item Dimensions: 6.9 x 6.9 x 6.0 inches
- Condition: New
- Fitment Type: Direct Replacement
- SKU: 4880209AB
- Warranty: This genuine part is guaranteed by Mopar's factory warranty.
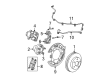
2006 Chrysler Pacifica Hub & Bearing, Rear Part Number: 4880209AC
$173.35 MSRP: $255.00You Save: $81.65 (33%)Ships in 1-2 Business DaysProduct Specifications- Other Name: Hub - Brake; Rear Wheel Bearing and Hub Assembly; Wheel Hub Repair Kit.
- Position: Rear
- Replaces: 4880209AA, 4880209AB
- Condition: New
- Fitment Type: Direct Replacement
- SKU: 4880209AC
- Warranty: This genuine part is guaranteed by Mopar's factory warranty.
2006 Chrysler Pacifica Wheel Bearing Parts and Q&A
- Q: How to Maintain and Fix a Wheel Bearing on 2006 Chrysler Pacifica?A: Begin by lifting the car and supporting it securely and after that, remove the tire and wheel. Take both the cotter pin and the nut lock, together with the spring washer from the stub shaft. Guide the vehicle so the front wheel can't turn and with the brakes applied, loosen and take out the hub nut. First, take off the front brake rotor and then remove the car's wiring harness from the wheel speed sensor connector at the same time as unclipping the outside reinforcement clip from the connector and routing clip. Onto the strut, detach the screw holding the routing bracket for the wheel speed sensor, open the clip at the knuckle and take out the cable. Squeeze in on the end of the halfshaft stub shaft to free the splines from the hub, then take out the four bolts that mount the hub and bearing to the steering knuckle from the rear and lift the hub and bearing with the wheel speed sensor out. During installation, check that both the hub and the bearing site on the stub shaft and steering knuckle are clean and clear of debris. Fit the hub and bearing onto the halfshaft stub shaft and until the end is nested in the steering knuckle. Put the four bolts from the rear of the knuckle into place, tightening each one gradually and in opposite direction so they are evenly tightened to 65 Nm (45 ft. lbs.). Insert the wheel speed sensor cable grommet into the clip at the knuckle and snap it down, then fasten the routing bracket for the wheel speed sensor assembly to the strut assembly and tighten the screw to 13 Nm (115 inch lbs.) torque. Run the wire clip for the wheel speed sensor and connect it to the frame rail outer reinforcement, then attach the vehicle wiring harness to the wheel speed sensor connector, insert the brake rotor, set the caliper and add the adapter assembly. Make sure the wheel speed sensor cable is not in a place where it can come in contact with the brake rotor or different moving parts. Put the washer and hub nut on the lubricated end of the halfshaft stub shaft and with someone applying brakes, tighten the hub nut to form a torque of 244 Nm (180 ft. lbs.). Apply the spring washer and hub nut lock to the hub nut and stub shaft, keeping them together with a new cotter pin and wrapping the prongs a number of times around the hub nut lock. Connect the tire and wheel assembly and tighten the wheel mounts, applying 135 Nm (100 ft. lbs.) torque, then lower the car. Check the brake pedal by gently pumping several times and make a full stop, adjust the brake fluid as needed and perform an alignment on the vehicles.
Related 2006 Chrysler Pacifica Parts
 2006 Chrysler Pacifica Alignment Bolt
 2006 Chrysler Pacifica Axle Beam Mount
 2006 Chrysler Pacifica Coil Springs
 2006 Chrysler Pacifica Control Arm
 2006 Chrysler Pacifica Control Arm Bushing
 2006 Chrysler Pacifica Crossmember Bushing
 2006 Chrysler Pacifica Lateral Link
 2006 Chrysler Pacifica Steering Knuckle
 2006 Chrysler Pacifica Sway Bar Bracket
 2006 Chrysler Pacifica Sway Bar Kit
 2006 Chrysler Pacifica Sway Bar Link
 2006 Chrysler Pacifica Track Bar