JeepParts
My Garage
My Account
Cart
OEM 2006 Chrysler Sebring Rack And Pinion
Steering Rack And Pinion- Select Vehicle by Model
- Select Vehicle by VIN
Select Vehicle by Model
orMake
Model
Year
Select Vehicle by VIN
For the most accurate results, select vehicle by your VIN (Vehicle Identification Number).
4 Rack And Pinions found


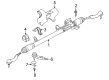
2006 Chrysler Sebring Steering Gear Part Number: 4764920AI
$811.37 MSRP: $931.00You Save: $119.63 (13%)Ships in 1-2 Business DaysProduct Specifications- Other Name: Gear - Power Steering; Rack and Pinion Assembly; Steering Gearbox; Rack & Pinion; Gear Assembly; Gear Power Steering
- Replaces: 4764402AI
- Item Weight: 26.30 Pounds
- Item Dimensions: 61.2 x 10.6 x 6.2 inches
- Condition: New
- Fitment Type: Direct Replacement
- SKU: 4764920AI
- Warranty: This genuine part is guaranteed by Mopar's factory warranty.
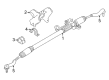
2006 Chrysler Sebring Steering Gear Part Number: 4764403AI
Product Specifications- Other Name: Gear - Power Steering; Rack and Pinion Assembly; Steering Gearbox; Gear Assembly; Gear Power Steering
- Item Weight: 25.30 Pounds
- Condition: New
- Fitment Type: Direct Replacement
- SKU: 4764403AI
- Warranty: This genuine part is guaranteed by Mopar's factory warranty.
2006 Chrysler Sebring Steering Gear Part Number: 4764995AJ
Product Specifications- Other Name: Gear - Power Steering; Rack and Pinion Assembly; Steering Gearbox; Gear Assembly; Gear Power Steering
- Item Weight: 28.60 Pounds
- Condition: New
- Fitment Type: Direct Replacement
- SKU: 4764995AJ
- Warranty: This genuine part is guaranteed by Mopar's factory warranty.

2006 Chrysler Sebring Steering Gear Part Number: 5273777AA
Product Specifications- Other Name: Gear - Rack And Pinion; Rack and Pinion Assembly; Steering Gearbox; Gear Assembly; Gear Power Steering
- Condition: New
- Fitment Type: Direct Replacement
- SKU: 5273777AA
- Warranty: This genuine part is guaranteed by Mopar's factory warranty.
2006 Chrysler Sebring Rack And Pinion Parts and Q&A
- Q: How to Service and Repair a Rack and Pinion Steering Gear on 2006 Chrysler Sebring?A: First, disconnect the remote ground cable from the stud on the left shock tower and put the cable somewhere away from the vehicle. Get out as much power steering fluid as you can from the remote reservoir. Centre the steering wheel and push down the lock on the steering wheel. Separate the intermediate shaft by removing the pinch bolt from the end of the intermediate shaft coupler and sliding the shaft away. Support the vehicle, remove the front wheels and assembly, together with the drive belt splash shield fasteners from the crossmember. Disconnect the tie rod ends from the steering knuckles by pulling out the nuts with a socket over the stud. Use Remover, Special Tool C-3894-A, to separate the two tie rod end studs from the steering knuckles. Fill the bodywork with scribe marks to show where the front suspension crossmember sits before you take it out, to keep your vehicle's alignment right. Get rid of the clamp-to-body bolts, clevis to lower control arm bolts and engine mount-to-crossmember bolts as well. With the mounting bolt at the engine collar loose, the manual transmission bracket should be able to swing down. Unscrew the bolts on the rack and pinion heat shield and the hose to the crossmember. Remove the rubber connections that direct the fuel lines and place a transmission jack under the center of the front suspension crossmember. Undo the fixings that link the front and rear parts of the front suspension crossmember to the frame rails, then lower the crossmember enough to take out the rack and pinion. Take off the power steering pressure hoses from the gear pump fluid outlets and the power steering connection to the pump pressure switch. Remove the bolts connecting the power steering rack and pinion to the front suspension crossmember and pull out the rack and pinion. Start by removing the steering sleeve from the isolator it is mounted in and take out the bushing from the rack and pinion's mounting bracket. Put some lubricant on the replacement mounting bolt isolator bushing, fit it inside the rack and pinion mounting bracket and slide the sleeve into the bushing. When installing the unit, attach it to the front suspension crossmember and secure it in position with each of the four mounting bolts that must be tightened to 68 Nm (or 50 ft. lbs.). Attach the power steering fluid pressure and return hoses back into their original position and tighten them with 31 Nm (275 inch lbs.). Hold the front suspension crossmember and rack and pinion against the vehicle body so their lines match those you marked previously. Install the two bolts at the rear end into the tapping plates, insert the bolts at the front and adjust all four bolts at 2 Nm (20 inch lbs.) to secure the crossmember in place. Tap the crossmember into place with a carefully applied hammer and then tighten both front and rear mounting bolts to 163 Nm (120 ft. lbs.). Get rid of the transmission jack and then reinstall the supported bundles for all the fuel channels, plus the bracket for the brake tube routing. Bolts the clamps of the power steering pressure hose routing to the crossmember and places the rack and pinion heat shield in position. Match the rear engine mount back onto the crossmember, with the manual transmission bracket in place if available and tighten the bolts using 65 Nm (48 ft. lbs.). Loosely put in the bolts from the shock absorber clevis to the lower control arm first, then place the tie rod seal boot heat shield over the tie rod and mount it in the steering knuckle, tightening the nut to 55 Nm (40 ft. lbs.). Tighten the stabilizer bar bushing clamp-to-body bolts to 61 Nm (45 ft. lbs.) and attach the drive-belt splash shield again. Place the jack stand under the lower control arm rather than under the ball joint cap. Elevate the wheel away from the ground and place jack stands underneath to support the front suspension, then use a torque wrench to tighten the shock absorber clevis-to-lower control arm bolts to 92 Nm (68 ft. lbs.). Drive the vehicle under its own power, park it carefully and then tighten the wheel nuts using a cross-tightening sequence to 135 Nm (100 ft. lbs.). Prior to connecting the intermediate shaft coupler, place the front wheels straight ahead and the steering wheel in the center position. Line up the splines within the intermediate shaft lower coupling with those on the rack and pinion shaft, slip the intermediate shaft onto the rack and pinion and add a new coupling pinch bolt, correctly tightening it to 44 Nm (32 ft. lbs.). Unplug the steering wheel holder, reattach the remote battery ground cable, put fresh fluid into the power steering pump tank and carry out the Power Steering Pump Initial Operation. After that, look for any leaks, drive the vehicle down and check the front wheel alignment, setting the toe and tightening the tie rod jam nuts to 55 ft. lbs.
Related 2006 Chrysler Sebring Parts
 2006 Chrysler Sebring Steering Wheel
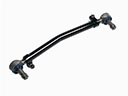 2006 Chrysler Sebring Drag Link
 2006 Chrysler Sebring Power Steering Cooler
 2006 Chrysler Sebring Power Steering Hose
 2006 Chrysler Sebring Power Steering Reservoir
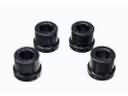 2006 Chrysler Sebring Rack & Pinion Bushing
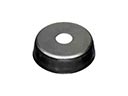 2006 Chrysler Sebring Radius Heat Shield
 2006 Chrysler Sebring Steering Column
 2006 Chrysler Sebring Steering Column Cover
 2006 Chrysler Sebring Steering Gear Box
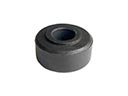 2006 Chrysler Sebring Tie Rod Bushing
 2006 Chrysler Sebring Tie Rod End