JeepParts
My Garage
My Account
Cart
OEM 2006 Dodge Caravan Parking Brake Shoe
Emergency Parking Brake Shoe- Select Vehicle by Model
- Select Vehicle by VIN
Select Vehicle by Model
orMake
Model
Year
Select Vehicle by VIN
For the most accurate results, select vehicle by your VIN (Vehicle Identification Number).
1 Parking Brake Shoe found


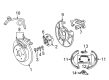
2006 Dodge Caravan Parking Brake Shoes, Rear Part Number: 5019802AA
$181.52 MSRP: $206.00You Save: $24.48 (12%)Ships in 1-2 Business DaysProduct Specifications- Other Name: Shoe Kit - Parking Brake; Parking Brake Shoe, Rear; Disc Brake Hardware Kit; Shoes; Shoe And Lining Kit Parking Brake; Parking Brake Shoe
- Position: Rear
- Item Weight: 2.70 Pounds
- Item Dimensions: 8.6 x 5.3 x 3.2 inches
- Condition: New
- Fitment Type: Direct Replacement
- SKU: 5019802AA
- Warranty: This genuine part is guaranteed by Mopar's factory warranty.
2006 Dodge Caravan Parking Brake Shoe Parts and Q&A
- Q: How to Maintain and Fix Parking Brake Shoes on 2006 Dodge Caravan?A: In order to service the parking brake shoes, turn the parking brake on AWD cars first, ensuring the bearings aren't rotating while you remove the hub nut. First, raise the vehicle and then remove the wheel and tire unit together. When doing AWD, take out the cotter pin and nut retainer from the C/V joint's stub shaft, then the spring washer and hub nut and its washer. Deactivate the automatic adjuster to let slack into the rear brake cables and lock the front cables with pliers held at the exposed part. Remove the pin bolts from the disc brake caliper guide pins, then raise the front of the caliper and pull the rear away from the adapter abutment. Slide the caliper aside to avoid damaging the brake hose and take out the rotor from the hub/bearing after that. Take the bolt out of the park brake cable mount and loosen the end of the cable from both the actuator lever and the adapter with a 10 mm wrench. To remove the wheel speed sensor head in AWD models, take out the ABS sensor from the hub or bearing; for FWD models, remove the secondary retaining clip, press up on the metal clip and pull the sensor to clear it. Then, disconnect the hub/bearing from the axle by undoing the bolts and not damaging the hub/bearing if corrosion has formed. In some cases, lightly tapping the disc brake caliper adapter with a soft-face hammer will help get both the caliper adapter and hub/bearing out together. Secure the adapter in a clamp, pull the lower return spring out, hold down the spring and pin from the leading park brake shoe and release the adjuster on both park brake shoes. Turn the leading park brake shoe inward to remove it and take away the upper springs from both shoes. Remove the last park brake shoe, then examine the wear on the shoe actuator. To install, start by adding the park brake shoe actuator into the adapter, then the trailing brake shoe with the hold down pin correctly set. Slot in the hold down spring and pin, upper return springs on each shoe and place the adjuster in its proper spot. Put the hold down spring and pin onto the leading shoe and after that, put the lower return spring behind both shoes. Secure the adapter and the hub/bearing to the axle by reinstalling the mounting bolts, making certain the hub/bearing is sitting level and tightened to a torque of 129 Nm (95 ft. lbs.). For AWD models, install the wheel speed sensor and tighten its bolt to 12 Nm (105 inch lbs.), but for FWD models, put the metal retaining clip in place, add the wheel speed sensor head and attach the secondary retaining clip as well. Connect the park brake cable to the adapter, join it to the actuator lever and place the mounting bolt. Take the locking pliers off the front park brake cable, adjust the park brake drum-in-hat brake shoes and install the rotor on the hub/bearing again. Lower the caliper and brake shoes onto the rotor, after that fit the guide pin bolts and tighten them to 35 Nm (26 ft. lbs.). For AWD, use a rag or blow duster to clear the outer C/V joint stub shaft's threads, add the washer and hub nut and tighten the hub nut with a torque wrench to 244 Nm (180 ft. lbs.). Fit the in-line wheel nut, spring washer and cotter pin on the stub shaft, put the wheel and tire back in place and screw the stud nuts to 135 Nm (100 ft. lbs.) accordingly. Hold the car low, tap the park brake pedal, let it go to stretch the cables, push the brake pedal several times for a solid feel and run the car on the road to make sure all works well.
Related 2006 Dodge Caravan Parts
 2006 Dodge Caravan Brake Caliper
 2006 Dodge Caravan Parking Brake Cable
 2006 Dodge Caravan Speed Sensor
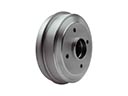 2006 Dodge Caravan Brake Drum
 2006 Dodge Caravan Brake Caliper Bracket
 2006 Dodge Caravan Brake Caliper Piston
 2006 Dodge Caravan Brake Disc
 2006 Dodge Caravan Brake Line
 2006 Dodge Caravan Brake Pad
 2006 Dodge Caravan Hydraulic Hose
 2006 Dodge Caravan Wheel Cylinder
 2006 Dodge Caravan Wheel Stud