JeepParts
My Garage
My Account
Cart
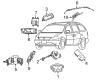
OEM 2007 Chrysler Town & Country Air Bag
Air Bag Module- Select Vehicle by Model
- Select Vehicle by VIN
Select Vehicle by Model
orMake
Model
Year
Select Vehicle by VIN
For the most accurate results, select vehicle by your VIN (Vehicle Identification Number).
9 Air Bags found

 Product Specifications
- Other Name: Airbagg - Air Bag; Steering Wheel Air Bag; Driver Air Bag
- Replaces: 1AV141DVAD, 1AV141DVAC
- Item Weight: 4.20 Pounds
- Item Dimensions: 13.4 x 9.8 x 8.4 inches
- Condition: New
- Fitment Type: Direct Replacement
- SKU: 1AV141DVAG
- Warranty: This genuine part is guaranteed by Mopar's factory warranty.
2007 Chrysler Town & Country Driver Air Bag Part Number: 1AV141J8AG
Product Specifications- Other Name: Airbagg - Airbag; Steering Wheel Air Bag
- Replaces: 1AV141J8AC, 1AV141J8AD
- Item Weight: 4.10 Pounds
- Item Dimensions: 13.5 x 8.9 x 8.0 inches
- Condition: New
- Fitment Type: Direct Replacement
- SKU: 1AV141J8AG
- Warranty: This genuine part is guaranteed by Mopar's factory warranty.
 Product Specifications
- Other Name: Airbag - Passenger; Instrument Panel Air Bag, Upper; Passenger Inflator Module
- Position: Upper Passenger Side
- Replaces: 4680888AE
- Item Weight: 9.80 Pounds
- Item Dimensions: 19.0 x 11.6 x 9.0 inches
- Condition: New
- Fitment Type: Direct Replacement
- SKU: 4680888AF
- Warranty: This genuine part is guaranteed by Mopar's factory warranty.
- Product Specifications
- Other Name: Airbag - Air Bag; Steering Wheel Air Bag; Driver Air Bag
- Replaces: YS931J8AD, YS931J8AE, YS931J8AF
- Item Weight: 4.80 Pounds
- Item Dimensions: 14.8 x 10.7 x 7.2 inches
- Condition: New
- Fitment Type: Direct Replacement
- SKU: YS931J8AH
- Warranty: This genuine part is guaranteed by Mopar's factory warranty.
- Product Specifications
- Other Name: Airbag - Air Bag; Steering Wheel Air Bag; Driver Air Bag
- Replaces: YS931DVAF, YS931DVAC, YS931DVAD, YS931DVAE
- Item Weight: 4.70 Pounds
- Item Dimensions: 15.0 x 11.2 x 7.4 inches
- Condition: New
- Fitment Type: Direct Replacement
- SKU: YS931DVAH
- Warranty: This genuine part is guaranteed by Mopar's factory warranty.
 Product Specifications
- Other Name: Curtain - Sideairbag; Curtain Air Bag, Left; Head Air Bag; Curtain Side Air Bag
- Position: Driver Side
- Replaces: 52029337AC, 52029337AB, 52029337AD
- Item Weight: 5.70 Pounds
- Item Dimensions: 43.9 x 7.2 x 7.1 inches
- Condition: New
- Fitment Type: Direct Replacement
- SKU: 52029337AE
- Warranty: This genuine part is guaranteed by Mopar's factory warranty.
- Product Specifications
- Other Name: Curtain - Sideairbag; Curtain Air Bag, Right; Head Air Bag; Curtain Side Air Bag
- Position: Passenger Side
- Replaces: 52029336AB, 52029336AD, 52029336AC
- Item Weight: 7.70 Pounds
- Item Dimensions: 43.1 x 7.2 x 7.2 inches
- Condition: New
- Fitment Type: Direct Replacement
- SKU: 52029336AE
- Warranty: This genuine part is guaranteed by Mopar's factory warranty.
- Product Specifications
- Other Name: Curtain - Sideairbag; Curtain Air Bag, Left; Head Air Bag; Curtain Side Air Bag
- Position: Driver Side
- Replaces: 4680533AC, 4680533AB
- Item Weight: 5.00 Pounds
- Item Dimensions: 44.7 x 7.4 x 7.3 inches
- Condition: New
- Fitment Type: Direct Replacement
- SKU: 4680533AD
- Warranty: This genuine part is guaranteed by Mopar's factory warranty.
- Product Specifications
- Other Name: Curtain - Sideairbag; Curtain Air Bag, Right; Head Air Bag; Curtain Side Air Bag
- Position: Passenger Side
- Replaces: 4680532AC, 4680532AB
- Item Weight: 3.00 Pounds
- Item Dimensions: 44.3 x 7.2 x 7.3 inches
- Condition: New
- Fitment Type: Direct Replacement
- SKU: 4680532AD
- Warranty: This genuine part is guaranteed by Mopar's factory warranty.
2007 Chrysler Town & Country Air Bag Parts and Q&A
- Q: How to Install an Air Bag in the Instrument Panel on 2007 Chrysler Town & Country?A: Relocate all usable instrument panel elements to the air bag, build the new Passenger air bag into the panel and place it securely with air bag mounting bolts. Tighten the two screws at the instrument panel retainer place to 2.7 ± 0.5 Nm (24 ± 5 in.lbs.) and tighten the three screws that hold the passenger air bag to the car's support beam to 10 ± 2 Nm (90 ± 15 in.lbs.). Join the yellow wire to the air bag and pin it on the instrument panel reinforcement with push pins prior to mounting the instrument panel. If the air bags are not deployed and you wish to install them, pull the dashboard cover back slightly and install the passenger air bag on the reinforcement and panel. When finished, use the three retaining bolts to hold things in place. Install the two retaining screws for the passenger air bag to the instrument panel cover/pad and tighten each to 2.7 ± 0.5 Nm (24 ± 5 in.lbs.) while paying attention that the cover/pad locator pins are in place. Tighten each of the three retaining bolts to 10 ± 2 Nm (90 ± 15 in.-lbs.) and join the passenger air bag electrical connector, attaching it using the fitted push-pin fasteners. Push the panel forward to secure the air distribution duct on the HVAC unit, then fix six upper fence line bolts, three A-pillar bolts by the right door and the right roll down bolt, using the smaller 10 mm fitting to align the car. After that, fix the bolts for the A-pillar left and bottom roll-down bolt, then add seven lower cover/pad retaining screws, four on the top front and one far left speaker retaining screw. Link the wires from the radio, fasten the radio in place with four screws, wire the glove box lamp and attach the trim under the radio with nineteen screws. Insert the cup holder assembly into the instrument panel, attach the wires from the center bezel to the HVAC controls and snap the center bezel in, using two screws to close it. Place the filler bezel over the cup holder, fit the top cover and snap the back edge into place. Mount the glove box, making sure all the hinges match before snapping it into place. After that, snap the right side A-pillar trim, the lower extension trim, end cap, cowl panel, front door sill plate and right side top bracket in place. Set the two right and two left nut side screws into the instrument panel support to the floor area, link the two wiring connectors to the under cubby box and place six screws. Pull the upper A-pillar trim from the left-hand side upper door rail, add four nuts to the brake pedal support bracket, install the lower extension trim on the right-hand side, attach the knee blocker and its retaining screws and put the Data Link Connector (DLC) into the knee blocker. Clamp down the parking brake lever, use four screws to set the lower steering column cover and position the front left cowl and sill plate into place. After that, install the console bin under the center of the dashboard, close the hood and make sure the entire system and vehicle function normally.
Related 2007 Chrysler Town & Country Parts
 2007 Chrysler Town & Country Air Bag Control Module
 2007 Chrysler Town & Country Air Bag Sensor
 2007 Chrysler Town & Country Antenna Mast
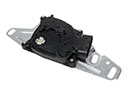 2007 Chrysler Town & Country Automatic Transmission Shift Position Sensor Switch
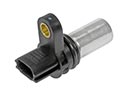 2007 Chrysler Town & Country Camshaft Position Sensor
 2007 Chrysler Town & Country Clock Spring
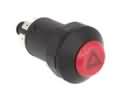 2007 Chrysler Town & Country Hazard Warning Switch
 2007 Chrysler Town & Country Ignition Lock Assembly
 2007 Chrysler Town & Country Ignition Switch
 2007 Chrysler Town & Country Relay
 2007 Chrysler Town & Country Seat Belt
 2007 Chrysler Town & Country Throttle Position Sensor