JeepParts
My Garage
My Account
Cart
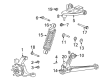
OEM 2009 Dodge Viper Steering Knuckle
Front Steering Knuckle- Select Vehicle by Model
- Select Vehicle by VIN
Select Vehicle by Model
orMake
Model
Year
Select Vehicle by VIN
For the most accurate results, select vehicle by your VIN (Vehicle Identification Number).
2 Steering Knuckles found


2009 Dodge Viper Knuckle, Front Passenger Side Part Number: 68272306AA
Product Specifications- Other Name: Knuckle - Front; Steering Knuckle, Front Right, Right; Knuckle Front
- Position: Front Passenger Side
- Replaces: 5290030AF, 5290030AC
- Item Weight: 20.70 Pounds
- Item Dimensions: 12.5 x 12.4 x 12.2 inches
- Condition: New
- Fitment Type: Direct Replacement
- SKU: 68272306AA
- Warranty: This genuine part is guaranteed by Mopar's factory warranty.
2009 Dodge Viper Knuckle, Front Driver Side Part Number: 68272307AA
$1132.41 MSRP: $1665.00You Save: $532.59 (32%)Product Specifications- Other Name: Knuckle - Front; Steering Knuckle, Front Left, Left; Knuckle Front
- Position: Front Driver Side
- Replaces: 5290031AC, 5290031AF
- Item Weight: 18.90 Pounds
- Item Dimensions: 17.4 x 14.8 x 9.9 inches
- Condition: New
- Fitment Type: Direct Replacement
- SKU: 68272307AA
- Warranty: This genuine part is guaranteed by Mopar's factory warranty.
2009 Dodge Viper Steering Knuckle Parts and Q&A
- Q: How to Install the Rear Steering Knuckle on 2009 Dodge Viper?A: Make sure a new corrosion prevention gasket is on the hub and bearing before you attempt to install the rear suspension knuckle. Then, fasten the hub and bearing to the knuckle so that the holes match. Usage needs four mounting screws tightened to 149 Nm to fasten the resulting assembly. Slide the upper control arm ball joint stud into the knuckle's mounting point, add the castle nut, screw it on tight to 102 Nm and then add the cotter pin. After the knuckle and upper control arm are removed, set them onto the car, sliding the hub and bearing onto the halfshaft yoke and put the upper control arm into the frame brackets. Put in the upper control arm frame pivot bolts and nuts before tightening them. Attach the lower ball joint to the lower control arm and put the castle nut on, without tightening it. Place the toe link into the hole of the knuckle and join them with a new nut held down to 75 Nm and then cap the stud of the toe link with a plastic appearance cover. Tighten the ball joint castle nut in the lower part to 160 Nm and include a cotter pin. Fix the ABS wheel speed sensor head on the knuckle with a bolt tightened to 11 Nm and put a washer and hub nut on the halfshaft yoke for now, without tightening. Set up the brake rotor, parking brake caliper and hydraulic brake caliper onto the knuckle. Head the vehicle down a bit, pull the brakes once or twice and finally release the brake pedal to pull the parking brake up. The halfshaft should not spin during tightening of the hub nut, so first engage the parking brake. Put the spring washer, nut lock and cotter pin onto the halfshaft yoke, fit the tire and wheel assembly and gradually tighten the wheel nuts to 135 Nm. Set the carriage on an alignment rack, lower the vehicle all the way and then position it at the design height before you tighten the upper control arm frame bolts to 102 Nm. Check and adjust the wheels if needed and then do a test drive to check if they are working as they should.
Related 2009 Dodge Viper Parts
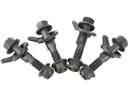 2009 Dodge Viper Alignment Bolt
 2009 Dodge Viper Axle Beam Mount
 2009 Dodge Viper Axle Pivot Bushing
 2009 Dodge Viper Axle Support Bushings
 2009 Dodge Viper Control Arm
 2009 Dodge Viper Control Arm Bushing
 2009 Dodge Viper Shock Absorber
 2009 Dodge Viper Shock And Strut Mount
 2009 Dodge Viper Sway Bar Bushing
 2009 Dodge Viper Sway Bar Kit
 2009 Dodge Viper Sway Bar Link
 2009 Dodge Viper Wheel Hub