JeepParts
My Garage
My Account
Cart
OEM 2009 Jeep Liberty Piston
Engine Pistons- Select Vehicle by Model
- Select Vehicle by VIN
Select Vehicle by Model
orMake
Model
Year
Select Vehicle by VIN
For the most accurate results, select vehicle by your VIN (Vehicle Identification Number).
1 Piston found

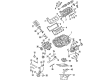
2009 Jeep Liberty Piston Part Number: 5019316AC
Product Specifications- Replaces: 5019316AA, 5019316AB
- Item Weight: 3.30 Pounds
- Item Dimensions: 11.3 x 7.3 x 6.9 inches
- Condition: New
- Fitment Type: Direct Replacement
- SKU: 5019316AC
- Warranty: This genuine part is guaranteed by Mopar's factory warranty.
2009 Jeep Liberty Piston Parts and Q&A
- Q: How to Install Piston and Connecting Rod Assemblies into the Bore on 2009 Jeep Liberty?A: Before fitting the piston and connecting rod into the engine block, first place the piston rings inside the bore. Place the piston and rings face down in oil, cover them with a ring compressor and use it to keep the rings in place. Ensure both the tabs and parting line inside the bearing line up with the slots and main edge of the connecting rod. Put clean engine oil on the part of the engine where the crankshaft bearing is located. Screw the Connecting Rod Guides 8507 on to the threads of the connecting rod bolts. An "F" is stamped on the piston pin bore near each piston, showing the correct direction for installation; the "F" must always be toward the front of the engine and the slinger slot of the connecting rod must point forward. Use engine oil to clean the cylinder bore and then grease it. Crank the engine until the connecting rod journal reaches the middle of the cylinder bore and whatever is in the wrong position, either the rod or the piston, should now be added as you correctly place the connecting rod guides atop the journal. Holding onto the connecting rod, drive the piston back into the cylinder with a hammer handle. When the plunger rods are removed, the bolts are designed as Torque to Yield and can't be tightened. So, you need to install new ones each time the bolts are loosened. Put engine oil on the rod bolts and the bearing surfaces before installing the connecting rod cap and its bearing. Screw the bolts until they reach 27 Nm (20 ft. lbs.) plus 90°, then pull them back to 90°. Put in the cylinder head(s), timing chain and cover, cylinder head covers and oil pan with gasket/windage tray. Put the right engine oil into the crankcase and attach the negative cable to the battery.
Related 2009 Jeep Liberty Parts
 2009 Jeep Liberty Oil Filter
 2009 Jeep Liberty Intake Valve
 2009 Jeep Liberty Oil Pump
 2009 Jeep Liberty Timing Chain
 2009 Jeep Liberty Timing Chain Tensioner
 2009 Jeep Liberty Crankshaft Pulley
 2009 Jeep Liberty Crankshaft Timing Gear
 2009 Jeep Liberty Cylinder Head Gasket
 2009 Jeep Liberty Dipstick
 2009 Jeep Liberty Engine Mount Bracket
 2009 Jeep Liberty Timing Cover Gasket
 2009 Jeep Liberty Valve Stem Seal