JeepParts
My Garage
My Account
Cart
OEM 2010 Dodge Challenger Control Arm
Suspension Arm- Select Vehicle by Model
- Select Vehicle by VIN
Select Vehicle by Model
orMake
Model
Year
Select Vehicle by VIN
For the most accurate results, select vehicle by your VIN (Vehicle Identification Number).
3 Control Arms found


2010 Dodge Challenger Lower Control Arm, Front Part Number: 68002123AC
$220.94 MSRP: $329.00You Save: $108.06 (33%)Ships in 1-2 Business DaysProduct Specifications- Other Name: Arm - Lower Control; Suspension Control Arm, Front Lower Rearward; Suspension Control Arm Bushing; Upper Control Arm; Arm Lower Control Front Lower; Arm Lower Control Front; Suspension Control Arm; Control Arm
- Position: Front Lower
- Replaces: 68002123AA, 68002123AB
- Item Weight: 6.40 Pounds
- Item Dimensions: 3.1 x 4.1 x 16.8 inches
- Condition: New
- Fitment Type: Direct Replacement
- Require Quantity: 2
- SKU: 68002123AC
- Warranty: This genuine part is guaranteed by Mopar's factory warranty.

2010 Dodge Challenger Upper Control Arm, Front Driver Side Part Number: 4782665AF
$127.11 MSRP: $190.00You Save: $62.89 (34%)Ships in 1-3 Business DaysProduct Specifications- Other Name: Arm - Upper Control; Front Left Upper Suspension Control Arm and Ball Joint Assembly.
- Position: Front Upper Driver Side
- Replaces: 4782665AE, 4782665AC
- Item Weight: 6.00 Pounds
- Item Dimensions: 3.1 x 11.8 x 12.6 inches
- Condition: New
- Fitment Type: Direct Replacement
- SKU: 4782665AF
- Warranty: This genuine part is guaranteed by Mopar's factory warranty.

2010 Dodge Challenger Upper Control Arm, Front Passenger Side Part Number: 4782666AF
$243.60 MSRP: $361.00You Save: $117.40 (33%)Product Specifications- Other Name: Arm - Upper Control; Front Right Upper Suspension Control Arm and Ball Joint Assembly.
- Position: Front Upper Passenger Side
- Replaces: 4782666AC, 4782666AE
- Item Weight: 6.10 Pounds
- Item Dimensions: 2.7 x 12.4 x 13.1 inches
- Condition: New
- Fitment Type: Direct Replacement
- SKU: 4782666AF
- Warranty: This genuine part is guaranteed by Mopar's factory warranty.
2010 Dodge Challenger Control Arm Parts and Q&A
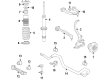
- Q: How to Install the Front Upper Control Arm on 2010 Dodge Challenger?A: Place the upper front arm between the control arm bracket and the body of the shock tower. Go ahead and put in the upper control arm mounting (flag) bolts (1) and set the flag on each bolt facing the outside and away from the wheel opening. Put the shock assembly (3) aside to open up space for adding the studs onto the holes in the shock tower (2) mounting area. Slide the upper ball joint stud (1) into the top hole of the knuckle and screw on the nut (4), tightening it by rotating the nut with a wrench, while keeping the stud in place with a hex wrench. Turn the bolts on the nut with a torque wrench, setting them at 47 Nm and another 90° turn (about 35 ft. lbs.). Hang the wheel speed sensor cable routing clip (2) at the brake tube bracket (3). Secure the tire and wheel put together (1) and tighten the nuts keeping them on (3) at 150 Nm (110 ft. lbs.) on normal models and 190 Nm (140 ft. lbs.) on police models. Lower the car to its curb position and bolt the nuts (2) to the upper part of the control arm mounting bolts (1) until you reach 75 Nm (55 ft. lbs.). Mount three nuts (2) on the shock front mount (4), fit them to the shock tower (3) and tighten them to 27 Nm (20 ft. lbs.). When you are installing the left upper control arm, make sure to insert the coolant recovery container. When installing the correct upper control arm, install the totally integrated power module (TIPM).
Related 2010 Dodge Challenger Parts
 2010 Dodge Challenger Ball Joint
 2010 Dodge Challenger Wheel Bearing
 2010 Dodge Challenger Shock Absorber
 2010 Dodge Challenger Coil Spring Insulator
 2010 Dodge Challenger Coil Springs
 2010 Dodge Challenger Lateral Link
 2010 Dodge Challenger Leaf Spring Bushing
 2010 Dodge Challenger Shock And Strut Mount
 2010 Dodge Challenger Sway Bar Bracket
 2010 Dodge Challenger Sway Bar Kit
 2010 Dodge Challenger Wheel Cover
 2010 Dodge Challenger Wheel Hub