JeepParts
My Garage
My Account
Cart
OEM Chrysler 300M Intake Manifold
Engine Intake Manifold- Select Vehicle by Model
- Select Vehicle by VIN
Select Vehicle by Model
orMake
Model
Year
Select Vehicle by VIN
For the most accurate results, select vehicle by your VIN (Vehicle Identification Number).
4 Intake Manifolds found

Chrysler 300M Intake Manifold Part Number: 5080818AA
$218.82 MSRP: $333.00You Save: $114.18 (35%)Ships in 1-2 Business Days
Chrysler 300M Intake Manifold Part Number: 5101819AA
Chrysler 300M Intake Manifold Part Number: 5080818AB

Chrysler 300M Intake Manifold Part Number: 5017188AA
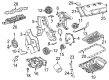
Chrysler 300M Intake Manifold
Choose OEM Intake Manifold that meet Chrysler factory standards. Chrysler designs and tests every component for precision and durability. Each Intake Manifold follows strict manufacturing steps to lock in quality and fit. If your Chrysler 300M matters to you, OEM parts make the smart choice. You'll get the exact look, feel, and performance you expect. Shop genuine 300M parts at the highly competitive prices online. Enjoy a manufacturer's warranty, a hassle-free return policy, and rapid delivery. No more guesswork with off brands. Get genuine parts with exact fit and true factory performance. Shop with confidence today at JeepPartsDeal.com.
Intake Manifold is one of the most important pieces of the design that determines the performance and overall efficiency of the Chrysler 300M series. Famed for its effective design, the intake manifold is lodged with the role of an air or an air/fuel mixture distributor to all cylinder head intake ports to aid combustion and engine power. This passed through cast iron and aluminum intake manifolds and has progressed to the use of the lighter intakes made out from advanced plastics. This evolution comprises variable length intake tracts with variable ingenious geometry that controls the airflow according to the engine loads adding to the performance. Some of these innovations have always been incorporated in the Chrysler 300M models starting with the year 1999 and this has made sure that interface in different models of the 300M is well achieved. The function of the intake manifold goes beyond the performance element it also intends to boost the efficiency and safety of the engines with the help of sensors that indicates the temperature and airflow of the manifold, which in turn leads to better power production and minimized emission levels. Some of these characteristics include the lightweight nature of the Chrysler 300M intake manifold together with the management of the airflow, which gives it a competitive edge when it comes to the automotive market, thus making it efficient for the consumers. All in all, the Chrysler 300M intake manifold is the solid emblem of the companies' concern on quality and great performances as the 300M had established its reputation as one of the powerful sporty sedan today.
Chrysler 300M Intake Manifold Parts and Q&A
- Q: How to Service and Repair an Intake Manifold on Chrysler 300M?A:To service the lower intake manifold, start with the fuel pressure release and empty the cooling system. Untwist the upper radiator hose from the outlet near the front of the manifold and afterwards, take out the upper intake manifold. After that, unplug the cables from the Fuel Injectors and Coolant Temperature Sensor and take off the heater and coolant bottle hoses attached to the rear of the intake manifold. Take out the fuel hose from the rail, disconnect the screw fastening the rail support bracket to the throttle body support bracket and unbolt and remove the Fuel Rail. Disconnect the fuel rail and its injectors, then take out the bolts connecting the lower intake to remove the intake manifold. Look for damage, cracks, blemished gasket and warped or distorted sections on the manifold; if any problems are noticed, you should replace it. Thoroughly clean where the seals go and check the gaskets for rips or cuts; replace them when needed. Raise the gaskets and the intake manifold into place on the cylinder head surfaces and then set the fuel rail with the injectors into position. Place the bolts onto the intake manifold and fasten them following the correct order, stopping when the torque reaches 28 Nm (250 in. lbs.). Bolt the end of the fuel rail support bracket screw to the throttle body support bracket, attach the fuel supply hose to the fuel rail and hook up the heater and coolant bottle supply hoses to the coolant tube at the rear of the intake manifold. After that, attach the electrical wirings to the fuel injectors and coolant temperature sensor, fit the upper intake manifold, reposition the radiator upper hose so it's connected to the coolant outlet on the front side of the lower manifold and finally fill the cooling system.
- Q: How to Maintain the Intake Manifold on Chrysler 300M?A:Before servicing the lower intake manifold, release the fuel system pressure and let out the coolant. Clear off the upper intake manifold, then take out the electrical connectors from the Fuel Injectors and Coolant Temperature Sensor. After that, disconnect the heater and coolant bottle supply hoses from the coolant tube at the rear of the intake manifold and then the fuel supply hose from the Fuel Rail. Unscrew the screw on the fuel rail support bracket that is connected to the throttle body support bracket and unbolt the fuel rail. After that, take out the fuel rail and injectors as a group. Unlock and remove the bolts connecting the lower intake and get rid of the intake manifold. Clean all areas to be sealed and make sure the gaskets are intact; change gaskets with tears or cuts. Mount the gaskets and intake manifold on the cylinder head, afterwards put the fuel rail with injectors in place. Mount the manifold bolts, secure them one at a time as stated in the sequence and stop when the torque reaches 28 Nm (250 in. lbs.). Screw in the fuel rail support bracket screw, link the fuel supply hose to the fuel rail and re-hook the heater and coolant bottle supply hoses. After that, reconnect the electrical parts to the fuel injectors and coolant sensor and install the upper intake manifold. After filling the cooling system, start the Asd Fuel System Test with the Drbiii scan tool to check for leaks in the fuel system. Leave the Asd relay energized for at least 7 minutes, unless the ignition switch is turned off or the Stop All Test is run.

Related Chrysler 300M Parts
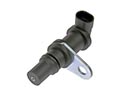 Chrysler 300M Crankshaft Position Sensor
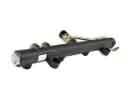 Chrysler 300M Fuel Rail
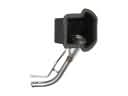 Chrysler 300M Fuel Filler Neck
 Chrysler 300M Fuel Injector O-Rings
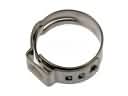 Chrysler 300M Fuel Line Clamps
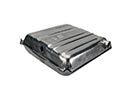 Chrysler 300M Fuel Tank
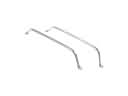 Chrysler 300M Fuel Tank Strap
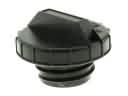 Chrysler 300M Gas Cap
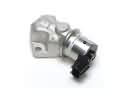 Chrysler 300M Idle Control Valve
 Chrysler 300M Intake Manifold Gasket
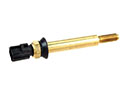 Chrysler 300M Temperature Sender
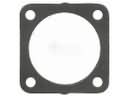 Chrysler 300M Throttle Body Gasket