JeepParts
My Garage
My Account
Cart
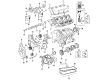
OEM Chrysler 300M Rod Bearing
Engine Connecting Rod Bearing- Select Vehicle by Model
- Select Vehicle by VIN
Select Vehicle by Model
orMake
Model
Year
Select Vehicle by VIN
For the most accurate results, select vehicle by your VIN (Vehicle Identification Number).
1 Rod Bearing found


Chrysler 300M Connecting Rod Bearing Part Number: 4626657AD
$16.53 MSRP: $24.35You Save: $7.82 (33%)Ships in 1-2 Business Days
Chrysler 300M Rod Bearing
Choose OEM Rod Bearing that meet Chrysler factory standards. Chrysler designs and tests every component for precision and durability. Each Rod Bearing follows strict manufacturing steps to lock in quality and fit. If your Chrysler 300M matters to you, OEM parts make the smart choice. You'll get the exact look, feel, and performance you expect. Shop genuine 300M parts at the highly competitive prices online. Enjoy a manufacturer's warranty, a hassle-free return policy, and rapid delivery. No more guesswork with off brands. Get genuine parts with exact fit and true factory performance. Shop with confidence today at JeepPartsDeal.com.
The Chrysler 300M Rod Bearing is a critical component that adds a lot to the car's reputation of a reliable and powerful car. Its primary function is to contain and directly support the crankshaft and the connecting rods while engaging in a perfect rotation whilst at the same time managing the oil clearance, which is vital in the running of the engine. These available for nearly all Chrysler 300M, Rod Bearings are generally produced as bi-metal or tri-metal primarily; the former contains an aluminum alloy lining with enhanced hardness while the latter boasts a copper alloy layer and thus has greater tensile strength. Due to Precision Machining, applications of Rod Bearings in the cylinder block are properly seated, as the latter is made for high-output engines. Apart from improving the performance of the Chrysler 300M, this attention to details impacts on safety by minimizing the chances of an engine conking out. The enhanced initial materials additionally some layer utilized for performance oriented Rod Bearings lessen the friction more and enhance the sturdiness these are some advantages of these Rod Bearings in automotive market. The Rod Bearings should therefore be installed correctly and maintained well if the Chrysler 300M has to be maintained as a strong performer in the rigor of the sports sedan category. All in all, the Chrysler 300M Rod Bearing perfectly illustrates the company's focus on the quality and the driving experience; it is undoubtedly an essential element of any vehicle.
Chrysler 300M Rod Bearing Parts and Q&A
- Q: How Can Rod Bearings Be Properly Marked and Installed for Accurate Assembly on Chrysler 300M?A:When taking off the bearing caps, remember to mark them so they go back in the same place; they are not alike. While assembling the bearing shells, each cap's tang should be inserted into the hole cut into its rod and the position of the cap tangs should align with the rod on the same side. Keep loading the bank with rods one after another until the job is complete, making sure taper or roundness on the Crankshaft journals always measures 0.015 mm (0.0006 in.) or less. Find bearings in regular, 0.025 mm (0.001 in.) and 0.254 mm (0.010 in.) sizes that are usually installed in pairs, so keep them separate; never combine a new and old half by filing the rods or bearing caps. To find the right clearance for main bearings and connecting rod bearings, use plastigage and refer to the clearance guidelines. Examine the rod bearing bolts and if you find any necking, then replace them with new bolts. To check for stretching, hold a scale against the threads of the connecting rod bolts; if some threads remain uncontacted, you have to put in a new bolt. Apply some engine oil to the threads before placing the nuts and finger tighten them all before using a wrench to torque each nut equally. To measure the connecting rod side clearance, attach a dial indicator to a fixed position on the engine, put the probe against the rod cap, zero the indicator with the rod in its rear position, move the rod forward to take a reading, use these readings to check against specs and repeat as you turn the crankshaft to access all the rods.

Related Chrysler 300M Parts
 Chrysler 300M Camshaft Seal
 Chrysler 300M Crankshaft
 Chrysler 300M Crankshaft Pulley
 Chrysler 300M Crankshaft Timing Gear
 Chrysler 300M Cylinder Head
 Chrysler 300M Engine Mount
 Chrysler 300M Engine Mount Bracket
 Chrysler 300M Oil Pan Gasket
 Chrysler 300M Oil Pump Gasket
 Chrysler 300M Rocker Arm Pivot
 Chrysler 300M Valve Stem Seal
 Chrysler 300M Variable Timing Sprocket