JeepParts
My Garage
My Account
Cart
OEM Chrysler 300M Piston
Engine Pistons- Select Vehicle by Model
- Select Vehicle by VIN
Select Vehicle by Model
orMake
Model
Year
Select Vehicle by VIN
For the most accurate results, select vehicle by your VIN (Vehicle Identification Number).
1 Piston found

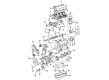
Chrysler 300M Piston Part Number: R5010335AB
Chrysler 300M Piston
Choose OEM Piston that meet Chrysler factory standards. Chrysler designs and tests every component for precision and durability. Each Piston follows strict manufacturing steps to lock in quality and fit. If your Chrysler 300M matters to you, OEM parts make the smart choice. You'll get the exact look, feel, and performance you expect. Shop genuine 300M parts at the highly competitive prices online. Enjoy a manufacturer's warranty, a hassle-free return policy, and rapid delivery. No more guesswork with off brands. Get genuine parts with exact fit and true factory performance. Shop with confidence today at JeepPartsDeal.com.
The Piston is a vital component of the Chrysler 300M internal combustion engine that provides engineering support for the conversion of combustion force into dynamic force that helps in movement of the vehicle. Highly recognized for its superb dependability and speed, the Piston is usually manufactured using lightweight aluminum alloys in order to go along with its sturdiness. This is accompanied by gas-tight pistons rings, which in turn increase efficiency as well as the safety of the Chrysler 300M. The Piston fits to other models in the Chrysler 300M series which continue to deliver the highest performance levels. Extraordinary characteristics like cooling cavities and enhanced oil lubrication system are built into the Piston and thus makes it unique in the market when compared to other automotive pistons. The exquisite and efficient 3.5L V6 engine of the 300M that delivers up 255 horsepower is made more effective by Piston that ensures the car runs smoothly. For the 300M, changes were made to the car as it went through the production run and the need for Piston stayed in the spotlight supporting the car as a reliable performer. In summary, much to the capability it furnishes power to the Chrysler 300M, it integrates an incredible function in safety and efficiency, which makes this Piston a vital component of the irresistible engineering of the Chrysler 300M.
Chrysler 300M Piston Parts and Q&A
- Q: How to Remove and Install a Piston in an Engine on Chrysler 300M?A:The first thing to do is remove both the cylinder heads and the Oil Pan. Apply a reliable ridge reamer to level the upper ridge in the piston bores and remember to cover the pistons' tops at all times. You should remove the pistons and connecting rods from the cylinder's upper area, making sure that the Crankshaft moves so that each connecting rod is centered in its bore. For each cylinder, examine the connecting rods and caps to identify them and mark them if that's needed. Unscrew the connecting rod cap and place protectors on the connecting rod bolts before you remove each piston and rod assembly out of the engine cylinders, always being careful not to damage the crankshaft journals. After you remove the bearing cap, replace it on the mating rod. While installing, put the piston rings in place first, looking out for possible necking in the connecting rod bearing cap bolts; change any of them that look damaged. Make sure the compression ring gaps are not in line with the oil ring rail gap. Submerge the piston and rings in clean engine oil, use the ring compressor over the piston head to position the rings and attach it with a special wrench. Once connectors for connecting rod bolts are fitted, rotate the engine crankshaft to have the center of the connecting rod journal in the cylinder and lead the rod and piston into place without moving piston assemblies from cylinder to cylinder. The piston's arrow has to point toward where the engine faces and the squirt hole on the connecting rod should face further down the cylinder bore where the piston's greatest thrust occurs. Glide the journal of the connecting rod into place, then with the hammer handle, tap the piston down into the cylinder bore. After installing the rod caps, set nuts over the clean and greased rod bolts and tighten them at 54 Nm (40 ft. lbs.) plus 1/4 turn. Reinstate both the cylinder head(s) and the oil pan at the end.

Related Chrysler 300M Parts
 Chrysler 300M Camshaft Seal
 Chrysler 300M Crankshaft
 Chrysler 300M Cylinder Head Gasket
 Chrysler 300M Engine Mount
 Chrysler 300M Engine Mount Bracket
 Chrysler 300M Exhaust Valve
 Chrysler 300M Harmonic Balancer
 Chrysler 300M Oil Pan
 Chrysler 300M Oil Pump Rotor Set
 Chrysler 300M Piston Ring Set
 Chrysler 300M Rocker Arm
 Chrysler 300M Variable Timing Sprocket