JeepParts
My Garage
My Account
Cart
OEM Chrysler Center Console Base
- Select Vehicle by Model
- Select Vehicle by VIN
Select Vehicle by Model
orMake
Model
Year
Select Vehicle by VIN
For the most accurate results, select vehicle by your VIN (Vehicle Identification Number).
119 Center Console Bases found

Chrysler Console Base, Dark Gray, Center Part Number: 1BB041DVAB
$19.30 MSRP: $111.00You Save: $91.70 (83%)Ships in 1-2 Business DaysProduct Specifications- Other Name: Console - Floor; Center Console, Center, Front Center; Center Console Base; Console
- Position: Center
- Replaces: 1BB041DVAA


Chrysler Console Panel, Beige/Taupe, Center Part Number: 1AC941KAAC
$29.80 MSRP: $171.00You Save: $141.20 (83%)Ships in 1-2 Business DaysProduct Specifications- Other Name: Console - Base; Seat Console, Center; Center Console; Center Console Base; Console Base
- Position: Center

Chrysler Base, Center Part Number: 1LD99DX9AA
$35.47 MSRP: $204.00You Save: $168.53 (83%)Ships in 1-2 Business DaysProduct Specifications- Other Name: Bin - Floor Console; Center Console, Front Center; Seat Console, Center; Console Compartment; Bin; Bin Floor Console
- Position: Center
- Replaces: 1LD991DVAA, 1LD991R4AA, 1LD991D5AA, 1LB961J8AA, 1LB961DVAA, 1LB961D5AA, 1LD991J8AA, 1LD991K5AA

Chrysler Console Base, Center Part Number: 1GM582D1AB
$40.36 MSRP: $232.00You Save: $191.64 (83%)Ships in 1-2 Business DaysProduct Specifications- Other Name: Console - Floor; Center Console, Center, Center Lower; Center Console Base; Console Floor Front
- Position: Center
- Replaces: 1GM58BD1AB, 1GM581D1AA, 1GM581D1AB

Chrysler Console, Light Gray, Front Center Part Number: 1JG421D1AA
$35.08 MSRP: $192.00You Save: $156.92 (82%)Ships in 1-2 Business DaysProduct Specifications- Other Name: Console - Base; Center Console, Center, Front Center; Center Console Base; Console Base
- Position: Front Center
- Replaces: 1GL371D1AA


Chrysler Console Base, Black, Center Part Number: 1VV18DX9AC
$180.65 MSRP: $298.00You Save: $117.35 (40%)Ships in 1-2 Business DaysProduct Specifications- Other Name: Console - Floor; Center Console, Center; Center Console Base; Console Floor Front
- Position: Center
- Replaces: 1VV18DX9AB

Chrysler Console Base, Black, Center Part Number: 5XF831D2AI
$690.06 MSRP: $1150.00You Save: $459.94 (40%)Ships in 1-2 Business DaysProduct Specifications- Other Name: Console - Floor; Center Console, Center; Center Console Base
- Position: Center
- Replaces: 5XF831D2AB, 5XF831D2AG, 5XF831D2AD, 5XF831D2AE, 5XF831D2AC, 5XF831D2AH, 5XF831D2AF
Chrysler Console Base, Center Part Number: 5RJ942D2AI
$467.09 MSRP: $740.00You Save: $272.91 (37%)Ships in 1-2 Business DaysProduct Specifications- Other Name: Console - Floor; Center Console, Center; Center Console Base; Console
- Position: Center

Chrysler Console Base, Beige Part Number: 1JC92HL5AA
$139.36 MSRP: $205.00You Save: $65.64 (33%)Ships in 1-3 Business DaysProduct Specifications- Other Name: Base - Floor Console; Center Console Base; Base Floor Console
Chrysler Console Assembly, Taupe, Front Center Part Number: RE921L8AK
$140.72 MSRP: $207.00You Save: $66.28 (33%)Ships in 1-3 Business DaysProduct Specifications- Other Name: Console - Floor; Center Console, Center, Front Center; Center Console Base; Console; Console Floor
- Position: Front Center

Chrysler Console Assembly, Dark Gray, Center Part Number: RE921DVAK
$151.82 MSRP: $224.00You Save: $72.18 (33%)Ships in 1-3 Business DaysProduct Specifications- Other Name: Console - Floor; Center Console, Center; Center Console Base; Console Floor; Console
- Position: Center

Chrysler Console Body, Center Part Number: 68270656AE
$152.96 MSRP: $226.00You Save: $73.04 (33%)Ships in 1-3 Business DaysProduct Specifications- Other Name: Console - Floor Console; Center Console, Center; Center Console Base; Console; Bin Floor Console
- Position: Center
- Replaces: 68270656AA, 68270656AB, 68270656AC, 68270656AD

Chrysler Console Assembly, Taupe, Center Part Number: RE911L8AH
$173.35 MSRP: $255.00You Save: $81.65 (33%)Ships in 1-3 Business DaysProduct Specifications- Other Name: Console - Floor; Center Console, Center; Center Console Base; Console; Console Floor
- Position: Center
- Replaces: RE911L8AF, RE911L8AG, RE911L8AE
Chrysler Console Assembly, Sandstone, Center Part Number: RE911TMAH
$189.21 MSRP: $279.00You Save: $89.79 (33%)Ships in 1-3 Business DaysProduct Specifications- Other Name: Console - Floor; Center Console, Center; Center Console Base; Console; Console Floor
- Position: Center
- Replaces: RE911TMAG, RE911TMAE, RE911TMAF
Chrysler Console Assembly, Dark Gray, Center Part Number: RE911DVAH
$193.74 MSRP: $285.00You Save: $91.26 (33%)Ships in 1-3 Business DaysProduct Specifications- Other Name: Console - Floor; Center Console, Center; Center Console Base; Console; Console Floor
- Position: Center
- Replaces: RE911DVAE, RE911DVAG, RE911DVAF
Chrysler Console Base, Black Part Number: 7EJ611X9AA
$224.33 MSRP: $330.00You Save: $105.67 (33%)Ships in 1-2 Business DaysProduct Specifications- Other Name: Console - Floor
Chrysler Console Assembly, Sandstone, Center Part Number: RE921TMAG
$228.87 MSRP: $337.00You Save: $108.13 (33%)Ships in 1-3 Business DaysProduct Specifications- Other Name: Console - Floor; Center Console, Center, Front Center; Center Console Base; Console
- Position: Center
- Replaces: RE921TMAE, RE921TMAF
Chrysler Console Assembly, Taupe, Center Part Number: RE921L8AG
$230.00 MSRP: $339.00You Save: $109.00 (33%)Ships in 1-3 Business DaysProduct Specifications- Other Name: Console - Floor; Center Console, Center, Front Center; Center Console Base; Console
- Position: Center
- Replaces: RE921L8AF, RE921L8AE
Chrysler Console Base, Black Part Number: 1JC92DX9AA
$242.46 MSRP: $358.00You Save: $115.54 (33%)Ships in 1-3 Business DaysProduct Specifications- Other Name: Base - Floor Console; Center Console Base; Base Floor Console

Chrysler Console Base Part Number: 1JC901D5AA
$251.53 MSRP: $370.00You Save: $118.47 (33%)Ships in 1-3 Business DaysProduct Specifications- Other Name: Base - Floor Console; Center Console Base; Base Floor Console
| Page 1 of 6 |Next >
1-20 of 119 Results
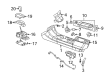
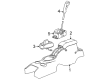
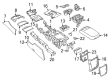
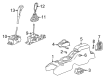
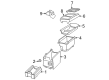
Chrysler Center Console Base
OEM parts sourced directly from Chrysler deliver superior quality, long lasting strength, and a precise fit you can trust. Each item goes through strict quality checks to ensure safety, toughness, and performance that matches your factory equipment. At JeepPartsDeal online shop, you'll get top-quality, budget-friendly OEM Chrysler Center Console Base for your vehicle. We focus on giving you a high standard without pushing up the price. Our full selection of genuine factory products comes backed by the original manufacturer's warranty. You'll love our fast delivery, seamless shopping experience, and convenient return policy, saving you all the hassle.
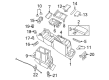
Chrysler Center Console Base ensures that the gear is organized and accessible to reduce distraction during driving. Since 1925, Chrysler has focused on solid build, smooth ride, and family-friendly space. At an early stage, Floating Power mounts reduce engine vibration and make everyday driving smoother, eliminating cabin vibration. The new Airflow design was a bold assurance that the company would trade in boring design in favor of increased flow of air and cooler interiors. Subsequent minivans had a tendency to have spacious cabins and fast access via sliding doors, which were adored by parents. Customers also valued the importance of being able to remain transparent and direct during the purchase process without losing wallets and nerves. Comfort was the shotgun carrying bumps and seats covered with long-trip support, which did not bother. Center Console Base fits into that tradition by providing each cabin with an intelligent mid-car stuff hub. The drivers of Chrysler make drops of phones, cards, or change in deep compartments, which remain in place during rough pavement. There are also robust cup holders in Center Console Base and a pass-through wiring that keeps the wires of the vehicle neat rather than losing their messiness on the floor when the vehicle is braking hard or making sharp turns. The owners of Chrysler will have quicker access to must-haves, which reduces eye-off-road time and boosts safety generally. Center Console Base has hard plastics and tight seams that shake off spills, sun glare, and everyday bangs. The Center Console Base connects without any special equipment, allowing replacement of a worn-out part or upgrade without any pain. Chrysler maintains the same part in its models, and therefore consistency is a certainty.
Chrysler Center Console Base Parts and Q&A
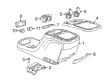
- Q: How to Install a Center Console Base on Chrysler 300?A:Place the floor console in the car far enough so you can reattach the jumper wire connector to the accessory power outlet under the console and if you have rear heated seats, connect those wires as well. After gripping the console, place the ears at the front firmly into the slots on the lower instrument panel and slide the console so the front's two alignment holes line up over the two alignment pins. Place the rear bin's locating pin into the top of the floor panel transmission tunnel and install and tighten the two 3 Nm (23 in. lbs.) front console screws into the instrument panel. Then, attach all three 8 mm bolts into the rear bin that bind the console to the floor panel transmission tunnel by tightening them to 5 Nm (40 in. lbs.). Carefully lift the bezel of the console shifter up and into place onto the gear selector lever, making sure the holes in the bezel fit the tabs underneath the console and then tighten the two screws that secure the front of the console shifter bezel to 3 Nm (23 in. lbs.). Set the curved side of the mat toward the back of the rear bin, then place the mat into the cubby bin in front of the console. Solidly push the trim ring down onto the gear selector while putting the selector into Park, set the retaining ring on the shaft about halfway, then mount the shifter knob fully over the shaft and press the retaining ring all the way up and to the shifter knob. Any time the Automatic Express Up power window feature is installed and the power to the door module drops or the battery is removed, owners must run a calibration and battery reconnect procedure. After that, secure the negative battery cable once more. Add the DVD to the center console, then put on the console cover, attach it by mounting six screws and top it off by installing the new side covers.
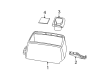
- Q: How to Service and Repair the Center Console Base (Front) on Chrysler Crossfire?A:The first step in servicing the front center console is to take out the lower instrument panel. Next, remove the cluster cover, the shifter cover and bezel, always disconnecting all the power window harness connectors. Take out the rear center console after that and then the radio using part number 1. Afterward, take out the center console lens by removing the two screws in the radio opening and disconnecting the harness cables in the switch panel. The module is attached to the vehicle with two screws and one wire connector. Unscrew and unhook these from behind and the module will come off. In the end, unscrew 4 and 2 from the side panels and remove 2 from the center console.