JeepParts
My Garage
My Account
Cart
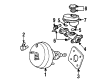
OEM Chrysler Cirrus Brake Master Cylinder
- Select Vehicle by Model
- Select Vehicle by VIN
Select Vehicle by Model
orMake
Model
Year
Select Vehicle by VIN
For the most accurate results, select vehicle by your VIN (Vehicle Identification Number).
3 Brake Master Cylinders found

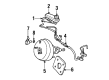
Chrysler Cirrus Master Cylinder Part Number: 4764192
$159.25 MSRP: $229.00You Save: $69.75 (31%)Ships in 1-2 Business DaysChrysler Cirrus Master Cylinder Part Number: 4764194

Chrysler Cirrus Master Cylinder Part Number: 4764103
Chrysler Cirrus Brake Master Cylinder
Choose OEM Brake Master Cylinder that meet Chrysler factory standards. Chrysler designs and tests every component for precision and durability. Each Brake Master Cylinder follows strict manufacturing steps to lock in quality and fit. If your Chrysler Cirrus matters to you, OEM parts make the smart choice. You'll get the exact look, feel, and performance you expect. Shop genuine Cirrus parts at the highly competitive prices online. Enjoy a manufacturer's warranty, a hassle-free return policy, and rapid delivery. No more guesswork with off brands. Get genuine parts with exact fit and true factory performance. Shop with confidence today at JeepPartsDeal.com.
Brake Master Cylinder in Chrysler Cirrus vehicles is an integral asset of this car's braking system - its function is to translate pressure from the brake pedal into hydraulic pressure. This hydraulic pressure goes to the slave cylinders where the push the brake to apply the brakes and produce the friction needed to offer the stopping force on the car. Ordinarily, the master cylinder incorporates techniques such as those involving pistons, seals and springs embedded in cast iron or aluminum; and the fluid reservoirs may be integrated or independent of the master cylinder main body. Chrysler Cirrus cars employ dual circuit master cylinders so that in the event that one circuit ceases to operate, then the other one will be able to supply the car with brake force. This design is safety improving as this layout provides the opportunity to carry on working regardless the hydraulic system failure. Some of the general problems of the Brake Master Cylinder include leakage of the hydraulic fluid, and internal problems, which may affect the pressure that is needed in the brake shoes. Leakage and moisture checks need to be conducted frequently in order to sustain the performance of the braking system.
Chrysler Cirrus Brake Master Cylinder Parts and Q&A
- Q: How to Service and Repair a Brake Master Cylinder on Chrysler Cirrus?A:Start by removing the connection between the brake fluid sensor in the brake master cylinder and your vehicle's wiring harness. At the next stage, take off both sets of brake tubes from the outlets on the brake master cylinder and put plugs in all the empty openings. Wash the connection point between the brake master cylinder and the booster with Mopar Brake Parts Cleaner or use an alternative cleaner. Take out the 2 nuts holding the brake master cylinder assembly to the power brake vacuum booster and slide the assembly off its studs. Set the brake master cylinder in a vise and attach Special Tool 6802, labeled Bleeding Tubes, to its outlets. Place the tubes below the brake fluid surface when the brake master cylinder is full with DOT 3 brake fluid or something similar. With a wooden dowel, apply slow pressure to the push rod and let the Pistons move back until you're certain that no more air bubbles exit the bleed tubes. With the reservoir filled, unplug the tube from the brake master cylinder outlets, cover the outlets, put the fill cap on the reservoir and take the brake master cylinder out of the vise. With the vehicle upside down, fix the frame of the brake master cylinder to the studs of the power brake unit. At the same time, line up the brake master cylinder piston with the push rod on the power brake vacuum booster. Join the brake vacuum booster with the 2 brake master cylinders using their mounting nuts and tighten all to a torque of 28 Nm (250 inch lbs.). At last, attach the brake tubes to the ports on the brake master cylinder, then screw on the tube nuts until they are tightened to a torque of 17 Nm (145 inch lbs.).
- Q: How to Bleed a Brake Master Cylinder on Chrysler Cirrus?A:For bleeding the brake master cylinder, clamp it down in a vise and attach Bleeding Tubes 6802 to both outlet ports, so they remain below the top of the brake fluid in the reservoir. Use fluid that matches DOT 3 standards such as Mopar, to fill the brake fluid reservoir. Insert a wooden dowel into the bleed screws and slowly depress the push rod as the Pistons return to the normal position, continue until you no longer see air bubbles escaping from the bleed tubes. When it's done bleeding, remove the tubes from the outlet ports, plug the ports and set the fill cap onto the reservoir before you ease the brake master cylinder out of the vise. It's fine to not worry about bleeding the entire hydraulic setup after the brake master cylinder is changed, but the brake master cylinder in the vacuum booster needs to be properly bled and filled when it is installed.

Related Chrysler Cirrus Parts
 Chrysler Cirrus ABS Control Module
 Chrysler Cirrus Brake Booster
 Chrysler Cirrus Brake Caliper
 Chrysler Cirrus Brake Controller
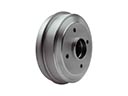 Chrysler Cirrus Brake Drum
 Chrysler Cirrus Brake Line
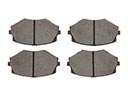 Chrysler Cirrus Brake Pads
 Chrysler Cirrus Brake Proportioning Valve
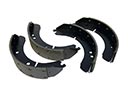 Chrysler Cirrus Brake Shoe Set
 Chrysler Cirrus Speed Sensor
 Chrysler Cirrus Wheel Cylinder
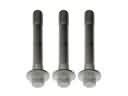 Chrysler Cirrus Wheel Hub Bolt