JeepParts
My Garage
My Account
Cart
OEM Chrysler Concorde Intake Manifold
Engine Intake Manifold- Select Vehicle by Model
- Select Vehicle by VIN
Select Vehicle by Model
orMake
Model
Year
Select Vehicle by VIN
For the most accurate results, select vehicle by your VIN (Vehicle Identification Number).
8 Intake Manifolds found

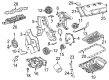
Chrysler Concorde Intake Manifold Part Number: 5080818AA
$218.82 MSRP: $333.00You Save: $114.18 (35%)Ships in 1-2 Business Days
Chrysler Concorde Intake Manifold Part Number: 5101819AA
Chrysler Concorde Intake Manifold Part Number: 5080818AB

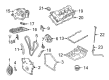
Chrysler Concorde Intake Manifold, Lower Part Number: 4591273AB
Chrysler Concorde Intake Manifold Part Number: 4792379AJ
Chrysler Concorde Intake Manifold Part Number: 4792379AN
Chrysler Concorde Intake Manifold Part Number: 4792379AG

Chrysler Concorde Intake Manifold Part Number: 5017188AA
Chrysler Concorde Intake Manifold
Choose OEM Intake Manifold that meet Chrysler factory standards. Chrysler designs and tests every component for precision and durability. Each Intake Manifold follows strict manufacturing steps to lock in quality and fit. If your Chrysler Concorde matters to you, OEM parts make the smart choice. You'll get the exact look, feel, and performance you expect. Shop genuine Concorde parts at the highly competitive prices online. Enjoy a manufacturer's warranty, a hassle-free return policy, and rapid delivery. No more guesswork with off brands. Get genuine parts with exact fit and true factory performance. Shop with confidence today at JeepPartsDeal.com.
Being an intake manifold, it plays a very critical role that enables Chrysler's full-sized Concorde sedan to run smoothly and be very efficient. Especially well known for effective air distribution, the intake manifold is one of the major components involved in the feeding of the air or air and fuel mixture to the cylinders where it influences the engine's power and performance levels. Built for the Concorde cars made between 1993 and 2004, this intake manifold is fashioned to improve airflow allowing the engine to run at its optimal while meeting a number of safety factors. The contemporary models of the Chrysler Concorde intake manifold, for example, uses such lightweight materials like the composite plastics that helps in conserving fuel while at the same time contributes to the cooling effect hence making it a unique item in the auto market. From the analysis of the present generation of models, some are fitted with variable-length intake manifolds (VLIM) for greater performance depending on the load applied by the engine. The quality of its gaskets: for same reasons as in the previous point, the existence of a good seal at the level of the intake manifold is crucial. Through this design and construction, the Chrysler Intake Manifold speaks a lot of the Concorde's engineering since it plays a key role in the car's reliability and performance. No matter in Chrysler Concorde's base LX, LXi or the Limited, one of the most significant remains the Chrysler Concorde Intake Manifold this is the major factor that add to the high quality ride of the vehicle as well as its driving experience.
Chrysler Concorde Intake Manifold Parts and Q&A
- Q: How to Service and Repair an Intake Manifold on Chrysler Concorde?A:Start by removing the negative cable from the battery remote jumper terminal and disconnecting the Inlet Air Temperature (IAT) Sensor before removing the air inlet resonator and tube. Then, separate the Throttle Cable and speed control cable from the throttle arm and bracket and take out the throttle cable bracket. Loosen and pull off the connectors from the MAP Sensor, TPS Sensor and IAC Motor. Remove the Vapor Purge hose, Brake Booster hose, Speed Control Servo and the PCV hose as well. Start by loosening the upper fastener at the throttle body support bracket, then deal with the attaching bolts and remove the upper manifold. Check the manifold for cracks, gasket surface damage, warpage and blockage in its EGR ports; if anything is found, replace it and clean the ports when required. Should the vacuum port on the aircraft be broken, deal with it using the repair procedure. In order to install the system, clean and look over the sealing surfaces, take advantage of existing gaskets if they are intact and make sure Fuel Injectors and wiring harnesses have enough space to be installed without problems. Line up the upper and lower manifolds, insert and tighten the attaching bolts as specified and complete each step to 12 Nm. Install the upper fastener in the throttle body support bracket, then put the speed control servo, PCV and the vacuum and vapor purge hoses in place. Return the electrical connectors back to the MAP Sensor, TPS Sensor and IAC Motor, attach the throttle cable bracket and link the throttle and speed control cables through the bracket and throttle arm. At this point, insert the air inlet resonator and inlet tube, linking the IAT Sensor connector again. Then, tie the negative battery cable to the battery remote jumper terminal.
Related Chrysler Concorde Parts
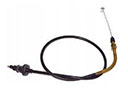 Chrysler Concorde Accelerator Cable
 Chrysler Concorde Air Duct
 Chrysler Concorde Air Filter
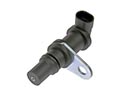 Chrysler Concorde Crankshaft Position Sensor
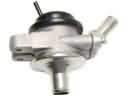 Chrysler Concorde Diverter Valve
 Chrysler Concorde Fuel Injector O-Rings
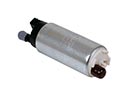 Chrysler Concorde Fuel Pump
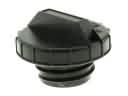 Chrysler Concorde Gas Cap
 Chrysler Concorde Intake Manifold Gasket
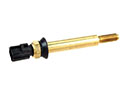 Chrysler Concorde Temperature Sender
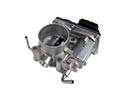 Chrysler Concorde Throttle Body
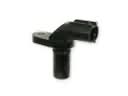 Chrysler Concorde Transmission Sensor