JeepParts
My Garage
My Account
Cart
OEM Chrysler Concorde Rack And Pinion
Steering Gear- Select Vehicle by Model
- Select Vehicle by VIN
Select Vehicle by Model
orMake
Model
Year
Select Vehicle by VIN
For the most accurate results, select vehicle by your VIN (Vehicle Identification Number).
7 Rack And Pinions found

Chrysler Concorde Steering Gear Part Number: 5003940AB

Chrysler Concorde Steering Gear Part Number: 4886209AB
Chrysler Concorde Steering Gear Part Number: 4886210AB
Chrysler Concorde Steering Gear Part Number: 4897712AB

Chrysler Concorde Steering Gear Part Number: 5003933AC

Chrysler Concorde Steering Gear Part Number: 5073185AA
Chrysler Concorde Steering Gear Part Number: 4897858AB
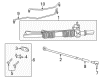
Chrysler Concorde Rack And Pinion
Choose OEM Rack And Pinion that meet Chrysler factory standards. Chrysler designs and tests every component for precision and durability. Each Rack And Pinion follows strict manufacturing steps to lock in quality and fit. If your Chrysler Concorde matters to you, OEM parts make the smart choice. You'll get the exact look, feel, and performance you expect. Shop genuine Concorde parts at the highly competitive prices online. Enjoy a manufacturer's warranty, a hassle-free return policy, and rapid delivery. No more guesswork with off brands. Get genuine parts with exact fit and true factory performance. Shop with confidence today at JeepPartsDeal.com.
Chrysler Concorde Rack And Pinion is another reliable tool that became the key component of the automaker's steering system in some Chrysler Concorde models manufactured between 1993 and 2004. This complex configuration of the rack and pinion steers the car by transmitting rotation from the steering wheel to directed translation of the front wheels thus making the car nimble to steer. Mentioned above is the Chrysler Concorde; this car has power aided rack and pinion steering system which employed the use of hydraulic to make it easier for the driver in steering the car. The Chrysler Concorde Rack And Pinion can be considered to be civilized not only because of the beneficial impact it has on the car's handling and fuel efficiency; the fact that the rack and pinion system is of paramount importance when it comes to responding to gear changes and sudden maneuvers that are part of an ordinary drive for avoiding a collision. For instance, in rack and pinion assembly, there are helical gears that as Service observed may contribute to wear, but provide smooth operation, and thus the assembly is strong enough to endure daily use. Chrysler Concorde Rack And Pinion also sometimes developed problems like leakage and so it needs to be maintained occasionally so that the rack and pinion will be long lasting and efficient. As a result of applicable to different models of Chrysler Concorde, this steering system is especially seen as a competitive advantageous to other existing steering systems in automotive market, thanks to both the innovative design, and the reliable performance of the Chrysler Concorde's steering system as an important attribute of vehicle's handling.
Chrysler Concorde Rack And Pinion Parts and Q&A
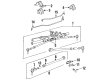
- Q: How to Install a Rack and Pinion Steering Gear on Chrysler Concorde?A:The tie rod attachment must remain centered at the steering when you install any rack and pinion in the vehicle. Start by reinstalling the rack and pinion the reverse way from how you took it out and ensure the left front tire is lying straight ahead if your vehicle uses a 2.7 Liter engine. Put the right tie rod into position in the hole on the inner fender and attach the outer tie rod at the steering arm on the right strut, fastening it with a 37 Nm (27 ft. lbs.) nut. Repeat the above, but torque the wheel mounting lugs up to the specified 135 Nm (100 ft. lbs.) when you do the right side. Make sure the front wheels are touching the floor lightly and that's when you should mount the intermediate steering shaft on the rack and pinion. Use roll pin Installer (Special Tool 6831A) to set the roll pin properly at the center of the intermediate shaft flex joint. Slip the rack and pinion and intermediate shaft into the dash panel sealing boot, placing the rack and pinion's holes so they match with the crossmember's holes. Loose-fit the bolts for the left rack and pinion assembly onto the crossmember and tighten the right side mounting bracket bolts to 58 Nm (43 ft. lbs.) and the left side bolts to the same torque. If you loosened them earlier, tighten the bolts for the rack and pinion mounting bracket on the right side to 37 Nm (27 ft. lbs.). Before installing tie rods, ensure the tie rod spacer block in the rack and pinion box is in line with the bolt holes on the rack. Fasten the fluid lines to the proper places on the rack and pinion and tighten the nuts on each tube to 47 Nm (35 ft. lbs.). If your ATV has speed-proportional steering, hook the wiring into the solenoid control valve connector. Pin the center take-off into the rack and pinion and install the bolts through the tie rod assemblies, stretching washers between them and the rack and pinion. Tighten the bolts to 100 Nm (74 ft. lbs.) afterward and bend the retaining plate tabs. Attach the vacuum hose from the power Brake Booster to the intake manifold vacuum outlet with a clamp. Then, place the master cylinder on the power brake vacuum booster, using the manufacturer's torque specification of 28 Nm (250 inch lbs.) Attach the end of the wire to the brake fluid level switch inside the master cylinder fluid reservoir and set the in-line resonator at the Throttle Body. After that, put the inlet hose from the air cleaner housing to the throttle body. Bolt the cowl reinforcement in place with eight bolts to the A-pillar assemblies and the wiper module bolt. Properly attach the wiper module and cowl, making sure screws are tight and fastened correctly. After that, attach the Wiper Arms to the pivots and tighten the nuts before putting on caps. Lift the intermediate shaft onto the steering column shaft, hold it with the steering column coupler pinch bolt tightened to 28 Nm (21 ft. lbs.) and put the pinch bolt nut retaining pin in place. Unfasten the holding clamp from the steering wheel, put the battery ground cable onto the shock tower's ground stud and only add Mopar Power Steering Fluid or something similar to the reservoir. To refill and flush the power steering system, raise the vehicle, perform the initial operation procedure, remove old fluid, lower the vehicle and then adjust the front toe.
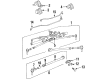
- Q: How to Remove a Rack and Pinion Steering Gear on Chrysler Concorde?A:Before taking out the rack and pinion, remove the ground cable from the battery, then isolate it using a cable isolator. Alignment to where the vehicle should go with the front wheels, hold them in place and tighten the Steering Wheel clamp to prevent it from moving. Taking out the retaining pin and coupler bolt, you can part the intermediate steering shaft away from the coupler on the steering column. Place the car on a frame contact hoist until the front tires start to lift off the floor. Unscrew the caps from the top of the Wiper Arm to find the nuts which you can then remove and rock back and forth to remove the arms. Pull the wiper module cover and cowl cover apart, then unfasten the eight bolts attaching the cowl reinforcement to the towers and the one bolt on the wiper module, before taking off the reinforcement assembly. Get rid of the resonator and hose from where they are fed into the Throttle Body and air cleaner housing. When the rack and pinion is speed proportional, remove the wiring harness connector from the solenoid control valve on the rack and pinion end cap below the Brake Master Cylinder. Unfasten the nuts securing the master cylinder to the booster, disconnect the brake fluid level switch wire and withdraw the master cylinder with its brake tubes still attached, standing it upright on the left valve cover. Keep the brake fluid from dripping on your car's painted parts. Release the vacuum hose from the power brake vacuum booster and straighten out the retaining tabs on the tie rod to rack and pinion mounting plate. Take the bolts and any washer clamps off the tie rods and detach them from the rack and pinion as well. Then, place the tie rods on the transaxle bell housing. Take out as much power steering fluid as you can with a siphon pump from the reservoir, then detach the return hose and pressure line attached to the rack and pinion. Loosen and remove the two screws found on the left side rack and pinion mounting bracket from the crossmember, as well as the two on the right side. Sometimes, it is important to loosen the bolts in the right mounting bracket so that the air conditioning lines fit well. Move the rack and pinion and intermediate shaft as one unit forward to get at the roll pin securing the intermediate shaft flex coupler to the rack and pinion shaft. Extract the roll pin from the flex joint of the intermediate shaft using the roll pin Remover, Special Tool 6831A. After you separate the intermediate steering shaft from the rack and pinion, lift the car and get the right front tire/wheel off. Remove the bolt connecting the tie rod end to the steering arm on the right strut and use a Puller, Special Tool C-3894-A, to free the tie rod end. Eliminate the tie rod from the car. Should you have a 2.7 liter engine, rotate the left front tire/wheel away from the car for some clearance. Position the rack and pinion in the tie rod hole in the right inner fender, pull the end attached to the wheel half-way through and pull the rack and pinion toward the left to take it from between the cowl and the engine.


Related Chrysler Concorde Parts
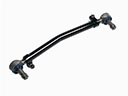 Chrysler Concorde Drag Link
 Chrysler Concorde Power Steering Hose
 Chrysler Concorde Power Steering Pump
 Chrysler Concorde Power Steering Reservoir
 Chrysler Concorde Rack & Pinion Bushing
 Chrysler Concorde Steering Column
 Chrysler Concorde Steering Column Cover
 Chrysler Concorde Steering Gear Box
 Chrysler Concorde Steering Wheel
 Chrysler Concorde Tie Rod
 Chrysler Concorde Tie Rod Adjusting Sleeve
 Chrysler Concorde Tie Rod End