JeepParts
My Garage
My Account
Cart
OEM Chrysler Pacifica Crossmember Bushing
Crossmember Mount- Select Vehicle by Model
- Select Vehicle by VIN
Select Vehicle by Model
orMake
Model
Year
Select Vehicle by VIN
For the most accurate results, select vehicle by your VIN (Vehicle Identification Number).
8 Crossmember Bushings found


Chrysler Pacifica Isolator, Upper Part Number: 4743433AC
$44.83 MSRP: $66.50You Save: $21.67 (33%)Ships in 1-2 Business Days
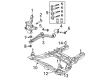
Chrysler Pacifica Crossmember Bushing Part Number: 68223023AB
$19.38 MSRP: $28.45You Save: $9.07 (32%)Ships in 1-2 Business Days
Chrysler Pacifica Isolator - Crossmember Part Number: 68273441AA
$20.81 MSRP: $30.45You Save: $9.64 (32%)Ships in 1-2 Business Days
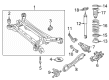
Chrysler Pacifica Crossmember Bushing, Front Part Number: 68231868AB
$39.22 MSRP: $57.40You Save: $18.18 (32%)Ships in 1-2 Business Days
Chrysler Pacifica Crossmember Bushing, Rear Part Number: 68231867AC
$48.11 MSRP: $70.40You Save: $22.29 (32%)Ships in 1-2 Business Days

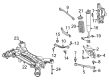
Chrysler Pacifica Isolator, Lower Part Number: 4743434AB


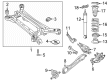
Chrysler Pacifica Crossmember Bushing, Rear Part Number: 4766746AA


Chrysler Pacifica Crossmember Bushing, Front Part Number: 4766744AA
Chrysler Pacifica Crossmember Bushing
Choose OEM Crossmember Bushing that meet Chrysler factory standards. Chrysler designs and tests every component for precision and durability. Each Crossmember Bushing follows strict manufacturing steps to lock in quality and fit. If your Chrysler Pacifica matters to you, OEM parts make the smart choice. You'll get the exact look, feel, and performance you expect. Shop genuine Pacifica parts at the highly competitive prices online. Enjoy a manufacturer's warranty, a hassle-free return policy, and rapid delivery. No more guesswork with off brands. Get genuine parts with exact fit and true factory performance. Shop with confidence today at JeepPartsDeal.com.
Chrysler Pacifica Crossmember Bushing Parts and Q&A
- Q: How to Service and Repair a Crossmember Bushing at the Front Mount on Chrysler Pacifica?A:Isolate the front mount's rear crossmember bushing by unplugging the battery's negative cable. If your vehicle doesn't have AWD, take the spare tire out. Blocks the automatic parking brake by pressing in the lever and then raise your car safely. Place extra jack stands below the front part of the engine cradle while you're removing and installing the rear suspension. After removing the rear wheel and tire units, come off the rear part of the exhaust system. Adjust the parking brake shoe if desired to make sure the cable buttons are able to disengage easily. Move the left rear cable button inside and pull it out of the equalizer and then tighten the front cable's connector using pliers before you slide the right rear cable button inside to remove it. Unscrew the left and right rear brake hose routing brackets from their mounting on the front of the rear crossmember. Should your car have AWD, note the rear driveline intersection with the propeller shaft flange, leaving the three screws there unremoved for the moment. Note the location points on the body for all four of the mounts for the rear crossmember. Location a jack below the middle of the rear suspension crossmember or rear driveline module, lift it onto the module and fix it. At the back, undo the bottom bolt and nut from every rear shock, then on the left front, loosen and unscrew both of the crossmember bolts. Let down the jack a little to place the left side of the crossmember just below the spring and then take out the spring and the isolator. Lift the left crossmember back to its spot and put in the mounting bolts you removed, but for now, don't tighten them. Do the same procedure on the right side; uninstall the coil spring and isolator. After you have released the jack, take the propeller shaft off the alignment pin and support it as you keep lowering the car until the rear suspension module is at a comfortable working height. Take the module out of the jack, turn it the other way up and note the position of the bushing you intend to remove. Whack the bushing ear with a mallet, then pull out the crossmember bolt and nut. Remove the compression link from its place and move it toward the bike's engine. Put the tools over the bushing, with the remover in the middle of the holes and tighten the press screw-drive to push the bushing out. Before installing, set the bushing onto the crossmember over the hole so that the flange meets the reference marks. With your tools assembled above the bushing and crossmember, make sure the installer avoids the compression link bracket as you tighten the press screw-drive. With the tools removed, check that everything is straight along the reference marks. Attach the compression link to the cylinder assembly and connect it with a bolt and nut still loose. Turn the rear suspension module up into the air, set it in the middle of the jack and tighten it securely. Moving the crossmember up to the body and propeller shaft, make sure the alignment pin is found and the shocks line up in the spring link pockets. Elevate the crossmember so that installing the left side's mounting bolts is easy, but you don't yet tighten them. Slowly guide the jack to position the right side carefully, just right for spring placement, then slide in the spring and isolator and secure them properly on the abutment. Use the jack to direct the spring and shock mounting into position and then insert one lower bolt without tightening it. Lift the right side of the crossmember and add the mounting bolts, fastening them firmly but only for now. Remove the bolts on the boosters' left side, lower the jack to fit the spring and repeat for the left side only. After both sides are ready, guide the crossmember into position along the marks and screw all four bolts to 163 N.m on each side and the shock bolts to 102 N.m on each side. Take off the jack, then, if your vehicle has AWD, tighten the propeller shaft-to-rear driveline module mounting bolts to 54 N.m (40 ft.lbs.). Get ready to hold the wheel speed sensor connectors with your third wrist and reattach the vehicle wiring harness. Secure the rear calipers to the braking system with their shims in place and then line up the caliper over the rotor using the adapter. Place and tighten the four caliper guide pin bolts to 22 N.m (192 in.lbs.) torque. Fit the brackets of the brake hose back in place, attach the Parking Brake Cables and put all exhaust components back together. Secure the tire and wheel assemblies and make sure the wheel nuts are tightened to 135 N.m (100 ft.lbs.) torque. Afterward, lower the car, unlock the parking brake adjuster, reattach the negative Battery Cable and install the spare tire in a two wheel drive car. Set the vehicle on an alignment rack, tighten the compression link bolt to the mentioned torque value and carry out a wheel alignment at this time.
- Q: How to Maintain and Fix a Crossmember Bushing on Chrysler Pacifica?A:Begin by taking out the negative cable from the battery and, if there is no AWD, put the spare wheel back inside. Secure your vehicle in position by locking the automatic adjuster on the parking brake lever and then lift up the vehicle, using jack stands under the engine cradle to ensure it doesn't move during rear suspension removal. Wheels and tires from the back and the whole bottom half of the exhaust system must be taken off first. It is common to need to use a parking brake tool to loosen the brake shoe a bit so disengaging the buttons is accessible. Exit the cable button from the equalizer for the left rear wheel, similarly remove the cable button for the right rear from the cable stud and use pliers to secure the front wheel button. After that, take away the screws holding the left and right rear brake hose routing brackets at the front edge of the Rear Crossmember. To these propeller shaft-to-rear driveline module input flange, add AWD and take out the three bolts, not detaching the shaft from the flange. Look for the rear suspension crossmember's location on the body at each of its mount points, then settle a jack below the chassis center, lifting up the shaft front suspension or rear driveline module. First, take out the lower mounting nut and bolt at each rear shock absorber and after that, take off all bolts connecting the front and rear crossmember to the left side of the car. Gradually lower the jack until enough of the left crossmember is suspended for the spring to be removed and then remove both the coil spring and its isolator. Gently align the left side of the crossmember onto its mounting brackets and fix the previous mounting bolts loosely for now. Follow the same steps on the right side of the crossmember to get rid of the coil spring and isolator. Following the preceding step, flip the lower side back over, remove the left mounting bolts and gently bring down the jack to pull the propeller shaft away from the alignment pin, supporting it with a bungee cord. Once the level is comfortable for working, take the rear suspension module off the jack and lay it upside down. On the crossmember, mark the place for removing the bushing, put the assemblies in place and tighten the pressure screw. To install, place the new bushing over the crossmember bore, line up the reference marks and press the bushing into position to ensure the flange touches the crossmember surface with the installer tool. Make sure the suspension part lines up with the marks, then turn it around and set it on the jack where it needs to be. Slide the crossmember so that the body mount guides go over the bolts, fit the propeller shaft onto the alignment pin and put the spring links into the shock pockets. Mount the left crossmember bolts and leave them loose, then let the jack lower the right side so you can put in the coils. Attach the coil spring and isolator, making sure they rest correctly against the abutment, then increase the jack height and settle the springs into place, installing the vehicle's lower shock mounting bolt without tightening it. Raise the crossmember on the right side and install the right side bolts so they are not loose. Having loosened the bolts on the left side, lower the jack so you can put in the left coil spring and repeat. After completing the mounting alignment, tighten the four crossmember bolts to 163 N.m (120 ft.lbs.) and the shock absorber lower mounting bolts to 102 N.m (75 ft.lbs.). Take the jack out and if your car has all-wheel drive, add the propeller shaft-to-rear driveline module mounting bolts and tighten them to 54 N.m (40 ft.lbs.) torque. Connect the two wheel speed sensor connector cables to the spare tire mounting support and plug the vehicle wiring harness into both sensors. Place the rear Brake Calipers back and add the abutment shims, followed by a careful installation of the caliper guide pin bolts, tighten them to 22 N.m (192 in.lbs.) torque. Attach the brackets for the back brake hoses on the car's sides, connect the parking brake cables, set up the exhaust system again, set up the wheels and tires again and tight the wheel mounting nuts to 135 N.m (100 ft.lbs.). Now, adjust the car so the wheels are near the ground, turn off the automatic parking brake adjuster, rejoin the battery negative link and if there is no AWD, install the spare tire under the vehicle before the alignment.


Related Chrysler Pacifica Parts
 Chrysler Pacifica Wheel Hub
 Chrysler Pacifica Shock Absorber
 Chrysler Pacifica Axle Pivot Bushing
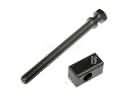 Chrysler Pacifica Belt Tensioner Bolt
 Chrysler Pacifica Coil Spring Insulator
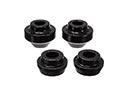 Chrysler Pacifica Radius Arm Bushing
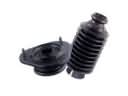 Chrysler Pacifica Shock and Strut Boot
 Chrysler Pacifica Steering Knuckle
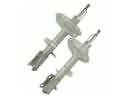 Chrysler Pacifica Strut Housing
 Chrysler Pacifica Strut Mounts
 Chrysler Pacifica Sway Bar Bracket
 Chrysler Pacifica Sway Bars