JeepParts
My Garage
My Account
Cart
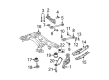
OEM Chrysler Sebring Lateral Link
Lateral Arm- Select Vehicle by Model
- Select Vehicle by VIN
Select Vehicle by Model
orMake
Model
Year
Select Vehicle by VIN
For the most accurate results, select vehicle by your VIN (Vehicle Identification Number).
5 Lateral Links found


Chrysler Sebring Lateral Link, Rear Part Number: 5085419AC
$88.09 MSRP: $131.00You Save: $42.91 (33%)Ships in 1-3 Business Days
Chrysler Sebring Front Lower Control Arm, Rear Part Number: 5135566AB
$116.39 MSRP: $167.00You Save: $50.61 (31%)Ships in 1-2 Business Days

Chrysler Sebring Rear Lower Control Arm Part Number: 4695548
$17.34 MSRP: $21.99You Save: $4.65 (22%)Ships in 1-2 Business DaysChrysler Sebring Front Lower Control Arm Part Number: 4626904
Chrysler Sebring Front Lower Control Arm, Rear Part Number: 5135565AB
Chrysler Sebring Lateral Link
Choose OEM Lateral Link that meet Chrysler factory standards. Chrysler designs and tests every component for precision and durability. Each Lateral Link follows strict manufacturing steps to lock in quality and fit. If your Chrysler Sebring matters to you, OEM parts make the smart choice. You'll get the exact look, feel, and performance you expect. Shop genuine Sebring parts at the highly competitive prices online. Enjoy a manufacturer's warranty, a hassle-free return policy, and rapid delivery. No more guesswork with off brands. Get genuine parts with exact fit and true factory performance. Shop with confidence today at JeepPartsDeal.com.
The Lateral Link in Chrysler Sebring vehicles are significant in offering support to the rear axle and the rear wheels so that the wheel hub can be positioned in the middle. This component is important for controlling and managing oscillation of the lateral movement of a vehicle, and its function in the vehicle's handling and ride comfort. In driving especially when in turns or on uneven ground Chrysler Sebring models employ the Lateral Link. The type or style of use of Lateral Link changes with different years of manufacture of such Sebring vehicles but the overall general purpose is to ensure that the suspension system of the rear part is well aligned and supported. Lateral Link plays an interesting role in Chrysler Sebring's performance and safety and therefore it is essential to determine its efficiency.
Chrysler Sebring Lateral Link Parts and Q&A
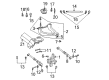
- Q: How to Remove the Lateral Link on Chrysler Sebring?A:You will need to first lift the car and support it before you remove the toe link. After that, unwind and take out the bolt and nut from the toe link secured by the knuckle. Apply red paint, a crayon or other heat-resistant marker at the proper position on the crossmember, so the paint does not damage it. Position the cam bolt head so it doesn't move, remove the relevant bolt nut and washer, loosen the bolt and then take it out. After that, take out the toe link.
- Q: How Does Lateral Link Impact the Servicing of Lower Compression and Arm Assemblies on Chrysler Sebring?A:The first stage in repairing the lower compression and lateral arm assemblies is to remove both the lower arm Ball Joint and knuckle. Bind the end of the special tool to a part around it and unscrew the nut, but do not remove it. When inspecting, apply shock to the ball joint stud, then install the nut and check its torque using the tool; ball joint values are 0.5 - 2.5 Nm (4 - 22 inch lbs.) on compression lower arm ball joints and 1.5 Nm (13 inch lbs.) or less on lateral lower arm ball joints. Should the measured result be above the standard, you should swap out the arm assembly in question. Should the ball joint show a lower value, make sure it moves around easily and does not have much extra play. Check the lower arm ball joint cover next; push on it lightly with your finger to find any cracks; if it is damaged, swap out the whole lower arm assembly so the ball joint is not damaged. Should the dust cover become damaged by mistake when servicing, take it out and put Mopar Multi-mileage Lubricant on the lip and inside of the new cover, plus on the special part on the top of the lateral lower arm dust cover. Be sure to not get grease on the ball and knuckle joints; if it gets there, clean it off. With the special tool, insert the dust cover all the way into the pan and check again for any sign of damage.


Related Chrysler Sebring Parts
 Chrysler Sebring Ball Joint
 Chrysler Sebring Bump Stop
 Chrysler Sebring Coil Spring Insulator
 Chrysler Sebring Coil Springs
 Chrysler Sebring Control Arm Bolt
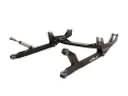 Chrysler Sebring Radius Arm
 Chrysler Sebring Radius Arm Bushing
 Chrysler Sebring Shock Absorber
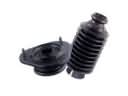 Chrysler Sebring Shock and Strut Boot
 Chrysler Sebring Steering Knuckle
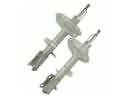 Chrysler Sebring Strut Housing
 Chrysler Sebring Sway Bar Bracket