JeepParts
My Garage
My Account
Cart
OEM Chrysler Sebring Control Arm
Suspension Arm- Select Vehicle by Model
- Select Vehicle by VIN
Select Vehicle by Model
orMake
Model
Year
Select Vehicle by VIN
For the most accurate results, select vehicle by your VIN (Vehicle Identification Number).
34 Control Arms found


Chrysler Sebring Lower Control Arm, Rear Part Number: 5085418AD
$69.49 MSRP: $156.00You Save: $86.51 (56%)Ships in 1-2 Business Days


Chrysler Sebring Upper Control Arm, Rear Passenger Side Part Number: 4895276AC
$190.41 MSRP: $321.00You Save: $130.59 (41%)Ships in 1-2 Business Days


Chrysler Sebring Upper Control Arm, Rear Passenger Side Part Number: 4782978AA
$216.58 MSRP: $307.00You Save: $90.42 (30%)Ships in 1-2 Business Days


Chrysler Sebring Lower Control Arm Part Number: MB864727
$68.24 MSRP: $86.50You Save: $18.26 (22%)Ships in 1-2 Business Days

Chrysler Sebring Upper Control Arm, Rear Lower Driver Side Part Number: 4782979AA
$281.08 MSRP: $286.00You Save: $4.92 (2%)Ships in 1-2 Business Days


Chrysler Sebring Lower Control Arm, Front Passenger Side Part Number: 4764500AG
$707.79Ships in 1-2 Business DaysChrysler Sebring Lower Control Arm, Rear Passenger Side Part Number: MR369665
$24.96 MSRP: $71.60You Save: $46.64 (66%)Ships in 1-2 Business Days
Chrysler Sebring Lower Control Arm, Rear Driver Side Part Number: MR369664
$24.96 MSRP: $71.60You Save: $46.64 (66%)Ships in 1-2 Business Days
Chrysler Sebring Lower Control Arm, Front Passenger Side Part Number: 5085408AK
$605.54 MSRP: $919.00You Save: $313.46 (35%)Ships in 1-2 Business DaysChrysler Sebring Lower Control Arm, Front Driver Side Part Number: 5085407AK
$605.54 MSRP: $919.00You Save: $313.46 (35%)Ships in 1-2 Business Days
Chrysler Sebring Upper Control Arm, Front Driver Side Part Number: 4782975AE
$131.33 MSRP: $174.00You Save: $42.67 (25%)Ships in 1-2 Business DaysChrysler Sebring Upper Control Arm, Rear Driver Side Part Number: 4895277AC
$211.12 MSRP: $315.00You Save: $103.88 (33%)Ships in 1-2 Business Days
Chrysler Sebring Lower Control Arm Part Number: 4616923
$352.34 MSRP: $498.00You Save: $145.66 (30%)Ships in 1-2 Business DaysChrysler Sebring Upper Control Arm, Front Passenger Side Part Number: 4782974AE
$121.10 MSRP: $160.00You Save: $38.90 (25%)Ships in 1-2 Business Days
Chrysler Sebring Control Arm Part Number: MR296290
$93.33 MSRP: $118.31You Save: $24.98 (22%)Ships in 1-2 Business DaysChrysler Sebring Lower Control Arm Part Number: 4616922
$234.57 MSRP: $280.00You Save: $45.43 (17%)Ships in 1-2 Business Days
Chrysler Sebring Front Lower Control Arm Part Number: MR972465
$61.20 MSRP: $93.20You Save: $32.00 (35%)Ships in 1-2 Business DaysChrysler Sebring Control Arm Part Number: MR296289


Chrysler Sebring Lower Control Arm Part Number: MR554376
Chrysler Sebring Lower Control Arm Part Number: MR554375
| Page 1 of 2 |Next >
1-20 of 34 Results
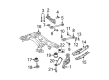
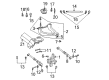
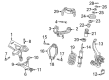
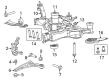
Chrysler Sebring Control Arm
Choose OEM Control Arm that meet Chrysler factory standards. Chrysler designs and tests every component for precision and durability. Each Control Arm follows strict manufacturing steps to lock in quality and fit. If your Chrysler Sebring matters to you, OEM parts make the smart choice. You'll get the exact look, feel, and performance you expect. Shop genuine Sebring parts at the highly competitive prices online. Enjoy a manufacturer's warranty, a hassle-free return policy, and rapid delivery. No more guesswork with off brands. Get genuine parts with exact fit and true factory performance. Shop with confidence today at JeepPartsDeal.com.
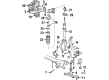
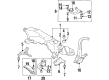
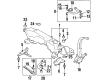
Chrysler Sebring vehicles are fitted with a Control Arm which helps in movement of the suspension system while establishing a link between the frame of the vehicle and the wheels. This component enables wheels to swivel in order to adapt to any irregularities on the road thus providing with proper alignment of the wheels thus improving on the handling of the car. Different types of Control Arms used in Chrysler Sebring models are stamped metal used as the conventional style, cast iron or aluminum to enhance strength and reduce heaviness. Though stamped steel Control Arms have durability, the material allows rusting which makes the Control Arm weak. However, newer designs have been developed to accommodate higher performance levels, and therefore incorporate heavy duty materials such as DOM tubular steel or aluminum. These hi-performance Control Arms are designed for extreme driving and tuning, and bring the optimal of control and balance on the Chrysler Sebring cars.
Chrysler Sebring Control Arm Parts and Q&A
- Q: How to Remove and Replace the Lower Control Arm Isolator Bushings on Chrysler Sebring?A:First, separate the lower control arm from the vehicle to be able to handle the isolator bushings. Mount Tool 6876 on the screw of Remover/Installer Tool C-4212-F, then manually start the bush bushing into the lower control arm, keeping it square with its mounting hole and install from the machined side. At this step which special tools should be assembled and checked for accuracy, particularly making sure Special Tool 6758 touches the lower control arm and Special Tool 6876 is correctly placed on the isolator bushing. Tighten the screw on Remover/Installer Special Tool C-4212-F to push the front bushing into the lower control arm until it becomes even with the machined surface. Open up the lower control arm and position the rear isolator bushing by hand, making sure it's squared with its hole and that the void in the bushing points away from the ball joint. Fit Mount Bushing Installer, Special Tool 6760, onto the screw of Remover/Installer Special Tool C-4212-F and line up Special Tool 6766 with the lower control arm and Special Tool 6760 with the isolator bushing. Use Remover/Installer Special Tool C-4212-F to drive the rear bushing into the lower control arm, pressing until it is even with the machined ground. Before any hammering, put the clevis bushing in place by hand so that it's square and installed with the machined side facing out. Attach Mount Bushing Installer Special Tool 6877 to the screw side of Remover/Installer Special Tool C-4212-F and place Special Tool 6876 with its flat face on the lower control arm. Tighten Remover/Installer Special Tool C-4212-F to force the clevis bushing into the lower control arm so that it is even with the top of the machined surface. Put the lower control arm assembly back onto the bottom of the vehicle as the final step.
- Q: How to Install the Control Arm on Chrysler Sebring?A:The lower control arm is fitted by aligning the rear with the front suspension crossmember, setting the front and fastening it together, leaving the front bolt loose. Tighten the attaching nut and bolt on the rear to a torque of 95 Nm (70 ft. lbs.). Then, put the lower control arm ball joint stud into the Steering Knuckle and attach it with the castle nut. Introduce the Tie Rod End inside the steering knuckle, begin twisting on the attaching nut onto the stud, lock the stud with one hand and then tighten it to 61 Nm (45 ft. lbs.) with a crowfoot and 11/32 socket. Secure the ball joint stud castle nut by turning it to 74 Nm (55 ft. lbs.) and place the cotter pin next to it. Put the bushing clamp through its two mounting holes so it lines up with the Sway Bar Link and tighten the bolts to 61 Nm (45 ft. lbs.). Fit the stabilizer bar link onto the lower control arm and torque it with a value of 102 Nm (75 ft. lbs.) while keeping the stud held with an Allen wrench. Fit the clevis loosely on the thru-bolt and check that you are not putting the jack stand where the ball joint cap would be. When the weight is supported by the jack stand and lower control arm, reduce the vehicle, then tighten the clevis to lower control arm bushing thru-bolt nut bolt to 65 ft. lbs. Secure the front lower control arm nut and bolt with 182 Nm (135 ft. lbs.) and the wheel mounting stud nuts with half the recommended torque for now, after that tighten all bolts and nuts to the full torque of 135 Nm (100 ft. lbs.). Then, take out the jack stand and test the car's alignment, making sure the front toe is to your preferred, proper amount.


Related Chrysler Sebring Parts
 Chrysler Sebring Ball Joint
 Chrysler Sebring Wheel Bearing
 Chrysler Sebring Axle Beam Mount
 Chrysler Sebring Bump Stop
 Chrysler Sebring Coil Springs
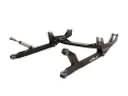 Chrysler Sebring Radius Arm
 Chrysler Sebring Radius Arm Bushing
 Chrysler Sebring Strut Bearing
 Chrysler Sebring Strut Housing
 Chrysler Sebring Strut Mounts
 Chrysler Sebring Sway Bar Bushing
 Chrysler Sebring Sway Bar Link Bushing
Browse Chrysler Sebring Control Arm by Years
2010
2009
2008
2007
2006
2005
2004
2003
2002
2001
2000
1999
1998
1997
1996
1995