JeepParts
My Garage
My Account
Cart
OEM Chrysler Town & Country Brake Booster
Brake Power Booster- Select Vehicle by Model
- Select Vehicle by VIN
Select Vehicle by Model
orMake
Model
Year
Select Vehicle by VIN
For the most accurate results, select vehicle by your VIN (Vehicle Identification Number).
8 Brake Boosters found


Chrysler Town & Country Brake Booster Part Number: 68064801AE
$259.68 MSRP: $392.00You Save: $132.32 (34%)Ships in 1-2 Business DaysChrysler Town & Country Brake Booster Part Number: 4721802AC
$289.51 MSRP: $442.00You Save: $152.49 (35%)Ships in 1-2 Business DaysChrysler Town & Country Brake Booster Part Number: 4581494AH
$403.32 MSRP: $569.00You Save: $165.68 (30%)
Chrysler Town & Country Brake Booster Part Number: 4797614


Chrysler Town & Country Brake Booster Part Number: 4721721AA
Chrysler Town & Country Brake Booster Part Number: 4721613AA

Chrysler Town & Country Brake Booster Part Number: 4721338AA
Chrysler Town & Country Booster Part Number: 4581658AF
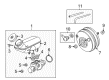
Chrysler Town & Country Brake Booster
Choose OEM Brake Booster that meet Chrysler factory standards. Chrysler designs and tests every component for precision and durability. Each Brake Booster follows strict manufacturing steps to lock in quality and fit. If your Chrysler Town & Country matters to you, OEM parts make the smart choice. You'll get the exact look, feel, and performance you expect. Shop genuine Town & Country parts at the highly competitive prices online. Enjoy a manufacturer's warranty, a hassle-free return policy, and rapid delivery. No more guesswork with off brands. Get genuine parts with exact fit and true factory performance. Shop with confidence today at JeepPartsDeal.com.
In Chrysler Town & Country vehicles the Brake Booster is very important in increasing braking potency and lessening with the amount of effort a driver has to apply when using the brakes. This component functions predominantly on vacuum operated through a mechanism which increases the pressure exerted on the brake pedal and relays it on to the master cylinder thus ease on the braking system. Some of the Chrysler Town & Country models key brake components have been the vacuum-operated and hydraulic brake boosters. As have been observed vacuum boosters are generally used but they may sometimes fail while hydraulic boosters use fluid pressure to assist. Design of these boosters can be also different, the boosters can be one or two diaphragm boosters and with different diameters due to the performance.
Chrysler Town & Country Brake Booster Parts and Q&A
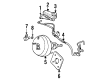
- Q: How to Remove a Brake Booster on Chrysler Town & Country?A:To start removing the vacuum brake booster, fully pump down the reserve vacuum by repeatedly pressing down the brake pedal 4-5 times when the engine is not running until the pedal becomes firm. Remove both cable connectors from your battery and pull out the battery and its support clamp and nut. Unscrew the engine filler tube from the battery tray and then disconnect the hose leading to the vacuum tank in cars with speed control. After that, remove two nuts and one bolt holding the battery tray to take the tray out. If your car has a speed control servo, disconnect it, unscrew the two nuts holding the servo onto the mount and put the servo away. Take the wiper module out and remove the wiring from the brake fluid level switch in the reservoir of the master cylinder. Use Mopar(R) Brake Parts Cleaner to clean the mounting area of the master cylinder onto the power brake booster. Remove the primary and secondary brake tubes from the ABS integrated control unit or non-ABS junction block and put sealing plugs in the open ports of these brake tubes. Pull the two nuts off that hold the master cylinder to the power brake booster and pull the master cylinder straight out, remembering to put on a new vacuum seal. Take the hose off the check valve, but keep the check valve where it is. Within the vehicle, remove the panel under the instrument panel, reach the booster input rod to brake pedal connection and use a small screwdriver to take off the clip attached to the brake pedal pin, throwing it out and placing a new clip during reassembly. First, pull the booster input rod off the pedal pin, undo the four nuts attaching the booster to the dash panel and slide the booster out in front of the engine. You should never try to open the power brake vacuum booster, as it can only be serviced as one whole device.
- Q: How to Properly Install a Brake Booster on Chrysler Town & Country?A:Installing the power brake booster should be preceded by fitting a new seal around the studs on the booster. Fit the booster into the engine compartment, then guide the push rod and mounting studs through the dash panel so that the vacuum check valve is at the 10 O'clock position on the booster face. Put in four brake booster mounting nuts and turn them to 28 Nm (21 ft. lbs.) torque. Push the booster push rod onto the brake pedal's pin and use a new retaining clip to attach the push rod to the brake pedal. You must fit a new stop lamp switch whenever the old one has been taken out or moved, never try to fix it yourself. When pedals are adjustable, adjust and put in a fresh stop lamp switch in their assembly. If the pedals are not adjustable and you are using the foot brake, change out the switch in the working end of the pedals assembly. Link the hose from the vacuum pump to the check valve on the edge of the booster. During installation of the master cylinder, a fresh vacuum seal needs to be added to it. Installing the master cylinder comes before putting in the battery. Pour clean Mopar(R) Brake Fluid or an equal kind into the master cylinder and then bleed the brakes. Take a drive to check that the vehicle's brakes are working as expected.


Related Chrysler Town & Country Parts
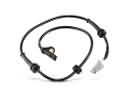 Chrysler Town & Country ABS Sensor
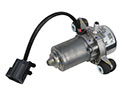 Chrysler Town & Country Brake Booster Vacuum Pump
 Chrysler Town & Country Brake Caliper
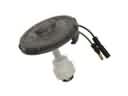 Chrysler Town & Country Brake Fluid Level Sensor
 Chrysler Town & Country Brake Line
 Chrysler Town & Country Brake Master Cylinder
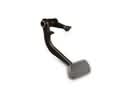 Chrysler Town & Country Brake Pedal
 Chrysler Town & Country Brake Proportioning Valve
 Chrysler Town & Country Speed Sensor
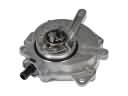 Chrysler Town & Country Vacuum Pump
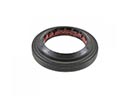 Chrysler Town & Country Wheel Seal
 Chrysler Town & Country Yaw Sensor