JeepParts
My Garage
My Account
Cart
OEM Chrysler Town & Country Piston
Engine Pistons- Select Vehicle by Model
- Select Vehicle by VIN
Select Vehicle by Model
orMake
Model
Year
Select Vehicle by VIN
For the most accurate results, select vehicle by your VIN (Vehicle Identification Number).
8 Pistons found


Chrysler Town & Country Piston Part Number: 4666129AA
$227.63 MSRP: $347.00You Save: $119.37 (35%)Ships in 1-2 Business Days
Chrysler Town & Country Pistons Part Number: MD119671
$28.61 MSRP: $36.27You Save: $7.66 (22%)Ships in 1-2 Business Days
Chrysler Town & Country Pistons Part Number: MD152563

Chrysler Town & Country Piston Part Number: 5241059

Chrysler Town & Country Piston Assembly Part Number: 4797692

Chrysler Town & Country Piston Assembly Part Number: 4798744

Chrysler Town & Country Piston Part Number: R4593589AB


Chrysler Town & Country Piston Part Number: 4666130AB
Chrysler Town & Country Piston
Choose OEM Piston that meet Chrysler factory standards. Chrysler designs and tests every component for precision and durability. Each Piston follows strict manufacturing steps to lock in quality and fit. If your Chrysler Town & Country matters to you, OEM parts make the smart choice. You'll get the exact look, feel, and performance you expect. Shop genuine Town & Country parts at the highly competitive prices online. Enjoy a manufacturer's warranty, a hassle-free return policy, and rapid delivery. No more guesswork with off brands. Get genuine parts with exact fit and true factory performance. Shop with confidence today at JeepPartsDeal.com.
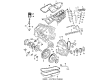
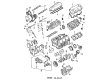
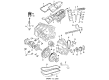
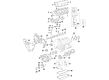
The Piston in Chrysler Town & Country vehicles have the crucial function of converting the power generated through combustion into the required energy for mobility of the vehicle. This component is mainly used by internal combustion engine to change the force exerted by expanding gases into crankshaft movement and rotation. Chrysler Town & Country has used different types of pistons, for instance, trunk pistons for Petrol as well as Diesel car which provides lateral support and it has oil ring for its lubrication. Further, racing pistons may also be used for more power, lightweight but strong so as to endure the high performance RPMs. These pistons are specifically designed and frequently use the aluminum alloy making sure that they withstand the demand that Chrysler Town & Country vehicles impose.
Chrysler Town & Country Piston Parts and Q&A
- Q: How to Remove and Replace a Piston and Its Connecting Rod on Chrysler Town & Country?A:Before taking out the piston and connecting rod, you'll need to remove the cylinder heads and the Oil Pan. It is important to use a trustworthy ridge reamer, take out the ridge of the cylinder and remove the pistons while keeping the piston tops covered. You need to remove the pistons and connecting rods from the top of the block, so turn the Crankshaft so each connecting rod is centered in its bore. Look at the connecting rods and connecting rod caps to figure out which cylinder they belong to and paint or engrave the information if you can't find it. Take off the cap over the connecting rod, then protect the rod and push each piston-rod unit from inside the cylinder, without touching the crankshaft journals. After you remove it, set the bearing cap on the rod it matches.
- Q: How to Install and Replace a Piston and Connecting Rod on Chrysler Town & Country?A:Start by putting in the piston rings and as you install the piston and connecting rod, examine the bolts that hold the connecting rod bearing cap; if there is necking, replace those bolts. Hold a scale up against the threads of the connecting rod bolts; if some of the threads are too high, you should replace the bolts. Be sure to stagger the gaps in the compression rings so that the oil ring rail isn't lined up with either gap. Put the piston and rings into engine oil, slide the ring compressor on, use the special wrench to tighten and keep the ring position from changing. After putting the rod bolts in protective covers, spin the Crankshaft to center the connecting rod journal inside the cylinder bore. Add the rod-and-piston unit to the cylinder bore, as before, with the rod going over the crankshaft journal and double-check that you aren't interchanging piston assemblies between cylinders or banks. It's important that the arrow on the top of the piston goes to the front of the engine and the oil squirt hole should be facing the main thrust (right) side of the cylinder bore. Put the hammer handle down on the piston in the cylinder as you slowly guide the connecting rod into place on the connecting rod journal. Install the caps over the rods, put in the cleaned and inspected connecting rod bolts and tighten them to 27 Nm (20 ft. lbs.) plus 1/4 turn. After that, set in place the cylinder head(s) and the Oil Pan.


Related Chrysler Town & Country Parts
 Chrysler Town & Country Camshaft
 Chrysler Town & Country Crankshaft Pulley
 Chrysler Town & Country Crankshaft Seal
 Chrysler Town & Country Crankshaft Thrust Washer
 Chrysler Town & Country Harmonic Balancer
 Chrysler Town & Country Pushrod
 Chrysler Town & Country Rocker Arm Pivot
 Chrysler Town & Country Rod Bearing
 Chrysler Town & Country Timing Belt Tensioner
 Chrysler Town & Country Timing Cover
 Chrysler Town & Country Timing Cover Gasket
 Chrysler Town & Country Valve Stem Seal